Samsung CLX-9251NA User Manual Ver.1.03 (English) - Page 145
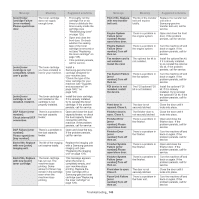
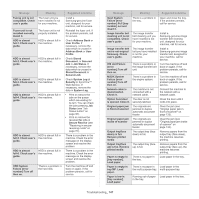
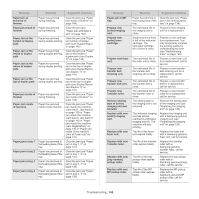
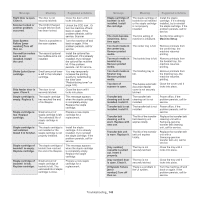
Understanding display messages, Message, Meaning, Suggested solutions
 |
View all Samsung CLX-9251NA manuals
Add to My Manuals
Save this manual to your list of manuals |
Page 145 highlights
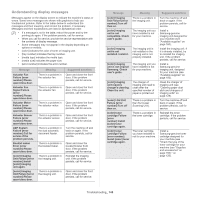
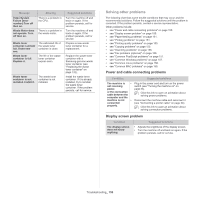
Understanding display messages Messages appear on the display screen to indicate the machine's status or errors. Some error messages are shown with graphics to help you troubleshoot problem. Refer to the tables below to understand the messages and their meaning, and correct the problem, if necessary. Messages and their explanations are listed in alphabetical order. • If a message is not in the table, reboot the power and try the printing job again. If the problem persists, call for service. • When you call for service, provide the service representative with the contents of display message. • Some messages may not appear in the display depending on options or models. • [color] indicates the color of toner or imaging unit. • [tray number] indicates the tray number. • [media type] indicates the media type. • [media size] indicates the paper size. • [error number] indicates the error number. Message Actuator Fan Failure [error number]:Please open/close door. Actuator Fan Signal Failure [error number]:Please open/close door. Actuator Motor Failure [error number]:Please open/close door. Actuator Sensor Failure [error number]:Please open/close door. ADF System Failure [error number]:Call for service if the problem persists. Booklet maker Error [error number]:Please open/close door. [color] Imaging Unit Failure [error number]:Install [color] imaging unit again. [color] Imaging Unit Failure [error number]:Please open/close door. Meaning There is a problem in the actuator fan. There is a problem in the actuator fan. There is a problem in the actuator motor. There is a problem in the actuator sensor. There is a problem in the dual automatic document feeder. There is a problem in the booklet maker. There is a problem in the imaging unit. There is a problem in the imaging unit. Suggested solutions Open and close the front door. If the problem persists, call for service. Open and close the front door. If the problem persists, call for service. Open and close the front door. If the problem persists, call for service. Open and close the front door. If the problem persists, call for service. Turn the machine off and back on again. If the problem persists, call for service. Open and close the booklet finisher front door. If the problem persists, call for service. Reinstall the imaging unit. If the problem persists, call for service. Open and close the front door. If the problem persists, call for service. Message [color] Imaging Unit Failure [error number]:Turn off then on. [color] imaging unit is not compatible. Check user's guide. Meaning There is a problem in the imaging unit. The imaging unit you have installed is not for your machine. [color] imaging unit is not installed. Install it. The imaging unit is not installed or the imaging unit is not properly installed. [color] imaging unit is not original Samsung. Check user's guide. The imaging unit you have installed is not for your machine. [color] imaging unit requires charger's cleaning. Clean the unit. The charger of imaging unit need to clean after the specified number of paper is printed out. [color] LSU Unit Failure [error number]:Turn off then on. [color] toner cartridge Failure [error number]:Install [color] toner cartridge again. [color] toner cartridge Failure [error number]: Install [color] toner cartridge again. There is a problem in the LSU (Laser Scanning Unit). There is a problem in the toner cartridge. The toner cartridge you have installed is not for your machine. Suggested solutions Turn the machine off and back on again. If the problem persists, call for service. Install a Samsung-genuine imaging unit designed for your machine (see "Available supplies" on page 160). Install the imaging unit. If it is already installed, try to reinstall the imaging unit. If the problem persists, call for service. Install a Samsung-genuine imaging unit, designed for your machine (see "Available supplies" on page 160). Clean the charger of imaging unit (see "Cleaning paper dust stick and chargers of imaging units" on page 128). Turn the machine off and back on again. If the problem persists, call for service. Reinstall the toner cartridge. If the problem persists, call for service. Install a Samsung-genuine toner cartridge designed for your machine (see "Check the type of the toner cartridge for your machine (see "Supplies and accessories" on page 160)." on page 126). Troubleshooting_ 145
-
 1
1 -
2
-
3
-
4
-
5
-
6
-
7
-
8
-
9
-
10
-
11
-
12
-
13
-
14
-
15
-
16
-
17
-
18
-
19
-
20
-
21
-
22
-
23
-
24
-
25
-
26
-
27
-
28
-
29
-
30
-
31
-
32
-
33
-
34
-
35
-
36
-
37
-
38
-
39
-
40
-
41
-
42
-
43
-
44
-
45
-
46
-
47
-
48
-
49
-
50
-
51
-
52
-
53
-
54
-
55
-
56
-
57
-
58
-
59
-
60
-
61
-
62
-
63
-
64
-
65
-
66
-
67
-
68
-
69
-
70
-
71
-
72
-
73
-
74
-
75
-
76
-
77
-
78
-
79
-
80
-
81
-
82
-
83
-
84
-
85
-
86
-
87
-
88
-
89
-
90
-
91
-
92
-
93
-
94
-
95
-
96
-
97
-
98
-
99
-
100
-
101
-
102
-
103
-
104
-
105
-
106
-
107
-
108
-
109
-
110
-
111
-
112
-
113
-
114
-
115
-
116
-
117
-
118
-
119
-
120
-
121
-
122
-
123
-
124
-
125
-
126
-
127
-
128
-
129
-
130
-
131
-
132
-
133
-
134
-
135
-
136
-
137
-
138
-
139
-
 140
140 -
 141
141 -
 142
142 -
 143
143 -
 144
144 -
 145
145 -
 146
146 -
 147
147 -
 148
148 -
 149
149 -
 150
150 -
151
-
152
-
153
-
154
-
155
-
156
-
157
-
158
-
159
-
160
-
161
-
162
-
163
-
164
-
165
-
166
-
167
-
168
-
169
-
170
-
171
-
172
-
173
-
174
-
175
-
176
-
177
-
178
 |
 |