Samsung CLX-9251NA User Manual Ver.1.03 (English) - Page 153
Printing quality problems, Light or faded print, Toner specks, Dropouts, Printing Preferences, Paper - drum
 |
View all Samsung CLX-9251NA manuals
Add to My Manuals
Save this manual to your list of manuals |
Page 153 highlights
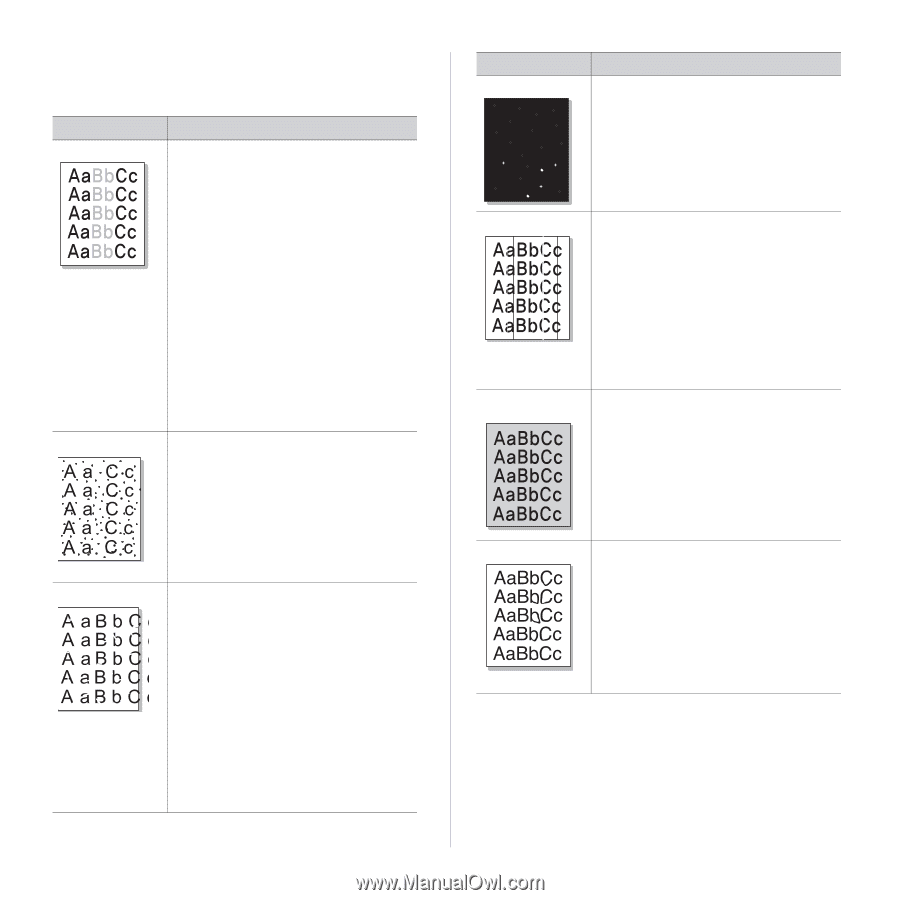
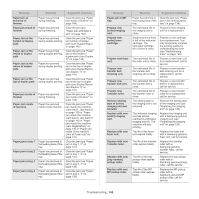
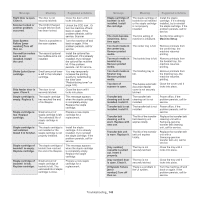
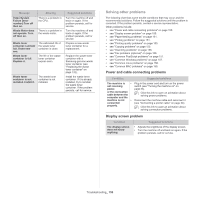
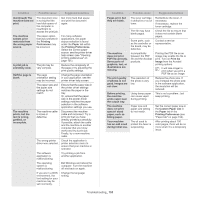
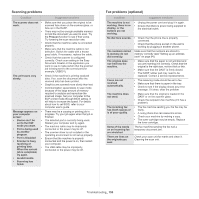
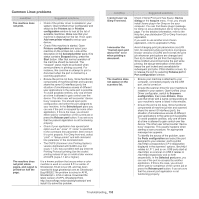
Printing quality problems If the inside of the machine is dirty or paper has been loaded improperly, there might be a reduction in print quality. see the table below to clear the problem. Condition Suggested Solutions Light or faded print • • • • • • If a vertical white streak or faded area appears on the page, the toner supply is low. You may be able to temporarily extend the toner cartridge life. If this does not improve the print quality, install a new toner cartridge. The color tone might not be adjusted. Adjust the color tone. The paper may not meet paper specifications; for example, the paper may be too moist or rough (see "Print media specifications" on page 165). If the entire page is light, the print resolution setting is too low or the toner save mode is on. Adjust the print resolution and turn the toner save mode off. see the help screen of the printer driver. A combination of faded or smeared defects may indicate that the toner cartridge needs cleaning. Contact a service representative. The surface of the LSU part inside the machine may be dirty. Clean the LSU, contact a service representative. Toner specks • The paper may not meet specifications; for example, the paper may be too moist or rough (see "Print media specifications" on page 165). • The transfer roller may be dirty. Clean the inside of your machine. Contact a service representative. • The paper path may need cleaning. Contact a service representative. • Check the location of the machine. If the area is not well-ventilated, this problem may occur. Dropouts If faded areas, generally rounded, occur randomly on the page: • A single sheet of paper may be defective. Try reprinting the job. • The moisture content of the paper is uneven or the paper has moist spots on its surface. Try a different brand of paper (see "Print media specifications" on page 165). • The paper lot is bad. The manufacturing processes can cause some areas to reject toner. Try a different kind or brand of paper. • Change the printer option and try again. Go to Printing Preferences, click Paper tab, and set type to thick paper (see "Opening printing preferences" on page 101). • If these steps do not correct the problem, contact a service representative. Condition White Spots Vertical lines Color or Black background Toner smear Suggested Solutions If white spots appear on the page: • The paper is too rough and a lot of dirt from a paper falls to the inner devices within the machine, so the transfer roller may be dirty. Clean the inside of your machine. Cleaning the inside or contact a service representative. • The paper path may need cleaning. Cleaning the inside or contact a service representative. If black vertical streaks appear on the page: • The drum inside the printer has probably been scratched. Remove the imaging unit and install a new one. Contact a service representative. If white vertical streaks appear on the page: • The surface of the LSU part inside the machine may be dirty. Cleaning the inside or contact a service representative. If vertical streaks appear on the page: • The surface of the scanner glass and its white sheet may be dirty. Cleaning the inside or contact a service representative. If the amount of background shading becomes unacceptable: • Change the image transfer belt if it has reached its lifespan. Contact a service representative. • Check the environmental conditions: very dry conditions (low humidity) or a high level of humidity (higher than 80% RH) can increase the amount of background shading. • Remove the old toner cartridge and install a new one. If toner smears on the page: • Clean the inside of the machine. Cleaning the inside or contact a service representative. • Check the paper type and quality (see "Print media specifications" on page 165). • Remove the imaging unit and install a new one. Contact a service representative. • Change the image transfer belt if it has reached its lifespan. Contact a service representative. Troubleshooting_ 153
-
 1
1 -
2
-
3
-
4
-
5
-
6
-
7
-
8
-
9
-
10
-
11
-
12
-
13
-
14
-
15
-
16
-
17
-
18
-
19
-
20
-
21
-
22
-
23
-
24
-
25
-
26
-
27
-
28
-
29
-
30
-
31
-
32
-
33
-
34
-
35
-
36
-
37
-
38
-
39
-
40
-
41
-
42
-
43
-
44
-
45
-
46
-
47
-
48
-
49
-
50
-
51
-
52
-
53
-
54
-
55
-
56
-
57
-
58
-
59
-
60
-
61
-
62
-
63
-
64
-
65
-
66
-
67
-
68
-
69
-
70
-
71
-
72
-
73
-
74
-
75
-
76
-
77
-
78
-
79
-
80
-
81
-
82
-
83
-
84
-
85
-
86
-
87
-
88
-
89
-
90
-
91
-
92
-
93
-
94
-
95
-
96
-
97
-
98
-
99
-
100
-
101
-
102
-
103
-
104
-
105
-
106
-
107
-
108
-
109
-
110
-
111
-
112
-
113
-
114
-
115
-
116
-
117
-
118
-
119
-
120
-
121
-
122
-
123
-
124
-
125
-
126
-
127
-
128
-
129
-
130
-
131
-
132
-
133
-
134
-
135
-
136
-
137
-
138
-
139
-
140
-
141
-
142
-
143
-
144
-
145
-
146
-
147
-
 148
148 -
 149
149 -
 150
150 -
 151
151 -
 152
152 -
 153
153 -
 154
154 -
 155
155 -
 156
156 -
 157
157 -
 158
158 -
159
-
160
-
161
-
162
-
163
-
164
-
165
-
166
-
167
-
168
-
169
-
170
-
171
-
172
-
173
-
174
-
175
-
176
-
177
-
178
 |
 |