Samsung CLX-9251NA User Manual Ver.1.03 (English) - Page 67
Understanding the fax screen, Basic tab, Advanced tab, Image tab
 |
View all Samsung CLX-9251NA manuals
Add to My Manuals
Save this manual to your list of manuals |
Page 67 highlights
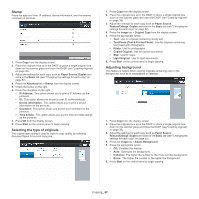
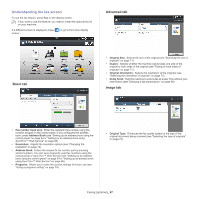
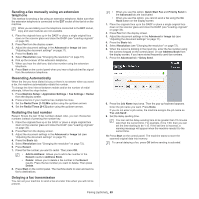
Understanding the fax screen To use the fax feature, press Fax on the display screen. If you want to use this feature, you need to install the optional fax kit on your machine. If a different screen is displayed, press ( ) to go to the home display screen. Advanced tab Basic tab • Original Size: Selects the size of the original (see "Selecting the size of originals" on page 71). • Duplex: Selects whether the machine sends faxes one side of the original or both sides of the original (see "Faxing on both sides of originals" on page 71). • Original Orientation: Selects the orientation of the originals (see "Selecting the orientation of originals" on page 72). • Delay Send: Sets the machine to send a fax at a later time without your intervention (see "Delaying a fax transmission" on page 69). Image tab • Fax number input area: Enter the recipient's fax number using the numeric keypad on the control panel. If you configured the address book, press Address Book (see "Setting up an address book using the control panel" on page 94 or "Setting up an address book using SyncThru™ Web Service" on page 96). • Resolution: Adjusts the resolution options (see "Changing the resolution" on page 72). • Address Book: Enters the recipient's fax number just by pressing stored numbers. You can save frequently used fax numbers using the control panel or SyncThru™ Web Service (see "Setting up an address book using the control panel" on page 94 or "Setting up an address book using SyncThru™ Web Service" on page 96). • Programs: Allows you to save the current settings for future use (see "Using a programs setting" on page 74). • Original Type: Enhances the fax quality based on the type of the original document being scanned (see "Selecting the type of originals" on page 73). Faxing (optional)_ 67
-
 1
1 -
2
-
3
-
4
-
5
-
6
-
7
-
8
-
9
-
10
-
11
-
12
-
13
-
14
-
15
-
16
-
17
-
18
-
19
-
20
-
21
-
22
-
23
-
24
-
25
-
26
-
27
-
28
-
29
-
30
-
31
-
32
-
33
-
34
-
35
-
36
-
37
-
38
-
39
-
40
-
41
-
42
-
43
-
44
-
45
-
46
-
47
-
48
-
49
-
50
-
51
-
52
-
53
-
54
-
55
-
56
-
57
-
58
-
59
-
60
-
61
-
 62
62 -
 63
63 -
 64
64 -
 65
65 -
 66
66 -
 67
67 -
 68
68 -
 69
69 -
 70
70 -
 71
71 -
 72
72 -
73
-
74
-
75
-
76
-
77
-
78
-
79
-
80
-
81
-
82
-
83
-
84
-
85
-
86
-
87
-
88
-
89
-
90
-
91
-
92
-
93
-
94
-
95
-
96
-
97
-
98
-
99
-
100
-
101
-
102
-
103
-
104
-
105
-
106
-
107
-
108
-
109
-
110
-
111
-
112
-
113
-
114
-
115
-
116
-
117
-
118
-
119
-
120
-
121
-
122
-
123
-
124
-
125
-
126
-
127
-
128
-
129
-
130
-
131
-
132
-
133
-
134
-
135
-
136
-
137
-
138
-
139
-
140
-
141
-
142
-
143
-
144
-
145
-
146
-
147
-
148
-
149
-
150
-
151
-
152
-
153
-
154
-
155
-
156
-
157
-
158
-
159
-
160
-
161
-
162
-
163
-
164
-
165
-
166
-
167
-
168
-
169
-
170
-
171
-
172
-
173
-
174
-
175
-
176
-
177
-
178
 |
 |
