Samsung CLX-9251NA User Manual Ver.1.03 (English) - Page 118
Managing USB memory, Formatting a USB memory device, Deleting an image file
 |
View all Samsung CLX-9251NA manuals
Add to My Manuals
Save this manual to your list of manuals |
Page 118 highlights
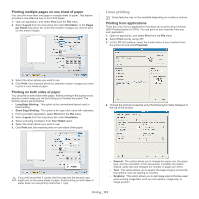
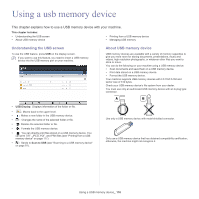
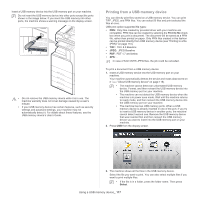
• If the PDF file you selected is secured with a password, you have to know the password for printing. Enter the password when the machine requires the secure password. If you do not know the password, the print job will be cancelled. 4. Press Print. 5. Press the appropriate option. • Copies: Selects the number of copies. • Color Mode: Selects the color mode of copies. • Duplex: Selects the machine to print copies on both sides of the paper. • Auto fit: Allows you to scale your print job to the selected paper size in the tray regardless of the document size. Select a tray, and press On. • Paper Source: Selects a tray that contains the paper to be printed. • Output: Sets the machine's various output options such as copy output option (see "Deciding the form of copy output" on page 53). 6. Press Start button to print the file. 7. Press to go back to the previous screen. 8. After printing is completed, you can remove the USB memory device from the machine. Press USB. Managing USB memory You can delete image files stored on a USB memory device one-by-one or all at once by reformatting the device. After deleting files or reformatting a USB memory device, files cannot be restored. Confirm that you no longer need the data before deleting it. Formatting a USB memory device 1. Insert a USB memory device into the USB memory port on your machine. 2. Press USB from the display screen. 3. Press Format. 4. Press OK when the confirmation window appears. Deleting an image file 1. Insert a USB memory device into the USB memory port on your machine. 2. Press USB from the display screen. 3. The machine shows all files in the USB memory device. Press the file you want to delete. If the file is in a folder, press the folder name. Then press Select. 4. Press Delete. 5. Press OK when the confirmation window appears. Using a USB memory device_ 118
-
 1
1 -
2
-
3
-
4
-
5
-
6
-
7
-
8
-
9
-
10
-
11
-
12
-
13
-
14
-
15
-
16
-
17
-
18
-
19
-
20
-
21
-
22
-
23
-
24
-
25
-
26
-
27
-
28
-
29
-
30
-
31
-
32
-
33
-
34
-
35
-
36
-
37
-
38
-
39
-
40
-
41
-
42
-
43
-
44
-
45
-
46
-
47
-
48
-
49
-
50
-
51
-
52
-
53
-
54
-
55
-
56
-
57
-
58
-
59
-
60
-
61
-
62
-
63
-
64
-
65
-
66
-
67
-
68
-
69
-
70
-
71
-
72
-
73
-
74
-
75
-
76
-
77
-
78
-
79
-
80
-
81
-
82
-
83
-
84
-
85
-
86
-
87
-
88
-
89
-
90
-
91
-
92
-
93
-
94
-
95
-
96
-
97
-
98
-
99
-
100
-
101
-
102
-
103
-
104
-
105
-
106
-
107
-
108
-
109
-
110
-
111
-
112
-
 113
113 -
 114
114 -
 115
115 -
 116
116 -
 117
117 -
 118
118 -
 119
119 -
 120
120 -
 121
121 -
 122
122 -
 123
123 -
124
-
125
-
126
-
127
-
128
-
129
-
130
-
131
-
132
-
133
-
134
-
135
-
136
-
137
-
138
-
139
-
140
-
141
-
142
-
143
-
144
-
145
-
146
-
147
-
148
-
149
-
150
-
151
-
152
-
153
-
154
-
155
-
156
-
157
-
158
-
159
-
160
-
161
-
162
-
163
-
164
-
165
-
166
-
167
-
168
-
169
-
170
-
171
-
172
-
173
-
174
-
175
-
176
-
177
-
178
 |
 |
