Samsung CLX-9251NA User Manual Ver.1.03 (English) - Page 148
Paper Jam inside
 |
View all Samsung CLX-9251NA manuals
Add to My Manuals
Save this manual to your list of manuals |
Page 148 highlights
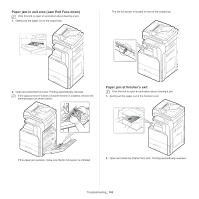
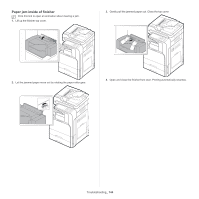
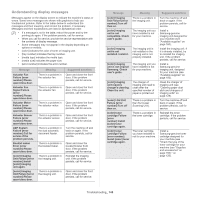
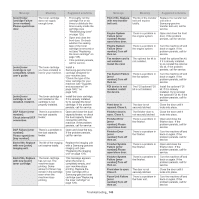
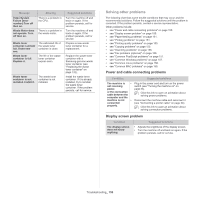
Message Paper jam at entrance of finisher Paper jam at exit of finisher Paper Jam at the bottom of duplex path Paper Jam at the inside of duplex path Paper Jam at the return of duplex path Paper Jam at the top of duplex path Paper jam inside of finisher Paper Jam inside of machine Paper jam in tray 1 Paper jam in tray 2 Paper jam in tray 3 Paper jam in tray 4 Meaning Paper has jammed during finishing. Paper has jammed during finishing. Paper has jammed during duplex printing. Paper has jammed during duplex printing. Paper has jammed during duplex printing. Paper has jammed during duplex printing. Paper has jammed during finishing. Paper has jammed inside of the machine. Paper has jammed in the feeding area of the tray. Paper has jammed in the feeding area of the tray. Paper has jammed in the feeding area of the tray. Paper has jammed in the feeding area of the tray. Suggested solutions Clear the jam (see "Paper jam inside of finisher" on page 144). Clear the jam (see "Paper jam at finisher's exit" on page 143). Clear the jam (see "Paper jam bottom of duplex path (Jam Duplex Regi.)" on page 142). Clear the jam (see "Paper jam at the inside of duplex path (Jam Duplex 2)" on page 142). Clear the jam (see "Paper jam at the top of duplex path (Jam Duplex Return, Jam Duplex 1)" on page 141). Clear the jam (see "Paper jam at the top of duplex path (Jam Duplex Return, Jam Duplex 1)" on page 141). Clear the jam (see "Paper jam inside of finisher" on page 144). Clear the jam (see "Paper jam inside the machine (Jam feed 1, Jam feed 2)" on page 139 or "Paper jam inside the machine (Jam feed 3, Jam feed 4)" on page 140 or "Paper jam inside the machine (Jam Registration)" on page 140 or "Paper jam inside of the machine (Jam at Fuser out)" on page 141). Clear the jam (see "Paper jam in tray 1, 2" on page 137). Clear the jam (see "Paper jam in tray 1, 2" on page 137). Clear the jam (see "Paper jam in tray 3, 4" on page 138). Clear the jam (see "Paper jam in tray 3, 4" on page 138). Message Paper jam in MP tray Prepare new [color] imaging unit. Prepare new [color] toner cartridge. Prepare new fuser unit. Prepare new transfer belt cleaning unit. Prepare new transfer belt unit. Prepare new Transfer roller. Remove sealing tape of [color] imaging unit and reinstall. Replace with new [color] imaging unit. Replace with new fuser unit. Replace with new Transfer roller. Replace with new [tray number] pickup roller. Replace with new MP pickup roller. Meaning Paper has jammed in the feeding area of the tray. The estimated life of the imaging unit is close. Small amount of toner is left in the indicated cartridge. The estimated cartridge life of toner is close. The estimated life of the fuser unit is close. The estimated life of the transfer belt cleaning unit is close. The estimated life of the transfer belt is close. The estimated life of the transfer roller is close. The sealing tape of the imaging unit is not removed. The indicated imaging unit has almost reached its estimated imaging unit life. The machine will stop printing. The life of the fuser unit expires totally. The life of the transfer roller expires totally. The life of the tray pickup roller expires totally. The life of the MP pickup roller expires totally. Suggested solutions Clear the jam (see "Paper jam in the multi-purpose tray" on page 139). Prepare a new imaging unit for a replacement. Prepare a new cartridge for a replacement. You may temporarily increase the printing quality by redistributing the toner (see "Redistributing toner" on page 125). Prepare a new fuser unit for a replacement, call for service. Prepare a new transfer belt cleaning unit for a replacement, call for service. Prepare a new transfer belt for a replacement, call for service. Prepare a new transfer roller for a replacement, call for service. Remove the sealing tape of the imaging unit (see "Replacing the imaging unit" on page 129). Replace the imaging unit with a Samsung-genuine imaging unit (see "Replacing the imaging unit" on page 129). Replace the fuser unit with a Samsung-genuine fuser unit, call for service. Replace the transfer roller with a Samsung-genuine transfer roller, call for service. Replace the tray pickup roller with a Samsung-genuine pickup roller, call for service. Replace the MP pickup roller with a Samsung-genuine MP pickup roller, call for service. Troubleshooting_ 148
-
 1
1 -
2
-
3
-
4
-
5
-
6
-
7
-
8
-
9
-
10
-
11
-
12
-
13
-
14
-
15
-
16
-
17
-
18
-
19
-
20
-
21
-
22
-
23
-
24
-
25
-
26
-
27
-
28
-
29
-
30
-
31
-
32
-
33
-
34
-
35
-
36
-
37
-
38
-
39
-
40
-
41
-
42
-
43
-
44
-
45
-
46
-
47
-
48
-
49
-
50
-
51
-
52
-
53
-
54
-
55
-
56
-
57
-
58
-
59
-
60
-
61
-
62
-
63
-
64
-
65
-
66
-
67
-
68
-
69
-
70
-
71
-
72
-
73
-
74
-
75
-
76
-
77
-
78
-
79
-
80
-
81
-
82
-
83
-
84
-
85
-
86
-
87
-
88
-
89
-
90
-
91
-
92
-
93
-
94
-
95
-
96
-
97
-
98
-
99
-
100
-
101
-
102
-
103
-
104
-
105
-
106
-
107
-
108
-
109
-
110
-
111
-
112
-
113
-
114
-
115
-
116
-
117
-
118
-
119
-
120
-
121
-
122
-
123
-
124
-
125
-
126
-
127
-
128
-
129
-
130
-
131
-
132
-
133
-
134
-
135
-
136
-
137
-
138
-
139
-
140
-
141
-
142
-
 143
143 -
 144
144 -
 145
145 -
 146
146 -
 147
147 -
 148
148 -
 149
149 -
 150
150 -
 151
151 -
 152
152 -
 153
153 -
154
-
155
-
156
-
157
-
158
-
159
-
160
-
161
-
162
-
163
-
164
-
165
-
166
-
167
-
168
-
169
-
170
-
171
-
172
-
173
-
174
-
175
-
176
-
177
-
178
 |
 |
