Samsung CLX-9251NA User Manual Ver.1.03 (English) - Page 110
Using the right-click menu, Changing the default print settings
 |
View all Samsung CLX-9251NA manuals
Add to My Manuals
Save this manual to your list of manuals |
Page 110 highlights
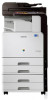
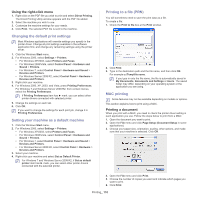
Using the right-click menu 1. Right-click on the PDF file you wish to print and select Direct Printing. The Direct Printing Utility window appears with the PDF file added. 2. Select the machine you wish to use. 3. Customize the machine settings for your needs. 4. Click Print. The selected PDF file is sent to the machine. Changing the default print settings Most Windows applications will override settings you specify in the printer driver. Change all print settings available in the software application first, and change any remaining settings using the printer driver. 1. Click the Windows Start menu. 2. For Windows 2000, select Settings > Printers. • For Windows XP/2003, select Printers and Faxes. • For Windows 2008/Vista, select Control Panel > Hardware and Sound > Printers. • For Windows 7, select Control Panel > Hardware and Sound > Devices and Printers. • For Windows Server 2008 R2, select Control Panel > Hardware > Devices and Printers. 3. Right-click your machine. 4. For Windows 2000, XP, 2003, and Vista, press Printing Preferences. For Windows 7 and Windows Server 2008 R2, from context menus, select the Printing Preferences. If Printing Preferences item has ► mark, you can select other printer drivers connected with selected printer. 5. Change the settings on each tab. 6. Click OK. If you want to change the settings for each print job, change it in Printing Preferences. Setting your machine as a default machine 1. Click the Windows Start menu. 2. For Windows 2000, select Settings > Printers. • For Windows XP/2003, select Printers and Faxes. • For Windows 2008/Vista, select Control Panel > Hardware and Sound > Printers. • For Windows 7, select Control Panel > Hardware and Sound > Devices and Printers. • For Windows Server 2008 R2, select Control Panel > Hardware > Devices and Printers. 3. Select your machine. 4. Right-click your machine and select Set as Default Printer. For Windows 7 and Windows Server 2008 R2, if Set as default printer item has ► mark, you can select other printer drivers connected with the selected printer. Printing to a file (PRN) You will sometimes need to save the print data as a file. To create a file: 1. Check the Print to file box at the Print window. 2. Click Print. 3. Type in the destination path and the file name, and then click OK. For example c:\Temp\file name. If you type in only the file name, the file is automatically saved in My Documents, Documents and Settings or Users. The saved folder may differ, depending on your operating system or the application you are using. MAC printing Some features may not be available depending on models or options. This section explains how to print using a MAC. Printing a document When you print with a MAC, you need to check the printer driver setting in each application you use. Follow the steps below to print from a MAC: 1. Open the document you want to print. 2. Open the File menu and click Page Setup (Document Setup in some applications). 3. Choose your paper size, orientation, scaling, other options, and make sure that your machine is selected. Click OK. 4. Open the File menu and click Print. 5. Choose the number of copies you want and indicate which pages you want to print. 6. Click Print. Printing_ 110
-
 1
1 -
2
-
3
-
4
-
5
-
6
-
7
-
8
-
9
-
10
-
11
-
12
-
13
-
14
-
15
-
16
-
17
-
18
-
19
-
20
-
21
-
22
-
23
-
24
-
25
-
26
-
27
-
28
-
29
-
30
-
31
-
32
-
33
-
34
-
35
-
36
-
37
-
38
-
39
-
40
-
41
-
42
-
43
-
44
-
45
-
46
-
47
-
48
-
49
-
50
-
51
-
52
-
53
-
54
-
55
-
56
-
57
-
58
-
59
-
60
-
61
-
62
-
63
-
64
-
65
-
66
-
67
-
68
-
69
-
70
-
71
-
72
-
73
-
74
-
75
-
76
-
77
-
78
-
79
-
80
-
81
-
82
-
83
-
84
-
85
-
86
-
87
-
88
-
89
-
90
-
91
-
92
-
93
-
94
-
95
-
96
-
97
-
98
-
99
-
100
-
101
-
102
-
103
-
104
-
 105
105 -
 106
106 -
 107
107 -
 108
108 -
 109
109 -
 110
110 -
 111
111 -
 112
112 -
 113
113 -
 114
114 -
 115
115 -
116
-
117
-
118
-
119
-
120
-
121
-
122
-
123
-
124
-
125
-
126
-
127
-
128
-
129
-
130
-
131
-
132
-
133
-
134
-
135
-
136
-
137
-
138
-
139
-
140
-
141
-
142
-
143
-
144
-
145
-
146
-
147
-
148
-
149
-
150
-
151
-
152
-
153
-
154
-
155
-
156
-
157
-
158
-
159
-
160
-
161
-
162
-
163
-
164
-
165
-
166
-
167
-
168
-
169
-
170
-
171
-
172
-
173
-
174
-
175
-
176
-
177
-
178
 |
 |
