Samsung GT-P1010/W16 User Manual (user Manual) (ver.f6) (English) - Page 35
Google Talk, Windows Live - updates
 |
View all Samsung GT-P1010/W16 manuals
Add to My Manuals
Save this manual to your list of manuals |
Page 35 highlights
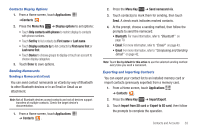
Creating Contacts 1. From a Home screen, touch Applications ➔Contacts ➔ . 2. At the Save contact to prompt, touch an account for synchronizing the contact (available options depend on the accounts you have set up for synchronization). 3. Touch contact fields to enter information: • Touch the Photo ID to Select photo to identify the contact. • Touch First name, then enter a first name for the contact. • Touch Last name, then enter a last name for the contact. Touch to enter a Name prefix, Middle name, Name suffix, Phonetic given name, Phonetic middle name, or Phonetic family name. • Touch Phone number to enter a phone number, then touch the Label button to choose a label, from Mobile, Home, Work, Work fax, Home Fax, Pager, Other, Custom, or Callback to create a custom label. To add another number, touch . • Touch Email address to enter an email address, then touch the Label button to choose a label, from Work, Home, Mobile, Other, or Custom to create a custom label. To add another address, touch . • Touch Instant msg to enter an instant message address, then touch the Label button to choose a label, from Google Talk, AIM, Windows Live, Yahoo!, Skype, QQ, ICQ, Jabber, or Custom to create a custom label. To add another IM, touch . • Touch Groups to assign the contact to a group. For more information about Groups, see "Groups" on page 34. • Touch Postal address fields to enter a physical address. • Touch Organization fields to enter a company name or association. • To add more fields, touch More to choose Note, Nickname, Web address, Birthday, and Anniversary. 4. When you finish entering information, touch Done. Updating Contacts Make changes to update an existing contact. 1. From a Home screen, touch Applications ➔Contacts . 2. Touch a contact to view its information, then touch Edit. 3. Continue entering contact information. For more information, refer to "Creating Contacts" on page 31. 4. To delete a contact, touch Delete. At the prompt, touch OK. Contacts and Accounts 31
-
 1
1 -
2
-
3
-
4
-
5
-
6
-
7
-
8
-
9
-
10
-
11
-
12
-
13
-
14
-
15
-
16
-
17
-
18
-
19
-
20
-
21
-
22
-
23
-
24
-
25
-
26
-
27
-
28
-
29
-
 30
30 -
 31
31 -
 32
32 -
 33
33 -
 34
34 -
 35
35 -
 36
36 -
 37
37 -
 38
38 -
 39
39 -
 40
40 -
41
-
42
-
43
-
44
-
45
-
46
-
47
-
48
-
49
-
50
-
51
-
52
-
53
-
54
-
55
-
56
-
57
-
58
-
59
-
60
-
61
-
62
-
63
-
64
-
65
-
66
-
67
-
68
-
69
-
70
-
71
-
72
-
73
-
74
-
75
-
76
-
77
-
78
-
79
-
80
-
81
-
82
-
83
-
84
-
85
-
86
-
87
-
88
-
89
-
90
-
91
-
92
-
93
-
94
-
95
-
96
-
97
-
98
-
99
-
100
-
101
-
102
-
103
-
104
-
105
-
106
-
107
-
108
-
109
-
110
-
111
-
112
-
113
-
114
-
115
-
116
-
117
-
118
-
119
-
120
-
121
-
122
-
123
-
124
-
125
-
126
-
127
-
128
-
129
-
130
-
131
-
132
-
133
-
134
-
135
-
136
-
137
-
138
-
139
-
140
-
141
-
142
-
143
-
144
-
145
-
146
-
147
 |
 |
