Samsung SCH-R360 User Manual (user Manual) (ver.f7) (English) - Page 52
Add Slide, Erase Slide, Sending Message, Messages, Send Message, Picture, Message, Create Pic Msg,
 |
View all Samsung SCH-R360 manuals
Add to My Manuals
Save this manual to your list of manuals |
Page 52 highlights
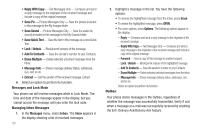
• Delivery Ack - Choose On or Off - Requests confirmation when your message is received. • Remove PIC - Remove the picture from your message. • Remove Sound - Remove the sound file from your message. • Add Slide - Add another picture, text, and sound to this message. • Erase Slide - Remove a slide added to this message. • Add To Contacts - Save the recipient's number or e-mail address as a Contacts list entry. Select the desired option. 10. Press SEND to send the message. "Sending Message" appears in the display and a progress bar indicates the send status. Send Picture Messages in Standby mode Send Picture messages to recipients with a compatible phone or other device, and accompany a Picture message with a voice memo, ringtone, or downloaded melody. Tip: You can send a Picture message to up to ten recipients. Enter each recipient's address or phone number in a separate Send To field of the Picture message composer. 1. In Standby mode, press the Navigation key Down (Messages shortcut). 49 - or - Select Menu ➔ Messages. 2. Then select Send Message ➔ Picture Message. The Create Pic Msg screen appears in the display with the Send To tab highlighted and showing the To: list. Tip: To launch the Create Pic Msg screen using a voice command - In Standby mode, press and hold until the phone prompts, "Say a command." Say "Send Picture" into the microphone. You are then prompted to say a Contact name or a number for the first recipient of the message. 3. Enter the phone number or e-mail address of the recipient using the keypad, then press . Tip: Press Add to display a pop-up menu containing: Contact, Groups, and Recent Calls. These options allow you to find and add recipients to the To: list. 4. The Subject: field appears in the display. Enter a subject for the Picture message using the keypad. (For more information, refer to "Entering Text" on page 15.) 5. Highlight the Text: field, then enter the message text using either keypad. (For more information, refer to "Entering Text" on page 15.) 6. For a Picture Message, highlight the PIC: field, then press Picture. A photo gallery of thumbnail images appears in the display.
-
 1
1 -
2
-
3
-
4
-
5
-
6
-
7
-
8
-
9
-
10
-
11
-
12
-
13
-
14
-
15
-
16
-
17
-
18
-
19
-
20
-
21
-
22
-
23
-
24
-
25
-
26
-
27
-
28
-
29
-
30
-
31
-
32
-
33
-
34
-
35
-
36
-
37
-
38
-
39
-
40
-
41
-
42
-
43
-
44
-
45
-
46
-
 47
47 -
 48
48 -
 49
49 -
 50
50 -
 51
51 -
 52
52 -
 53
53 -
 54
54 -
 55
55 -
 56
56 -
 57
57 -
58
-
59
-
60
-
61
-
62
-
63
-
64
-
65
-
66
-
67
-
68
-
69
-
70
-
71
-
72
-
73
-
74
-
75
-
76
-
77
-
78
-
79
-
80
-
81
-
82
-
83
-
84
-
85
-
86
-
87
-
88
-
89
-
90
-
91
-
92
-
93
-
94
-
95
-
96
-
97
-
98
-
99
-
100
-
101
-
102
-
103
-
104
-
105
-
106
-
107
-
108
-
109
-
110
-
111
-
112
-
113
-
114
-
115
-
116
-
117
-
118
-
119
 |
 |