Samsung SCH-R360 User Manual (user Manual) (ver.f7) (English) - Page 68
Display, Display All, Shooting Mode Single Frame, Shooting Mode Series, Shooting Mode Mosaic,
 |
View all Samsung SCH-R360 manuals
Add to My Manuals
Save this manual to your list of manuals |
Page 68 highlights
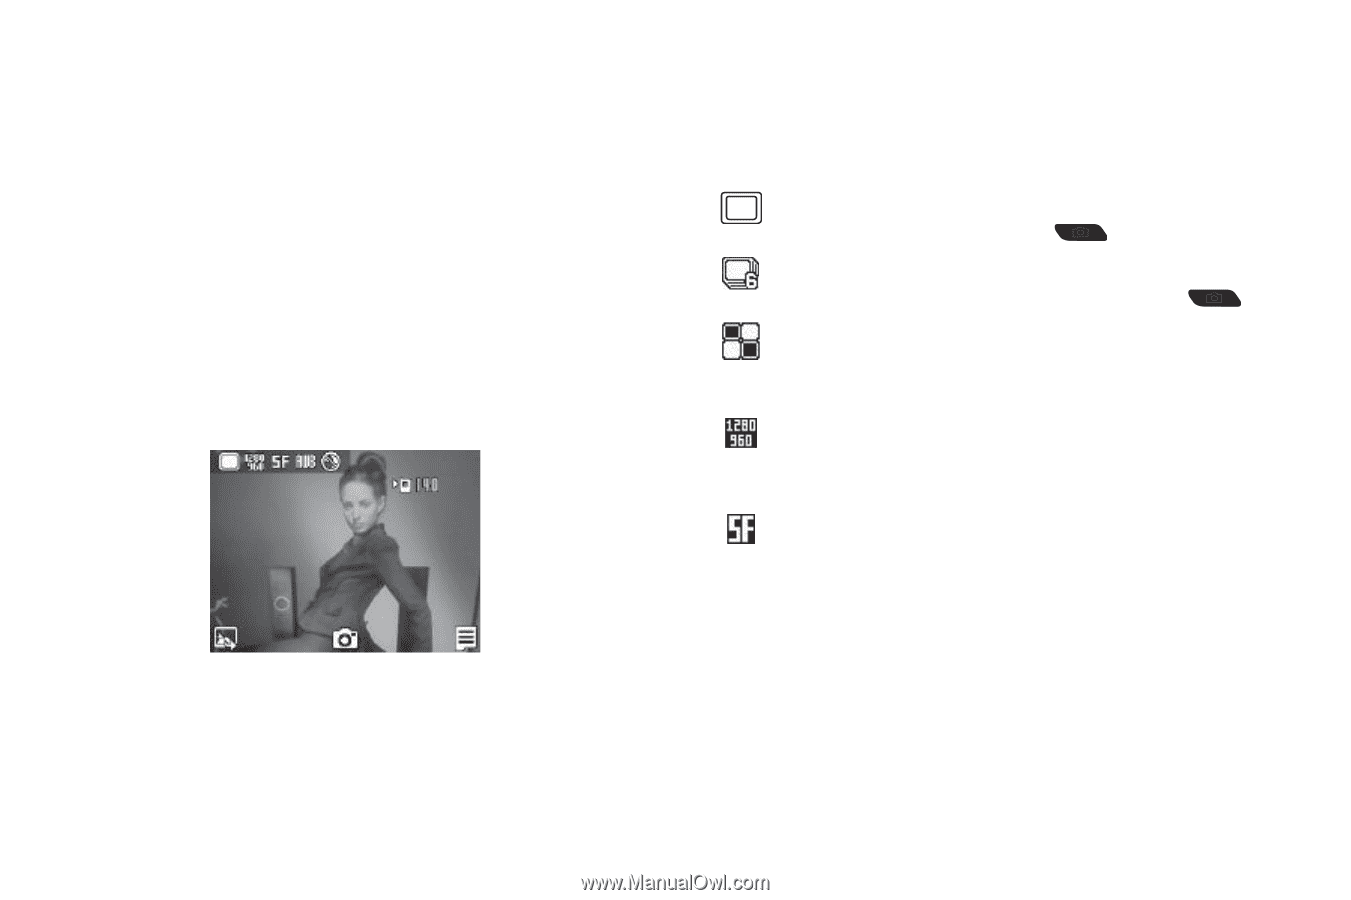
4. Enter or add the recipient(s) phone number(s) or e-mail address(es). (For more information, refer to "Send Picture Messages in Camera Mode" on page 47.) 5. To save the address(es), press OK. 6. Select other message fields as needed. (For more information, refer to "Send Picture Messages in Camera Mode" on page 47, and see "Send Picture Messages in Standby mode" on page 49.) 7. When you are finished composing your message, press SEND to send the Picture message to the intended recipient(s). Screen Layout Camera Screen Icons The following icons appear in the Camera screen when the Icon Display Camera setting is set to Display All. For more information on this setting, see "Camera Settings" on page 67. Shooting Mode (Single Frame) - Takes one photo with each press of the Camera key ( ). Shooting Mode (Series) - Takes 6 pictures automatically when you press the Camera key ( ). Shooting Mode (Mosaic) - Combines from 4 to 9 shots into a single picture, depending upon which one of 18 available Mosaic layouts you select. Resolution - Indicates the current camera resolution setting. (For more information, refer to "Camera Options" on page 66.) Quality - Indicates camera's picture quality setting. [You can change the picture quality setting. (For more information, refer to "Camera Options" on page 66.)] When you activate your phone's camera, the second line of the display is reserved for the current camera resolution setting and the picture counter. The center of the display shows a viewfinder image of the subject at which the camera is pointed. 65
-
 1
1 -
2
-
3
-
4
-
5
-
6
-
7
-
8
-
9
-
10
-
11
-
12
-
13
-
14
-
15
-
16
-
17
-
18
-
19
-
20
-
21
-
22
-
23
-
24
-
25
-
26
-
27
-
28
-
29
-
30
-
31
-
32
-
33
-
34
-
35
-
36
-
37
-
38
-
39
-
40
-
41
-
42
-
43
-
44
-
45
-
46
-
47
-
48
-
49
-
50
-
51
-
52
-
53
-
54
-
55
-
56
-
57
-
58
-
59
-
60
-
61
-
62
-
 63
63 -
 64
64 -
 65
65 -
 66
66 -
 67
67 -
 68
68 -
 69
69 -
 70
70 -
 71
71 -
 72
72 -
 73
73 -
74
-
75
-
76
-
77
-
78
-
79
-
80
-
81
-
82
-
83
-
84
-
85
-
86
-
87
-
88
-
89
-
90
-
91
-
92
-
93
-
94
-
95
-
96
-
97
-
98
-
99
-
100
-
101
-
102
-
103
-
104
-
105
-
106
-
107
-
108
-
109
-
110
-
111
-
112
-
113
-
114
-
115
-
116
-
117
-
118
-
119
 |
 |