Samsung SM-T807A User Manual Att Tab S Sm-t807a Kk English User Manual Ver.nh6 - Page 36
Accounts and Contacts
 |
View all Samsung SM-T807A manuals
Add to My Manuals
Save this manual to your list of manuals |
Page 36 highlights
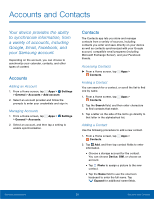
Accounts and Contacts Your device provides the ability to synchronize information, from a variety of accounts, including Google, Email, Facebook, and your Samsung account. Depending on the account, you can choose to synchronize your calendar, contacts, and other types of content. Accounts Adding an Account 1. From a Home screen, tap Apps > Settings > General > Accounts > Add account. 2. Select an account provider and follow the prompts to enter your credentials and sign in. Managing Accounts 1. From a Home screen, tap Apps > Settings > General > Accounts. 2. Select an account, and then tap a setting to enable synchronization. Contacts The Contacts app lets you store and manage contacts from a variety of sources, including contacts you enter and save directly on your device as well as contacts synchronized with your Google account, compatible email programs (including Microsoft Exchange Server), and your Facebook friends. Accessing Contacts ► From a Home screen, tap Contacts. Apps > Finding a Contact You can search for a contact, or scroll the list to find one by name. 1. From a Home screen, tap Apps > Contacts. 2. Tap the Search field, and then enter characters to find contacts that match. 3. Tap a letter on the side of the list to go directly to that letter in the alphabetical list. Adding a Contact Use the following procedure to add a new contact. 1. From a Home screen, tap Apps > Contacts. 2. Tap Add, and then tap contact fields to enter information. • Choose a storage account for the contact. You can choose Device, SIM, or choose an account. • Tap Photo to assign a picture to the new contact. • Tap the Name field to use the onscreen keyboard to enter the full name. Tap Expand for additional name fields. Samsung Applications 30 Accounts and Contacts
-
 1
1 -
2
-
3
-
4
-
5
-
6
-
7
-
8
-
9
-
10
-
11
-
12
-
13
-
14
-
15
-
16
-
17
-
18
-
19
-
20
-
21
-
22
-
23
-
24
-
25
-
26
-
27
-
28
-
29
-
30
-
 31
31 -
 32
32 -
 33
33 -
 34
34 -
 35
35 -
 36
36 -
 37
37 -
 38
38 -
 39
39 -
 40
40 -
 41
41 -
42
-
43
-
44
-
45
-
46
-
47
-
48
-
49
-
50
-
51
-
52
-
53
-
54
-
55
-
56
-
57
-
58
-
59
-
60
-
61
-
62
-
63
-
64
-
65
-
66
-
67
-
68
-
69
-
70
-
71
-
72
-
73
-
74
-
75
-
76
-
77
-
78
-
79
-
80
-
81
-
82
-
83
-
84
-
85
-
86
-
87
-
88
-
89
-
90
-
91
-
92
-
93
-
94
-
95
-
96
-
97
-
98
-
99
-
100
-
101
-
102
-
103
-
104
-
105
-
106
 |
 |
