Samsung SPH A920 User Manual (ENGLISH) - Page 164
Save to, Erase, Erase Selection, Erase All, Options, Send to Contact, New Album, Album Info
 |
View all Samsung SPH A920 manuals
Add to My Manuals
Save this manual to your list of manuals |
Page 164 highlights
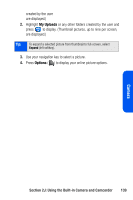
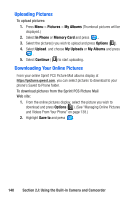
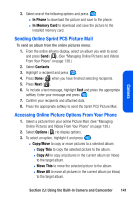
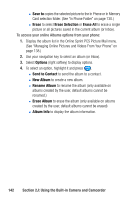
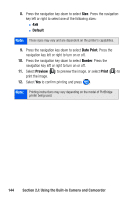
Ⅲ Save to copies the selected picture to the In Phone or In Memory Card selection folder. (See "In Phone Folder" on page 130.) Ⅲ Erase to select Erase Selection or Erase All to erase a single picture or all pictures saved in the current album (or Inbox). To access your online Albums options from your phone: 1. Display the album list in the Online Sprint PCS Picture Mail menu. (See "Managing Online Pictures and Videos From Your Phone" on page 138.) 2. Use your navigation key to select an album (or Inbox). 3. Select Options (right softkey) to display options. 4. To select an option, highlight it and press . Ⅲ Send to Contact to send the album to a contact. Ⅲ New Album to create a new album. Ⅲ Rename Album to rename the album (only available on albums created by the user, default albums cannot be renamed.) Ⅲ Erase Album to erase the album (only available on albums created by the user, default albums cannot be erased) Ⅲ Album Info to display the album information. 142 Section 2J: Using the Built-in Camera and Camcorder
-
 1
1 -
2
-
3
-
4
-
5
-
6
-
7
-
8
-
9
-
10
-
11
-
12
-
13
-
14
-
15
-
16
-
17
-
18
-
19
-
20
-
21
-
22
-
23
-
24
-
25
-
26
-
27
-
28
-
29
-
30
-
31
-
32
-
33
-
34
-
35
-
36
-
37
-
38
-
39
-
40
-
41
-
42
-
43
-
44
-
45
-
46
-
47
-
48
-
49
-
50
-
51
-
52
-
53
-
54
-
55
-
56
-
57
-
58
-
59
-
60
-
61
-
62
-
63
-
64
-
65
-
66
-
67
-
68
-
69
-
70
-
71
-
72
-
73
-
74
-
75
-
76
-
77
-
78
-
79
-
80
-
81
-
82
-
83
-
84
-
85
-
86
-
87
-
88
-
89
-
90
-
91
-
92
-
93
-
94
-
95
-
96
-
97
-
98
-
99
-
100
-
101
-
102
-
103
-
104
-
105
-
106
-
107
-
108
-
109
-
110
-
111
-
112
-
113
-
114
-
115
-
116
-
117
-
118
-
119
-
120
-
121
-
122
-
123
-
124
-
125
-
126
-
127
-
128
-
129
-
130
-
131
-
132
-
133
-
134
-
135
-
136
-
137
-
138
-
139
-
140
-
141
-
142
-
143
-
144
-
145
-
146
-
147
-
148
-
149
-
150
-
151
-
152
-
153
-
154
-
155
-
156
-
157
-
158
-
 159
159 -
 160
160 -
 161
161 -
 162
162 -
 163
163 -
 164
164 -
 165
165 -
 166
166 -
 167
167 -
 168
168 -
 169
169 -
170
-
171
-
172
-
173
-
174
-
175
-
176
-
177
-
178
-
179
-
180
-
181
-
182
-
183
-
184
-
185
-
186
-
187
-
188
-
189
-
190
-
191
-
192
-
193
-
194
-
195
-
196
-
197
-
198
-
199
-
200
-
201
-
202
-
203
-
204
-
205
-
206
-
207
-
208
-
209
-
210
-
211
-
212
-
213
-
214
-
215
-
216
-
217
-
218
-
219
-
220
-
221
-
222
-
223
-
224
-
225
-
226
-
227
-
228
-
229
-
230
-
231
-
232
-
233
-
234
-
235
-
236
-
237
-
238
-
239
-
240
-
241
-
242
-
243
-
244
-
245
-
246
 |
 |