Sharp MX-2310U Installation Manual - Page 11
D. Lock release, 2. Installation, A. Developer installation
 |
View all Sharp MX-2310U manuals
Add to My Manuals
Save this manual to your list of manuals |
Page 11 highlights
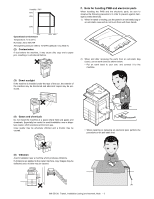
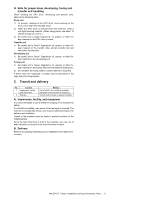
D. Lock release (1) Tray rotation plate lock release 1) Pull out the tray. Turn the fixing material and remove it. Remove the caution label. Attach the removed fixing material to the position shown in the figure for future use. Close the tray which was pulled out. 2. Installation When an optional paper feed desk is connected to the machine, unpack and install the paper feed desk, then unpack the machine. Place the option desk on the machine securely, and perform the installing procedures of the machine. Place the machine on the optional desk firmly and secure. A. Developer installation Be careful not to leave fingerprints or oily dirt on the DV roller surface. 1) Open the front cabinet. Slide the lock to release, and remove the waste toner box. (2) Scanner (2/3 mirror unit) lock release 1) Remove the optical unit fixing screw, and remove the note label. 2 3 1 2) Turn the drum cover securing locks (2) to release, and then raise the drum positioning cove. 1 2 MX-2310U MX-2310U (MAIN UNIT) 2 - 2
-
 1
1 -
2
-
3
-
4
-
5
-
 6
6 -
 7
7 -
 8
8 -
 9
9 -
 10
10 -
 11
11 -
 12
12 -
 13
13 -
 14
14 -
 15
15 -
 16
16 -
17
-
18
-
19
-
20
-
21
-
22
-
23
-
24
-
25
-
26
-
27
-
28
-
29
-
30
-
31
-
32
-
33
-
34
-
35
-
36
-
37
-
38
-
39
-
40
-
41
-
42
-
43
-
44
-
45
-
46
-
47
-
48
-
49
-
50
-
51
-
52
-
53
-
54
-
55
-
56
-
57
-
58
-
59
-
60
-
61
-
62
-
63
-
64
-
65
-
66
-
67
-
68
-
69
-
70
-
71
-
72
-
73
-
74
-
75
-
76
 |
 |
