TRENDnet TPE-1620WS User's Guide - Page 68
Con Voice VLAN OUI settings, User Defined OUI - Description
 |
View all TRENDnet TPE-1620WS manuals
Add to My Manuals
Save this manual to your list of manuals |
Page 68 highlights
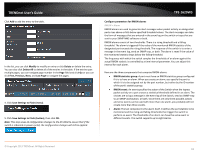
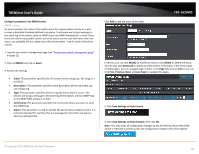
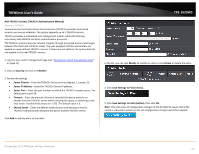
TRENDnet User's Guide 4. Click Save Settings to Flash (menu). TPE-1620WS • Enter the MAC address in the User Defined OUI - Telephony OUI field of one of the IP phones with the manufacturer's OUI. • Click Add. The new OUI entry is displayed in the table at the bottom of the page. Note: If you find more than one OUI among the IP phones you are installing, enter one MAC address that represents each individual OUI. You can enter a total of 10 OUIs. 5. Click Save Settings to Flash (button), then click OK. Note: This step saves all configuration changes to the NV-RAM to ensure that if the switch is rebooted or power cycled, the configuration changes will still be applied. Configure Voice VLAN OUI settings Voice VLAN > Voice VLAN OUI Settings 1. Log into your switch management page (see "Access your switch management page" on page 11). 2. Click on Voice VLAN and click on Voice VLAN OUI Settings. 3. Review the settings. Use the following procedure to configure voice VLAN OUIs: • Enter a text description that helps you identify the manufacturer's OUI in the User Defined OUI - Description field. This parameter can be up to 20 characters in length. Modify OUI Setting To modify or delete an OUI, it must be first be deleted and then re-created. Delete OUI Setting To delete a specific OUI that had already been entered in the table at the bottom of the page, click on Delete in the Action column of the table. The specific OUI will be deleted from the table. 4. Click Save Settings to Flash (menu). 5. Click Save Settings to Flash (button), then click OK. Note: This step saves all configuration changes to the NV-RAM to ensure that if the switch is rebooted or power cycled, the configuration changes will still be applied. © Copyright 2013 TRENDnet. All Rights Reserved. 68
-
 1
1 -
2
-
3
-
4
-
5
-
6
-
7
-
8
-
9
-
10
-
11
-
12
-
13
-
14
-
15
-
16
-
17
-
18
-
19
-
20
-
21
-
22
-
23
-
24
-
25
-
26
-
27
-
28
-
29
-
30
-
31
-
32
-
33
-
34
-
35
-
36
-
37
-
38
-
39
-
40
-
41
-
42
-
43
-
44
-
45
-
46
-
47
-
48
-
49
-
50
-
51
-
52
-
53
-
54
-
55
-
56
-
57
-
58
-
59
-
60
-
61
-
62
-
 63
63 -
 64
64 -
 65
65 -
 66
66 -
 67
67 -
 68
68 -
 69
69 -
 70
70 -
 71
71 -
 72
72 -
 73
73 -
74
-
75
-
76
-
77
-
78
-
79
-
80
-
81
-
82
-
83
-
84
-
85
-
86
-
87
-
88
-
89
-
90
-
91
-
92
-
93
-
94
-
95
-
96
-
97
-
98
-
99
-
100
-
101
-
102
-
103
-
104
 |
 |
