TRENDnet TPE-1620WS User's Guide - Page 78
Set Trusted Interfaces, Con Binding Database
 |
View all TRENDnet TPE-1620WS manuals
Add to My Manuals
Save this manual to your list of manuals |
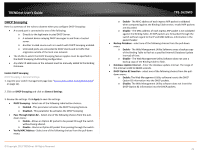
Page 78 highlights
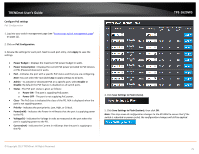
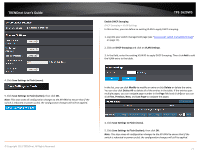
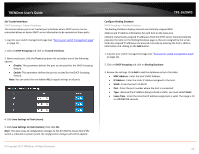
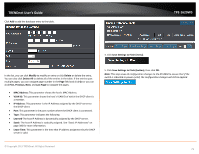
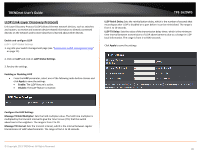
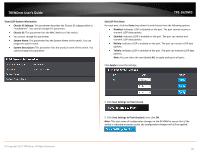
TRENDnet User's Guide Set Trusted Interfaces DHCP Snooping > Trusted Interfaces This section allows you to set trusted port interfaces where DHCP servers can be connected allows or denies DHCP server information to be received on those ports. 1. Log into your switch management page (see "Access your switch management page" on page 11). 2. Click on DHCP Snooping and click on Trusted Interfaces. 3. Next to each port, click the Trust drop-down list and select one of the following options. • Disable: This parameter defines the port as untrusted for the DHCP Snooping feature. • Enable: This parameter defines the port as trusted for the DHCP Snooping feature. Note: You can select the row labeled ALL to apply settings to all ports. TPE-1620WS Configure Binding Database DHCP Snooping > Binding Database The Binding Database displays learned and statically assigned MAC Address and IP Address information for each host on the local area network. Dynamically assigned IP addresses from the DHCP server will automatically populate the table on the Binding Database page as they are assigned by the server. Statically assigned IP addresses are entered manually by entering the host's address information and clicking on the Add button. 1. Log into your switch management page (see "Access your switch management page" on page 11). 2. Click on DHCP Snooping and click on Binding Database. 3. Review the settings. Click Add to add the database entry to the table. • MAC Address - Enter the host's MAC Address. • IP Address - Enter the static IP Address assigned to the host. • VLAN - Enter the host's VLAN ID. • Port - Enter the port number where the host is connected. • Type - Because the IP Address being entered is static, you must select Static. • Lease Time - Enter the time that IP address assignment is valid. The range is 10 to 4294967295 seconds. 4. Click Save Settings to Flash (menu). 5. Click Save Settings to Flash (button), then click OK. Note: This step saves all configuration changes to the NV-RAM to ensure that if the switch is rebooted or power cycled, the configuration changes will still be applied. © Copyright 2013 TRENDnet. All Rights Reserved. 78
-
 1
1 -
2
-
3
-
4
-
5
-
6
-
7
-
8
-
9
-
10
-
11
-
12
-
13
-
14
-
15
-
16
-
17
-
18
-
19
-
20
-
21
-
22
-
23
-
24
-
25
-
26
-
27
-
28
-
29
-
30
-
31
-
32
-
33
-
34
-
35
-
36
-
37
-
38
-
39
-
40
-
41
-
42
-
43
-
44
-
45
-
46
-
47
-
48
-
49
-
50
-
51
-
52
-
53
-
54
-
55
-
56
-
57
-
58
-
59
-
60
-
61
-
62
-
63
-
64
-
65
-
66
-
67
-
68
-
69
-
70
-
71
-
72
-
 73
73 -
 74
74 -
 75
75 -
 76
76 -
 77
77 -
 78
78 -
 79
79 -
 80
80 -
 81
81 -
 82
82 -
 83
83 -
84
-
85
-
86
-
87
-
88
-
89
-
90
-
91
-
92
-
93
-
94
-
95
-
96
-
97
-
98
-
99
-
100
-
101
-
102
-
103
-
104
 |
 |
