Toshiba Portege M780 PPM78C-005006 Users Manual Canada; English - Page 139
Setting the Optical Drive Auto Lock, Optical Drive Auto Lock
 |
View all Toshiba Portege M780 PPM78C-005006 manuals
Add to My Manuals
Save this manual to your list of manuals |
Page 139 highlights
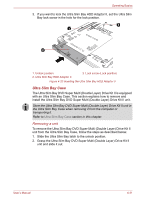
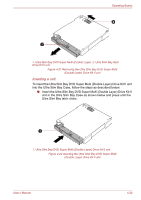
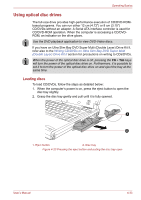
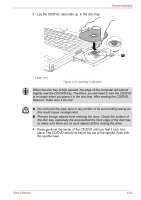
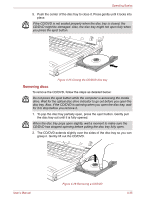
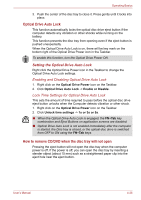
Operating Basics 3. Push the center of the disc tray to close it. Press gently until it locks into place. Optical Drive Auto Lock This function automatically locks the optical disc drive eject button if the computer detects any vibration or other shocks while running on the battery. This function prevents the disc tray from opening even if the eject button is pushed unexpectedly. When the Optical Drive Auto Lock is on, there will be key mark on the bottom right of the Optical Drive Power icon in the Taskbar. To enable this function, turn the Optical Drive Power ON. Setting the Optical Drive Auto Lock Right click the Optical Drive Power icon in the Taskbar to change the Optical Drive Auto Lock settings. Enabling and Disabling Optical Drive Auto Lock 1. Right click on the Optical Drive Power icon on the Taskbar. 2. Click Optical Drive Auto Lock -> Enable or Disable. Lock Time Settings for Optical Drive Auto Lock This sets the amount of time required to pass before the optical disc drive eject button unlocks when the Computer detects vibration or other shock. 1. Right click on the Optical Drive Power icon on the Taskbar. 2. Click Unlock time settings -> 1s or 3s or 5s. ■ When the Optical Drive Auto Lock is engaged, the FN+Tab key combination and Eject Buttons on application screens are disabled. ■ Optical Drive Auto Lock is not enabled immediately after the computer is started, the Disc tray is closed, or the optical disc drive is switched from OFF to ON using the FN+Tab keys. How to remove CD/DVD when the disc tray will not open Pressing the eject button will not open the disc tray when the computer power is off. If the power is off, you can open the disc tray by inserting a slender object (about 15 mm) such as a straightened paper clip into the eject hole near the eject button. User's Manual 4-36
-
 1
1 -
2
-
3
-
4
-
5
-
6
-
7
-
8
-
9
-
10
-
11
-
12
-
13
-
14
-
15
-
16
-
17
-
18
-
19
-
20
-
21
-
22
-
23
-
24
-
25
-
26
-
27
-
28
-
29
-
30
-
31
-
32
-
33
-
34
-
35
-
36
-
37
-
38
-
39
-
40
-
41
-
42
-
43
-
44
-
45
-
46
-
47
-
48
-
49
-
50
-
51
-
52
-
53
-
54
-
55
-
56
-
57
-
58
-
59
-
60
-
61
-
62
-
63
-
64
-
65
-
66
-
67
-
68
-
69
-
70
-
71
-
72
-
73
-
74
-
75
-
76
-
77
-
78
-
79
-
80
-
81
-
82
-
83
-
84
-
85
-
86
-
87
-
88
-
89
-
90
-
91
-
92
-
93
-
94
-
95
-
96
-
97
-
98
-
99
-
100
-
101
-
102
-
103
-
104
-
105
-
106
-
107
-
108
-
109
-
110
-
111
-
112
-
113
-
114
-
115
-
116
-
117
-
118
-
119
-
120
-
121
-
122
-
123
-
124
-
125
-
126
-
127
-
128
-
129
-
130
-
131
-
132
-
133
-
 134
134 -
 135
135 -
 136
136 -
 137
137 -
 138
138 -
 139
139 -
 140
140 -
 141
141 -
 142
142 -
 143
143 -
 144
144 -
145
-
146
-
147
-
148
-
149
-
150
-
151
-
152
-
153
-
154
-
155
-
156
-
157
-
158
-
159
-
160
-
161
-
162
-
163
-
164
-
165
-
166
-
167
-
168
-
169
-
170
-
171
-
172
-
173
-
174
-
175
-
176
-
177
-
178
-
179
-
180
-
181
-
182
-
183
-
184
-
185
-
186
-
187
-
188
-
189
-
190
-
191
-
192
-
193
-
194
-
195
-
196
-
197
-
198
-
199
-
200
-
201
-
202
-
203
-
204
-
205
-
206
-
207
-
208
-
209
-
210
-
211
-
212
-
213
-
214
-
215
-
216
-
217
-
218
-
219
-
220
-
221
-
222
-
223
-
224
-
225
-
226
-
227
-
228
-
229
-
230
-
231
-
232
-
233
-
234
-
235
-
236
-
237
-
238
-
239
-
240
-
241
-
242
-
243
-
244
-
245
-
246
-
247
-
248
-
249
-
250
-
251
-
252
-
253
-
254
-
255
-
256
-
257
-
258
-
259
-
260
-
261
-
262
-
263
-
264
-
265
-
266
-
267
-
268
 |
 |
