Toshiba Qosmio G40 PQG40C-MM108C Users Manual Canada; English - Page 108
Information, Power Management, Speaker Configuration, Sound Effects, Dolby, Home Theater™
 |
View all Toshiba Qosmio G40 PQG40C-MM108C manuals
Add to My Manuals
Save this manual to your list of manuals |
Page 108 highlights
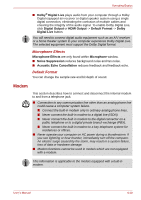
Operating Basics ■ Line In should be selected when connecting the audio cable to the Line In jack for recording analog sound from audio equipment. Information Click the information button to view hardware information, software information, and language setting. Power Management The audio controller in your computer can be turned off when the audio function is not used. To adjust the configuration of audio power management, click the battery button . ■ When audio power management is enabled, the circle button at the upper left of the Power Management is blue and convex. ■ When audio power management is disabled, the button is black and concave. Speaker Configuration Click the playback button to confirm the internal speakers or the headphone sound is coming from the right direction. Sound Effects This section explains how to select various sound effects. ■ Environment - simulates reverberations of sound for familiar environments around us. You can select an existing preset in the menu. ■ Equalizer - raises or lowers a frequency of sound to simulate a popular genre of music. You can select an existing preset in the menu. ■ Karaoke - cancels the specific frequency of sound and results in the Vocal Cancellation. Clicking the Karaoke icon, lowers the vocal sound within music. Using the arrow buttons will adjust the musical key of the sound. Dolby® Home Theater™ Dolby Home Theater enhances sound quality when you listen to audio of a music CD or a DVD on your computer. ■ Dolby® Virtual Speaker simulates a 5.1-speaker surround sound listening environment from just two speakers. To enable Dolby Virtual Speaker, click Speakers -> Dolby Home Theater -> On. ■ Dolby® Headphone lets you enjoy a simulated 5.1-channel surround sound experience from any set of headphones without disturbing others. To enable Dolby Virtual Speaker, click Speakers -> Dolby Home Theater -> On. User's Manual 4-29
-
 1
1 -
2
-
3
-
4
-
5
-
6
-
7
-
8
-
9
-
10
-
11
-
12
-
13
-
14
-
15
-
16
-
17
-
18
-
19
-
20
-
21
-
22
-
23
-
24
-
25
-
26
-
27
-
28
-
29
-
30
-
31
-
32
-
33
-
34
-
35
-
36
-
37
-
38
-
39
-
40
-
41
-
42
-
43
-
44
-
45
-
46
-
47
-
48
-
49
-
50
-
51
-
52
-
53
-
54
-
55
-
56
-
57
-
58
-
59
-
60
-
61
-
62
-
63
-
64
-
65
-
66
-
67
-
68
-
69
-
70
-
71
-
72
-
73
-
74
-
75
-
76
-
77
-
78
-
79
-
80
-
81
-
82
-
83
-
84
-
85
-
86
-
87
-
88
-
89
-
90
-
91
-
92
-
93
-
94
-
95
-
96
-
97
-
98
-
99
-
100
-
101
-
102
-
 103
103 -
 104
104 -
 105
105 -
 106
106 -
 107
107 -
 108
108 -
 109
109 -
 110
110 -
 111
111 -
 112
112 -
 113
113 -
114
-
115
-
116
-
117
-
118
-
119
-
120
-
121
-
122
-
123
-
124
-
125
-
126
-
127
-
128
-
129
-
130
-
131
-
132
-
133
-
134
-
135
-
136
-
137
-
138
-
139
-
140
-
141
-
142
-
143
-
144
-
145
-
146
-
147
-
148
-
149
-
150
-
151
-
152
-
153
-
154
-
155
-
156
-
157
-
158
-
159
-
160
-
161
-
162
-
163
-
164
-
165
-
166
-
167
-
168
-
169
-
170
-
171
-
172
-
173
-
174
-
175
-
176
-
177
-
178
-
179
-
180
-
181
-
182
-
183
-
184
-
185
-
186
-
187
-
188
-
189
-
190
-
191
-
192
-
193
-
194
-
195
-
196
-
197
-
198
-
199
-
200
-
201
-
202
-
203
-
204
-
205
-
206
-
207
-
208
-
209
-
210
-
211
-
212
-
213
-
214
-
215
-
216
-
217
-
218
-
219
-
220
-
221
-
222
-
223
-
224
-
225
-
226
-
227
-
228
-
229
-
230
-
231
-
232
-
233
-
234
-
235
-
236
-
237
-
238
-
239
-
240
-
241
-
242
-
243
-
244
-
245
-
246
-
247
-
248
-
249
-
250
-
251
-
252
-
253
-
254
-
255
-
256
-
257
-
258
-
259
-
260
-
261
-
262
-
263
-
264
-
265
-
266
-
267
-
268
-
269
-
270
-
271
-
272
-
273
-
274
-
275
-
276
-
277
-
278
-
279
-
280
-
281
 |
 |