Uniden MYSTIC English Owners Manual - Page 123
Upload to SD Card Programmer or Store on Hard Drive.
 |
UPC - 050633500262
View all Uniden MYSTIC manuals
Add to My Manuals
Save this manual to your list of manuals |
Page 123 highlights
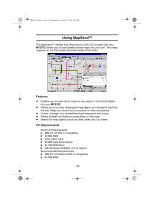
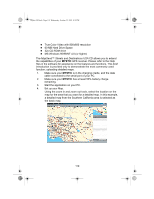
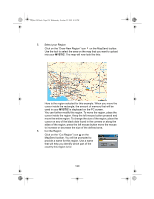
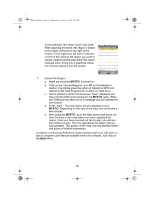
Mystic OM.book Page 121 Wednesday, October 22, 2003 8:59 PM In this example, the name "socal" was used. After supplying the name, this region is added to the region list found at the right of the screen. In the region list, left click on the box in front of the name of the region you want to upload. Notice that the area within the region changes color, giving you a graphical indication of what region(s) you will upload. 7. Upload the Region a. Make sure that the MYSTIC is turned on. b. Click on the "Upload Regions" icon on the MapSend toolbar. You will be given the option of Upload to GPS Unit, Upload to SD Card Programmer or Store on Hard Drive. c. Select Upload to GPS Unit and press "Next". MapSend will then poll the COM ports looking for the MYSTIC radio. When the COM port has been found, a message box will indicate the correct port. d. Press "Next". The map region will be uploaded to your MYSTIC. Depending on the size of the map, this could take a few minutes. e. Now using the MYSTIC, go to the Map screen and zoom out over the area on the map where you have uploaded the region. Once you have zoomed out far enough, you will see the outline of a box. This box represents the region that you just uploaded. This portion of the map now has detailed street and points of interest information. In addition to the Quick Reference Guide enclosed with your CD, there is also a complete User Manual available within the software. Just click on the Help Menu. 121
-
 1
1 -
2
-
3
-
4
-
5
-
6
-
7
-
8
-
9
-
10
-
11
-
12
-
13
-
14
-
15
-
16
-
17
-
18
-
19
-
20
-
21
-
22
-
23
-
24
-
25
-
26
-
27
-
28
-
29
-
30
-
31
-
32
-
33
-
34
-
35
-
36
-
37
-
38
-
39
-
40
-
41
-
42
-
43
-
44
-
45
-
46
-
47
-
48
-
49
-
50
-
51
-
52
-
53
-
54
-
55
-
56
-
57
-
58
-
59
-
60
-
61
-
62
-
63
-
64
-
65
-
66
-
67
-
68
-
69
-
70
-
71
-
72
-
73
-
74
-
75
-
76
-
77
-
78
-
79
-
80
-
81
-
82
-
83
-
84
-
85
-
86
-
87
-
88
-
89
-
90
-
91
-
92
-
93
-
94
-
95
-
96
-
97
-
98
-
99
-
100
-
101
-
102
-
103
-
104
-
105
-
106
-
107
-
108
-
109
-
110
-
111
-
112
-
113
-
114
-
115
-
116
-
117
-
 118
118 -
 119
119 -
 120
120 -
 121
121 -
 122
122 -
 123
123 -
 124
124 -
 125
125 -
 126
126 -
 127
127 -
 128
128 -
129
-
130
-
131
-
132
 |
 |
