Uniden MYSTIC English Owners Manual - Page 55
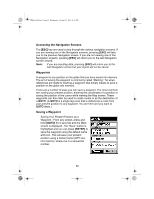
Navigating on a GOTO Route
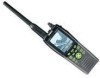 |
UPC - 050633500262
View all Uniden MYSTIC manuals
Add to My Manuals
Save this manual to your list of manuals |
Page 55 highlights
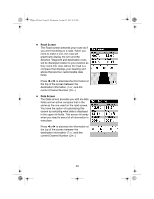
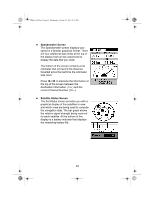
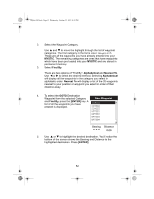
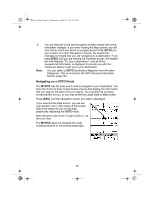
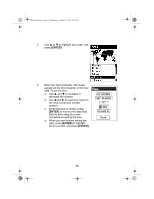
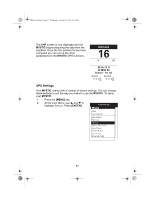
Mystic OM.book Page 53 Wednesday, October 22, 2003 8:59 PM 6. You are returned to the last Navigation screen viewed with some noticeable changes. If you were viewing the Map screen, you will now notice a thick line which is a graphical plot of the GOTO you just created. For other Navigation screens, the header bar changes to indicate that you are navigating to a destination. If you press [ESC] until you are viewing the Compass screen, the header bar now displays "To: (your destination)", and all of the navigational information is displayed to provide you with the necessary details to get you to your destination. Note: You can select a GOTO Destination Waypoint from the other Categories. This is covered in the GPS Advanced Operation Section (page 96). Navigating on a GOTO Route The MYSTIC has the tools you'll need to navigate to your destination. You have the choice of three customizable screens that display the information that you need in the layout that you desire. You may find the compass screen perfect for you, or you may prefer the Large Data or Map screen. Press [ESC] until the navigation screen you want is displayed. If you selected the Map screen, you will see your position icon in the center of the screen with a line drawn for you on the map, graphically displaying the GOTO route. Note that this route is line of sight (LOS) or "as the crow flies." The MYSTIC does not compute the route avoiding hazards or connecting waterways. 53
-
 1
1 -
2
-
3
-
4
-
5
-
6
-
7
-
8
-
9
-
10
-
11
-
12
-
13
-
14
-
15
-
16
-
17
-
18
-
19
-
20
-
21
-
22
-
23
-
24
-
25
-
26
-
27
-
28
-
29
-
30
-
31
-
32
-
33
-
34
-
35
-
36
-
37
-
38
-
39
-
40
-
41
-
42
-
43
-
44
-
45
-
46
-
47
-
48
-
49
-
 50
50 -
 51
51 -
 52
52 -
 53
53 -
 54
54 -
 55
55 -
 56
56 -
 57
57 -
 58
58 -
 59
59 -
 60
60 -
61
-
62
-
63
-
64
-
65
-
66
-
67
-
68
-
69
-
70
-
71
-
72
-
73
-
74
-
75
-
76
-
77
-
78
-
79
-
80
-
81
-
82
-
83
-
84
-
85
-
86
-
87
-
88
-
89
-
90
-
91
-
92
-
93
-
94
-
95
-
96
-
97
-
98
-
99
-
100
-
101
-
102
-
103
-
104
-
105
-
106
-
107
-
108
-
109
-
110
-
111
-
112
-
113
-
114
-
115
-
116
-
117
-
118
-
119
-
120
-
121
-
122
-
123
-
124
-
125
-
126
-
127
-
128
-
129
-
130
-
131
-
132
 |
 |
