WestBend 41077 Instruction Manual - Page 8
Basic Steps In Making Bread
 |
View all WestBend 41077 manuals
Add to My Manuals
Save this manual to your list of manuals |
Page 8 highlights
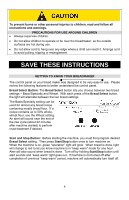
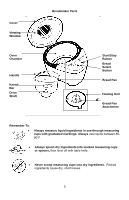
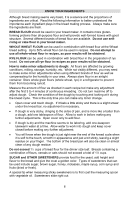
YEAST is a living organism, which, through fermentation feeds on carbohydrates in flour and sugar to produce carbon dioxide gas that makes the bread rise. Fast rising or bread machine yeast must be used in your bread maker for best results in the 45-minute cycle. Do not use active dry or compressed yeast, as poor results will be obtained. A ¼-ounce package of fast rising or bread machine yeast contains 2¼ teaspoons, the exact amount needed when making scratch recipes. Yeast can also be purchased in glass jars so you can measure the exact amount needed. Once jar is opened, keep refrigerated. Always make sure yeast is fresh and has not passed the "use by" date. SPECIAL NOTE ON CINNAMON AND GARLIC: Adding too much cinnamon or garlic can affect the texture and size of the loaf obtained. Cinnamon can break down the structure of the dough, affecting height and texture. Too much garlic can inhibit the yeast activity. Use only the amount of cinnamon and garlic recommended in the recipe. BASIC STEPS IN MAKING BREAD Always clean your new appliance thoroughly before using. Refer to "Cleaning Your Breadmaker" section. 1. Position knead bar onto shaft in bottom of pan, matching hub shape with shaft shape. You may need to twist bar slightly to drop in place. Make sure knead bar is pushed down onto shaft all the way. 2. Add ingredients to pan in order listed in recipe, liquids first, then the butter or margarine, next the dry ingredients and finally the yeast. It is best to level the dry ingredients before adding the yeast. 3. Postion pan into bread maker and turn in direction of arrow (counterclockwise) to lock in place. If pan does not lock securely, remove and reposition until secured. Pan must always be locked in place for bread maker to function. Close cover. 4. Plug bread maker cord into a 120 volt AC electrical outlet ONLY. Alert will sound. Press Bread Select button for type of bread being made. Press Start/Stop once to turn machine on. Green "operation" light on control panel will glow. After bread maker has been turned on, programmed setting cannot be changed. To change setting, hold Start/Stop button down until alert sounds and green "operation" light goes out. Then program control as desired and turn back on. The bread making process will begin and green "operation" light will glow. The dough will knead, rise and bake all in 45 minutes. A few minutes before the bread starts to bake (22 minutes after machine is turned on), an alert will sound to perform crust treatment if desired (see pg. 10). 5. When bread is done, alert will sound and red light for "keep warm" will glow on control panel. Turn bread maker off by holding Start/Stop button down until alert sounds and red "keep warm" light goes out. Unplug cord from electrical outlet. It is best to remove bread immediately for a crispier crust. Open cover and remove pan using oven mitt or hot pad, turning to right, (clockwise) to unlock. If bread is not removed right after cycle is complete, it will automatically go into 8
-
 1
1 -
2
-
 3
3 -
 4
4 -
 5
5 -
 6
6 -
 7
7 -
 8
8 -
 9
9 -
 10
10 -
 11
11 -
 12
12 -
 13
13 -
14
-
15
-
16
-
17
-
18
-
19
-
20
-
21
-
22
-
23
-
24
-
25
-
26
-
27
-
28
-
29
-
30
-
31
-
32
-
33
-
34
-
35
-
36
-
37
-
38
-
39
-
40
-
41
-
42
-
43
-
44
-
45
-
46
-
47
-
48
-
49
-
50
-
51
-
52
-
53
-
54
-
55
-
56
-
57
-
58
-
59
-
60
 |
 |
