WestBend 47410 Instruction Manual - Page 4
Control Panel And Functions, Lcd Display, Light, Medium, Dark., Medium., Buttons, Delay Start, Never - west bend review
 |
View all WestBend 47410 manuals
Add to My Manuals
Save this manual to your list of manuals |
Page 4 highlights
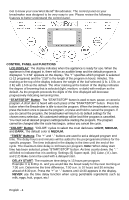
Get to know your new West Bend® Breadmaker. The control panel on your breadmaker was designed to be very easy to use. Please review the following features to better understand the control panel. CONTROL PANEL and FUNCTIONS LCD DISPLAY: The display indicates when the appliance is ready for use. When the appliance is first plugged in, there will be an audible beep and the default program is displayed. "1 2:58" appears on the display. The "1" specifies which program is selected (1-12 programs) and the "2:58" is the length of the program in hours: minutes. The marking at the top of the display indicates the weight of the loaf selected (1 lb, 1.5 lb, or 2 lb) with 1.5 lb as the default. The other marking at the bottom of the display indicates the degree of browning that is selected (light, medium, or dark) with medium as the default. As the program proceeds the digits of the time displayed will decrease progressively indicating remaining time. "START/STOP" Button: The "START/STOP" button is used to start, pause, or cancel a program. A short alert is heard with each press of the "START/STOP" button. Press this button when the Breadmaker is idle to start the program. When the breadmaker is active, press the button once to pause the program, or press and hold to cancel the program. If you do cancel the program, the breadmaker will return to its default settings for the chosen menu selection. All customized settings will be lost if the program is cancelled. You must set all desired program settings before starting the program. The program cannot be changed after the cycle has begun, unless you cancel the cycle. "COLOR" Button: "COLOR" cycles to select the crust darkness: LIGHT, MEDIUM, and DARK. The default color is MEDIUM. "TIMER" Buttons: The "+" and "-" buttons are used to set a delayed program end time. The delay hours and minutes will be added to the preprogrammed times for the specific program. The time indicated in the display is the time until the end of the cycle. The maximum time delay is 13 hours per program. Note: When delay start time has been selected, press "START/STOP" button. As time counts down, the ": " will blink to indicate that it is working. Settings (5) Super rapid, (10) Cake, (11) Jam, and (12) Bake cannot be used with a delayed start. DELAY START: The maximum time delay is 13 hours per program. Example: It is 8:30 p.m. and you would like the bread ready for the next morning at 7:00 a.m. Determine the time difference, 7:00 a.m. is 10 hours and 30 minutes ahead of 8:30 p.m. Press the "+" or "-" buttons until 10:30 appears in the display. NEVER use the time delay function when using perishable ingredients such as milk, eggs, fruit, yogurt, etc.! English - 4
-
 1
1 -
 2
2 -
 3
3 -
 4
4 -
 5
5 -
 6
6 -
 7
7 -
 8
8 -
 9
9 -
 10
10 -
11
-
12
-
13
-
14
-
15
-
16
-
17
-
18
-
19
-
20
-
21
-
22
-
23
-
24
-
25
-
26
-
27
-
28
-
29
-
30
-
31
-
32
-
33
-
34
-
35
-
36
-
37
-
38
-
39
-
40
-
41
-
42
-
43
-
44
-
45
-
46
-
47
-
48
-
49
-
50
-
51
-
52
-
53
-
54
-
55
-
56
-
57
-
58
-
59
-
60
-
61
-
62
-
63
-
64
-
65
-
66
-
67
-
68
 |
 |
