WestBend 47410 Instruction Manual - Page 9
Special Note On Flour, Checking The Dough, Special Note On Cinnamon And Garlic, Creating Artisan
 |
View all WestBend 47410 manuals
Add to My Manuals
Save this manual to your list of manuals |
Page 9 highlights
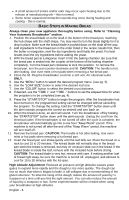
SPECIAL NOTE ON FLOUR: All flours are affected by growing conditions, milling, storage, humidity, etc. While not visibly different, you may need to make some minor adjustments when using different brands of flour as well as compensating for the humidity in your area. Always store bread flour in an airtight container. Store whole grain flours, whole wheat and rye, in a refrigerator to prevent them from becoming rancid. Measure the amount of flour as directed in each recipe, but make any adjustments after the first 3 - 4 minutes of continuous kneading. You may find you get better bread by weighing your flour rather than measuring in measuring cups. Most flours average 1 cup = 135 grams. CHECKING THE DOUGH: Making changes to the dough is easy. This can be done during the knead cycle only. Do not turn off the breadmaker to adjust dough. • Touch the dough. If it feels a little sticky and there is a slight smear of dough under the knead blade, no adjustment is necessary. • If the dough is very sticky, clinging to the sides of the pan, and is more like a batter than a dough, add one tablespoon of flour. Allow the flour to be mixed completely into the dough before making any more adjustments. To prevent heat from escaping, open the lid of the bread maker only to add flour. • If the dough is dry and the bread maker appears to be laboring, add one teaspoon of lukewarm water. Allow water to be completely mixed into the dough before making any additional adjustments and keep lid closed to keep heat in the appliance. Dough is "just right" when it is smooth in appearance, soft to the touch, leaves a slight residue on your finger, and the bottom of the bread pan is clean of dough residue. SPECIAL NOTE ON CINNAMON AND GARLIC: Adding too much cinnamon or garlic can affect the texture and size of the loaf obtained. Cinnamon can break down the structure of the dough, affecting height and texture. Too much garlic can inhibit the yeast activity. Use only the amount of cinnamon and garlic recommended in the recipe. CREATING ARTISAN BREAD CRUSTS: Just before the bread baking cycle begins, open the lid of the bread maker and carefully brush the top surface of the dough with a lightly beaten egg white that has been mixed with 1 teaspoon of water. If desired, slash the top of the dough ¼ to ½ inch deep with a sharp knife into desired design. Leave plain or sprinkle with seeds, herbs, grated parmesan or romano cheeses, or other desired toppings. Press toppings gently into the dough to ensure it adheres and will not fall off. Close the lid and allow bread to bake. For best results, use only the beaten egg white with water to treat the crust before the bake cycle begins. This mixture will ensure that toppings will stick and not fall off when bread is removed from the pan. Do not use vegetable oil cooking sprays to treat crusts, as the cooking sprays can be flammable when exposed to the bread maker's heating unit. Crust can also be treated after bread is done baking. Remove bread from the bread pan and place on a rack. Lightly brush the top of the loaf with melted butter, margarine, olive oil, or vegetable oil and sprinkle desired topping on to the bread's top. GLUTEN FREE BREAD: Always use room-temperature ingredients. Do not use eggs directly from the refrigerator. Instead, place them in a bowl of warm water until they reach room temperature. Gluten free bread dough will have more of a muffin batter texture than a typical bread dough texture. This is normal. You may need to assist mixing of the ingredients in your bread pan with a rubber spatula. If you desire a lighter loaf of gluten free bread, try beer bread or bread made with club soda or ginger ale. English - 9
-
 1
1 -
2
-
3
-
 4
4 -
 5
5 -
 6
6 -
 7
7 -
 8
8 -
 9
9 -
 10
10 -
 11
11 -
 12
12 -
 13
13 -
 14
14 -
15
-
16
-
17
-
18
-
19
-
20
-
21
-
22
-
23
-
24
-
25
-
26
-
27
-
28
-
29
-
30
-
31
-
32
-
33
-
34
-
35
-
36
-
37
-
38
-
39
-
40
-
41
-
42
-
43
-
44
-
45
-
46
-
47
-
48
-
49
-
50
-
51
-
52
-
53
-
54
-
55
-
56
-
57
-
58
-
59
-
60
-
61
-
62
-
63
-
64
-
65
-
66
-
67
-
68
 |
 |
