Yamaha DGX-650 Owner's Manual - Page 42
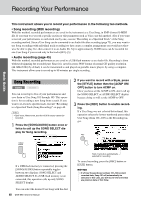
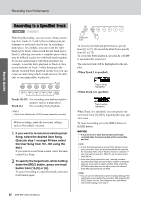
Recording to a Specified Track, Track [A], When Track 1 is specified
 |
View all Yamaha DGX-650 manuals
Add to My Manuals
Save this manual to your list of manuals |
Page 42 highlights
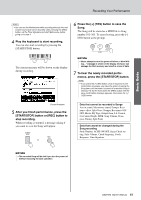
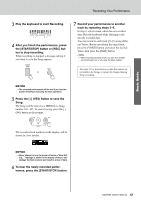
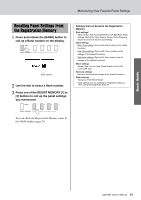
Recording Your Performance Basic Guide Recording to a Specified Track SONG AUDIO With Song Recording, you can create a Song consisting of six tracks (1-5 and A) by recording your performance to each track one by one. In recording a piano piece, for example, you can record the righthand part to Track 1 then record the left-hand part to Track 2, allowing you create a complete piece which may be difficult to play live with both hands together. To record a performance with Style playback, for example, record the Style playback to Track A, then record melodies to Track 1 while listening to the already recorded Style playback. In this way, you can create an entire Song which would otherwise be difficult, or even impossible, to play live. Track Track Track Track Track Style 1 2 3 4 5 Track Tracks [1]-[5] For recording your keyboard perfor- mances, such as a piano piece. Track [A] For recording Style playback. NOTE • Split Voice, Metronome, AUX IN sound cannot be recorded. Before recording, make the necessary settings such as Voice/Style selection. 1 If you want to re-record an existing User Song, select the desired User Song. (Execute step 1 on page 40 then select the User Song from 101-105 using the dial.) If you want to record from scratch, select the unrecorded User Song. 2 To specify the target track, while holding down the [REC] button, press one track button from [1]-[5] or [A]. To cancel recording to a specified track, press that track button again. Press and hold To record your keyboard performance, specify from [1] to [5]. (To record the Dual Voice specify from [1] to [3].) To record the Style playback, specify [A]. (ACMP is automatically turned on.) The selected track will be highlighted in the display. (When Track 1 is specified) Track 1 will be highlighted (When Track A is specified) Track A will be highlighted When Track A is specified, you can specify one more track from [1]-[5] by repeating this step, and vice versa. To cancel recording, press the [REC] button or [EXIT] button. NOTICE • If you record to a track that contains previously recorded data, the previous data will be overwritten and lost. NOTE • If Auto Accompaniment is on and Track [A] has not yet been recorded, Track [A] will automatically be selected for recording when one of Tracks ([1]-[5]) is selected. If you only want to record to Track [1]-[5], be sure to turn Track [A] off. • If the User Song selected in step 1 already contains recorded Style data, the same Style number is automatically set. If you want to select another Style, press the [STYLE] button then use the dial to select the desired Style after specifying the [A] track. NOTE • You can use the Metronome while recording although the metronome sound will not be recorded. After pressing the [REC] button, set the Time Signature and start Metronome before going on to step 3. 42 DGX-650 Owner's Manual
-
 1
1 -
2
-
3
-
4
-
5
-
6
-
7
-
8
-
9
-
10
-
11
-
12
-
13
-
14
-
15
-
16
-
17
-
18
-
19
-
20
-
21
-
22
-
23
-
24
-
25
-
26
-
27
-
28
-
29
-
30
-
31
-
32
-
33
-
34
-
35
-
36
-
 37
37 -
 38
38 -
 39
39 -
 40
40 -
 41
41 -
 42
42 -
 43
43 -
 44
44 -
 45
45 -
 46
46 -
 47
47 -
48
-
49
-
50
-
51
-
52
-
53
-
54
-
55
-
56
-
57
-
58
-
59
-
60
-
61
-
62
-
63
-
64
-
65
-
66
-
67
-
68
-
69
-
70
-
71
-
72
-
73
-
74
-
75
-
76
-
77
-
78
-
79
-
80
-
81
-
82
-
83
-
84
-
85
-
86
 |
 |