Yamaha DGX-650 Owner's Manual - Page 45
Audio Recording, USB TO DEVICE terminal.
 |
View all Yamaha DGX-650 manuals
Add to My Manuals
Save this manual to your list of manuals |
Page 45 highlights
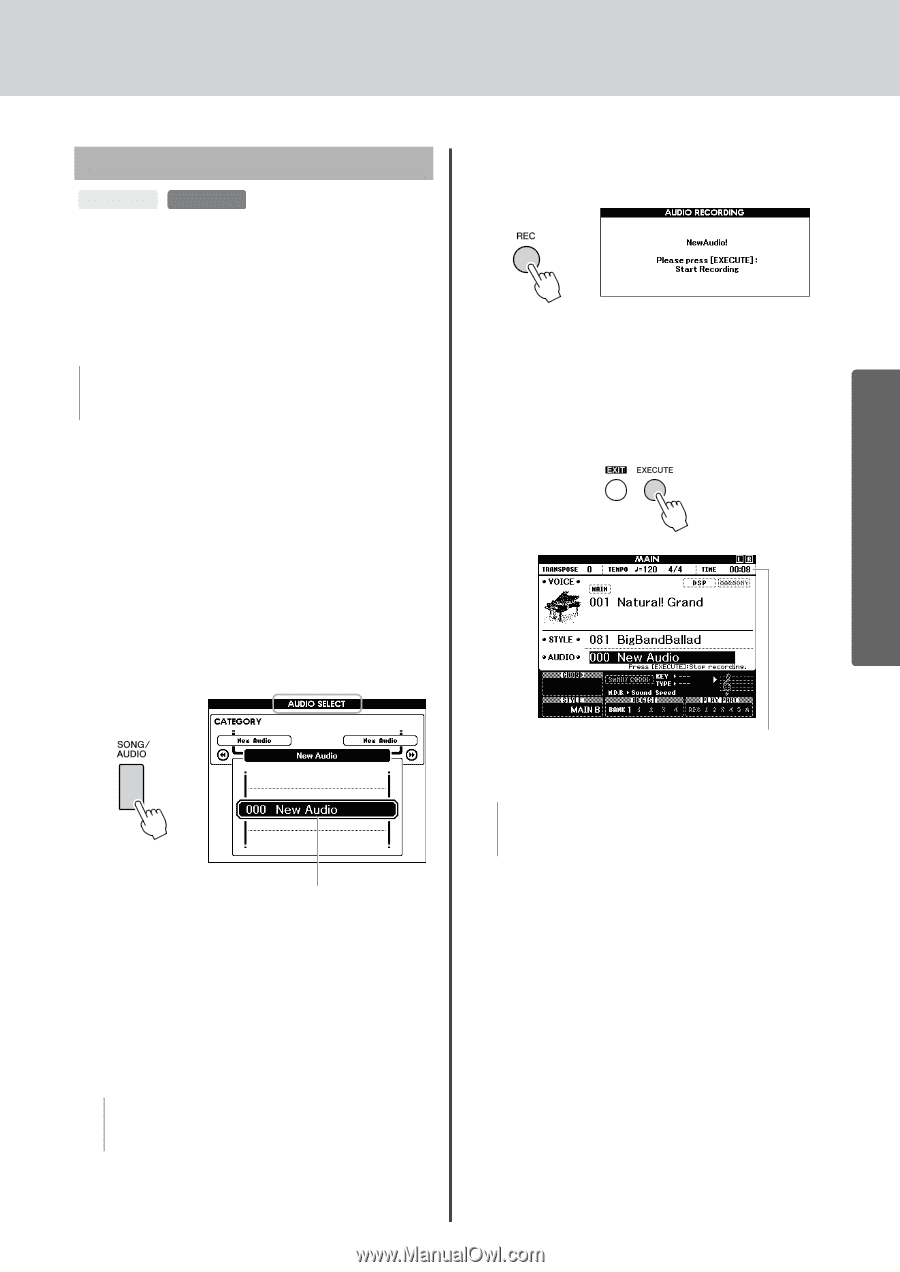
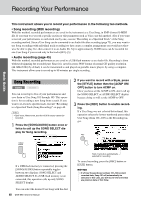
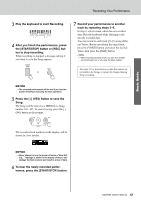
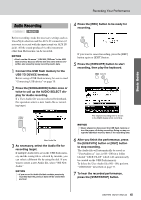
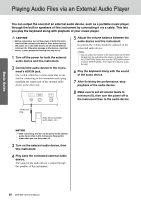
Basic Guide Recording Your Performance Audio Recording SONG AUDIO Before recording, make the necessary settings such as Voice/Style selection and the AUX IN connection (if you want to record with the input sound via AUX IN jack). All the sound produced via this instrument other than Metronome can be recorded. NOTICE • Don't use the file name "_DGX-650_TMP.wav" in the USB flash memory because the file with the name will be overwritten and erased by newly recording Audio data. 1 Connect the USB flash memory to the USB TO DEVICE terminal. Before using a USB flash memory, be sure to read "Connecting USB device" on page 70. 2 Press the [SONG/AUDIO] button once or twice to call up the AUDIO SELECT display for Audio recording. If a User Audio file was not selected beforehand, this operation selects a new Audio file as recording target. 4 Press the [REC] button to be ready for recording. If you want to cancel recording, press the [REC] button again or [EXIT] button. 5 Press the [EXECUTE] button to start recording, then play the keyboard. New Audio file 3 As necessary, select the Audio file for recording target. If multiple Audio files are in the USB flash memory and the wrong file is selected by mistake, you can select a different file by using the dial. If you want to create a new Audio file, select "000 New Audio." NOTICE • If you record to Audio file that contains previously recorded data the previous data will be overwritten and lost. The elapsed recording time is shown in the MAIN display while recording. NOTICE • Never attempt to disconnect the USB flash memory or turn the power off during recording. Doing so may corrupt the USB flash memory data or the recording data. 6 After you finish the performance, press the [EXECUTE] button or [REC] button to stop recording. The Audio file will automatically be saved as "UserAudioxxx" (xxx is 001-100) in a folder labeled "USER FILES" which will automatically be created on the USB flash memory. To delete the User Audio files 001-100, perform "USB Delete" described on page 77. 7 To hear the recorded performance, press the [START/STOP] button. DGX-650 Owner's Manual 45
-
 1
1 -
2
-
3
-
4
-
5
-
6
-
7
-
8
-
9
-
10
-
11
-
12
-
13
-
14
-
15
-
16
-
17
-
18
-
19
-
20
-
21
-
22
-
23
-
24
-
25
-
26
-
27
-
28
-
29
-
30
-
31
-
32
-
33
-
34
-
35
-
36
-
37
-
38
-
39
-
 40
40 -
 41
41 -
 42
42 -
 43
43 -
 44
44 -
 45
45 -
 46
46 -
 47
47 -
 48
48 -
 49
49 -
 50
50 -
51
-
52
-
53
-
54
-
55
-
56
-
57
-
58
-
59
-
60
-
61
-
62
-
63
-
64
-
65
-
66
-
67
-
68
-
69
-
70
-
71
-
72
-
73
-
74
-
75
-
76
-
77
-
78
-
79
-
80
-
81
-
82
-
83
-
84
-
85
-
86
 |
 |