Yamaha DGX-670 DGX-670 Reference Manual - Page 32
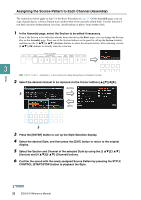
Assigning the Source Pattern to Each Channel, Assembly
 |
View all Yamaha DGX-670 manuals
Add to My Manuals
Save this manual to your list of manuals |
Page 32 highlights
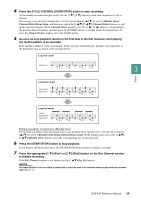
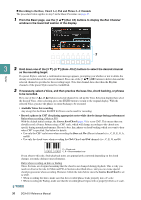
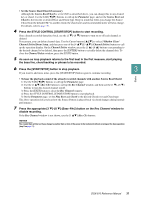
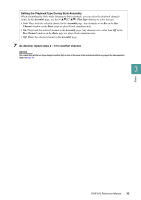
Assigning the Source Pattern to Each Channel (Assembly) The instructions below apply to step 5 of the Basic Procedure on page 27. On the Assembly page, you can copy channel data as a Source Pattern from another Style to the currently edited Style. Use this function if you find a favorite rhythm pattern, bass line, chord backing or phrase from another Style. 1 In the Assembly page, select the Section to be edited if necessary. Even if the Section to be edited has already been selected on the Basic page, you can change the Section also on the Assembly page. Press one of the Section buttons on the panel to call up the Section window, and then use the [5 ]/[6 ] (Section) buttons to select the desired section. After selecting, use the [8 ] (OK) buttons to actually enter the selection. 3 NOTE Fill In A - D, Intro 1 - 4 and Ending 1 - 4 can be selected on the display although they are not available on the panel. Styles 2 Select the desired channel to be replaced via the Cursor buttons [][][E][F]. [ENTER] 2 [EXIT] 5 3 Press the [ENTER] button to call up the Style Selection display. 4 Select the desired Style, and then press the [EXIT] button to return to the original display. 5 Select the Section and Channel of the selected Style by using the [2 ]/[3 ] (Section) and [4 ]/[5 ] (Channel) buttons. 6 Confirm the sound with the newly assigned Source Pattern by pressing the STYLE CONTROL [START/STOP] button to playback the Style. 32 DGX-670 Reference Manual
-
 1
1 -
2
-
3
-
4
-
5
-
6
-
7
-
8
-
9
-
10
-
11
-
12
-
13
-
14
-
15
-
16
-
17
-
18
-
19
-
20
-
21
-
22
-
23
-
24
-
25
-
26
-
 27
27 -
 28
28 -
 29
29 -
 30
30 -
 31
31 -
 32
32 -
 33
33 -
 34
34 -
 35
35 -
 36
36 -
 37
37 -
38
-
39
-
40
-
41
-
42
-
43
-
44
-
45
-
46
-
47
-
48
-
49
-
50
-
51
-
52
-
53
-
54
-
55
-
56
-
57
-
58
-
59
-
60
-
61
-
62
-
63
-
64
-
65
-
66
-
67
-
68
-
69
-
70
-
71
-
72
-
73
-
74
-
75
-
76
-
77
-
78
-
79
-
80
-
81
-
82
-
83
-
84
-
85
-
86
-
87
-
88
-
89
-
90
-
91
-
92
-
93
 |
 |
