Yamaha DGX-670 DGX-670 Reference Manual - Page 85
Making Wireless LAN Settings, Infrastructure Mode
 |
View all Yamaha DGX-670 manuals
Add to My Manuals
Save this manual to your list of manuals |
Page 85 highlights
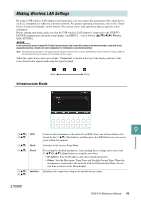
Making Wireless LAN Settings By using a USB wireless LAN adaptor (sold separately), you can connect this instrument with a smart device such as a smartphone or tablet via a wireless network. For general operating instructions, refer to the "Smart Device Connection Manual" on the website. This section covers only operations that are specific to this instrument. Before starting operations, make sure that the USB wireless LAN adaptor is connected to the [USB TO DEVICE] terminal and call up the setup display via [MENU] → Cursor buttons [][][E][F] Wireless LAN, [ENTER]. NOTICE Do not connect this product to public Wi-Fi and/or Internet directly. Only connect this product to the Internet through a router with strong password-protections. Consult your router manufacturer for information on security best practices. NOTE If the USB wireless LAN adaptor is not recognized by the instrument, Wireless LAN is not shown. When Wireless LAN is not shown even though a USB wireless LAN adaptor has been connected, turn the instrument off then on again. When the connection is done successfully, "Connected" is shown at the top of the display, and one of the icons shown below appears indicating the signal strength. Weak Infrastructure Mode Strong 9 [1 ]/ WPS [2 ] Connects this instrument to the network via WPS. Press one of these buttons followed by the [7 ] (Yes) buttons, and then press the WPS button on your access point within two minutes. Connections [3 ] Mode Switches to the Access Point Mode. [4 ] Detail For setting the detailed parameters. After making these settings, press one of the [7 ]/[8 ] (Save) buttons to actually save them. • IP Address: Sets the IP address and other related parameters. • Others: Sets the Host name, Time Zone and Daylight Saving Time. When the instrument is connected to the network with the Infrastructure Mode, the current time is shown on the Main display. [5 ]/ Initialize Initializes the connection setup to the default factory status. [6 ] DGX-670 Reference Manual 85
-
 1
1 -
2
-
3
-
4
-
5
-
6
-
7
-
8
-
9
-
10
-
11
-
12
-
13
-
14
-
15
-
16
-
17
-
18
-
19
-
20
-
21
-
22
-
23
-
24
-
25
-
26
-
27
-
28
-
29
-
30
-
31
-
32
-
33
-
34
-
35
-
36
-
37
-
38
-
39
-
40
-
41
-
42
-
43
-
44
-
45
-
46
-
47
-
48
-
49
-
50
-
51
-
52
-
53
-
54
-
55
-
56
-
57
-
58
-
59
-
60
-
61
-
62
-
63
-
64
-
65
-
66
-
67
-
68
-
69
-
70
-
71
-
72
-
73
-
74
-
75
-
76
-
77
-
78
-
79
-
 80
80 -
 81
81 -
 82
82 -
 83
83 -
 84
84 -
 85
85 -
 86
86 -
 87
87 -
 88
88 -
 89
89 -
 90
90 -
91
-
92
-
93
 |
 |
