Yamaha RX-V2065 Owner's Manual - Page 12
Simplified remote control
 |
UPC - 027108933948
View all Yamaha RX-V2065 manuals
Add to My Manuals
Save this manual to your list of manuals |
Page 12 highlights
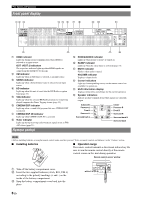
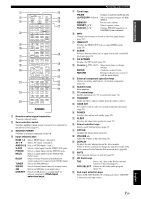
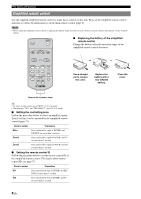
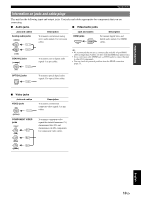
Part names and functions Simplified remote control Use the supplied simplified remote control to make basic controls of this unit. Keys on the simplified remote control function as well as the identical keys on the main remote control (page 6). Note • Before using the simplified remote control or replacing the battery, make sure that you read "Notes on remote controls and batteries" in the "Caution" section. SLEEP POWER BD DVD SCENE TV CD RADIO ■ Replacing the battery of the simplified remote control Change the battery when the operation range of the simplified remote control decreases. INPUT ON SCREEN OPTION VOLUME ENTER RETURN TAG DISPLAY PRG SELECT MUTE PRESET Use a straight pin to remove the cover. Replace the battery with a new CR2025 battery. Close the cover. Remove the insulation sheet y • To select an input source, press INPUT l / h repeatedly. • The printings "TAG" and "PRG SELECT" are for U.S.A. model. ■ Setting the controlling zone Follow the procedure below to select an amplifier (main, Zone2 or Zone3) to be operated by the simplified remote control (page 71). Zone to select Main Zone2 Zone3 Procedure Press and hold h (right of ENTER) and BD/DVD for more than 3 seconds. Press and hold h (right of ENTER) and TV for more than 3 seconds. Press and hold h (right of ENTER) and CD for more than 3 seconds. ■ Setting the remote control ID Follow the procedure below to set the remote control ID of the simplified remote control. For details about remote control ID, see page 74. Zone to select ID1 ID2 Procedure Press and hold l (left of ENTER) and BD/ DVD for more than 3 seconds. Press and hold l (left of ENTER) and TV for more than 3 seconds. 8 En
-
 1
1 -
2
-
3
-
4
-
5
-
6
-
 7
7 -
 8
8 -
 9
9 -
 10
10 -
 11
11 -
 12
12 -
 13
13 -
 14
14 -
 15
15 -
 16
16 -
 17
17 -
18
-
19
-
20
-
21
-
22
-
23
-
24
-
25
-
26
-
27
-
28
-
29
-
30
-
31
-
32
-
33
-
34
-
35
-
36
-
37
-
38
-
39
-
40
-
41
-
42
-
43
-
44
-
45
-
46
-
47
-
48
-
49
-
50
-
51
-
52
-
53
-
54
-
55
-
56
-
57
-
58
-
59
-
60
-
61
-
62
-
63
-
64
-
65
-
66
-
67
-
68
-
69
-
70
-
71
-
72
-
73
-
74
-
75
-
76
-
77
-
78
-
79
-
80
-
81
-
82
-
83
-
84
-
85
-
86
-
87
-
88
-
89
-
90
-
91
-
92
-
93
-
94
-
95
-
96
-
97
-
98
-
99
-
100
-
101
-
102
-
103
-
104
-
105
-
106
-
107
-
108
-
109
-
110
-
111
-
112
-
113
-
114
 |
 |
