Yamaha RX-V2065 Owner's Manual - Page 26
Zone2+Zone3, Presence or None. - back surround sound problems
 |
UPC - 027108933948
View all Yamaha RX-V2065 manuals
Add to My Manuals
Save this manual to your list of manuals |
Page 26 highlights
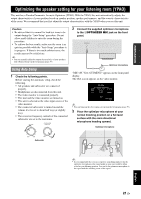
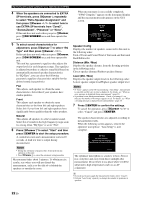
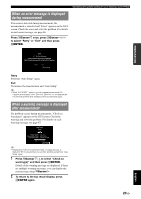
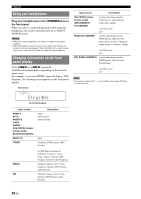
Optimizing the speaker setting for your listening room (YPAO) 4 When the speakers are connected to EXTRA SP terminals, press jCursor k repeatedly to select "Extra Speaker Assignment" and then press jCursor l / h to select how to use EXTRA SP terminals from "Zone2", "Zone2+Zone3", "Presence" or "None". If this unit does not work when you press jCursor, press iON SCREEN once and then operate this unit. 5 To select sound characteristics for adjustment, press jCursor n to select "EQ Type" and then press jCursor l / h. If this unit does not work when you press jCursor, press iON SCREEN once and then operate this unit. This unit has a parametric equalizer that adjusts the output levels for each frequency range. The equalizer is adjusted to produce a cohesive sound field based on automatically measured speaker characteristics. In "EQ Type", you can select the following parametric equalizer characteristics suitable for the desired sound characteristics. Flat This adjusts each speaker to obtain the same characteristics. Select this if your speakers have similar qualities. Front This adjusts each speaker to obtain the same characteristics as the front left and right speakers. Select this if your front left and right speakers have significantly better qualities than the other speakers. Natural This adjusts all speakers to achieve natural sound. Select this if sounds in the high frequency range seem too strong when "EQ Type" is set to "Flat". 6 Press jCursor n to select "Start" and then press jENTER to start the setup procedure. A countdown starts and a measurement starts in 10 seconds. A loud test tone is output during measurement. Notes • During the automatic setup procedure, do not perform any operation on this unit. • Press jCursor k to cancel the automatic setup procedure. Measurement takes about 3 minutes. To obtain precise results, stay where you will not disturb the measurement, such as to the side of or behind the speakers or outside the room. When measurement is successfully completed, "YPAO Complete" appears on the front panel display and the measurement result appears on the GUI screen. Auto Setup Result Speaker Config : 3 /4 / 0.1 Distance (Min / Max) : 8.0ft / 8.5ft Level (Min / Max) : -3.5dB / +4.5dB Set Cancel Finish Select items Speaker Config Displays the number of speakers connected to this unit in the following order: Total of Front and Center/Total of Surround and Surround Back/Subwoofer Distance (Min / Max) Displays the speaker distance from the listening position in the following order: Closest speaker distance/Farthest speaker distance Level (Min / Max) Displays the speaker output levels in the following order: Lowest speaker output level/Highest speaker output level Notes • If "Error" appears on the GUI screen during "Auto Setup", measurement is canceled and the type of error is displayed. For details, see "When an error message is displayed during measurement" (page 23). • If problems occur during measurement, "Check xx warning(s)" (xx indicates the number of warnings) appears in red. For details, see "When a warning message is displayed after measurement" (page 23). 7 Press jENTER to confirm the settings. To cancel the operation, press jCursor l / h to select "Cancel" and press jENTER. The speaker characteristics are adjusted according to measurement results. When the following screen appears, remove the optimizer microphone. "Auto Setup" is now complete. Auto Setup Auto Setup Completed ! Please disconnect the micorphone (Then this screen will automatically disappear) Return The optimizer microphone is sensitive to heat. Store it in a cool place and away from direct sunlight after measurement. Do not leave it in a place where it will be subjected to high temperatures such on an AV component. y • If you do not want to apply the measurement results, select "Cancel". • Perform "Auto Setup" again if you change the number or positions of speakers. 22 En
-
 1
1 -
2
-
3
-
4
-
5
-
6
-
7
-
8
-
9
-
10
-
11
-
12
-
13
-
14
-
15
-
16
-
17
-
18
-
19
-
20
-
 21
21 -
 22
22 -
 23
23 -
 24
24 -
 25
25 -
 26
26 -
 27
27 -
 28
28 -
 29
29 -
 30
30 -
 31
31 -
32
-
33
-
34
-
35
-
36
-
37
-
38
-
39
-
40
-
41
-
42
-
43
-
44
-
45
-
46
-
47
-
48
-
49
-
50
-
51
-
52
-
53
-
54
-
55
-
56
-
57
-
58
-
59
-
60
-
61
-
62
-
63
-
64
-
65
-
66
-
67
-
68
-
69
-
70
-
71
-
72
-
73
-
74
-
75
-
76
-
77
-
78
-
79
-
80
-
81
-
82
-
83
-
84
-
85
-
86
-
87
-
88
-
89
-
90
-
91
-
92
-
93
-
94
-
95
-
96
-
97
-
98
-
99
-
100
-
101
-
102
-
103
-
104
-
105
-
106
-
107
-
108
-
109
-
110
-
111
-
112
-
113
-
114
 |
 |
