Yamaha RX-V2065 Owner's Manual - Page 13
Quick start guide - receivers
 |
UPC - 027108933948
View all Yamaha RX-V2065 manuals
Add to My Manuals
Save this manual to your list of manuals |
Page 13 highlights
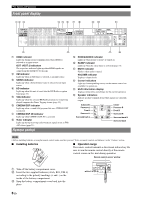
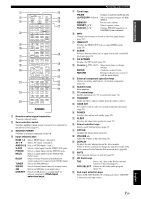
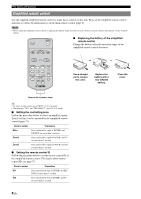
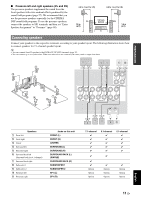
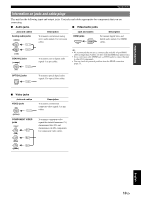
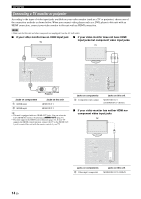
INTRODUCTION PREPARATION BASIC OPERATION Quick start guide When you use this product for the first time, perform setup following the steps below. See the related pages for details on operations and settings. Step 1: Prepare items for setup Step 2: Set up your speakers Prepare speakers, DVD player, cables, and other items necessary for setup. For example, prepare the following items for setting up a 7.1-channel sound system. Front right speaker Video monitor Subwoofer Front left speaker Surround right speaker Place your speakers in the room and connect them to this unit. • Placing speakers • Connecting speakers ☞P. 10 ☞P. 11 y • This unit has a YPAO (Yamaha Parametric Room Acoustic Optimizer) that automatically optimizes this unit based on room acoustic characteristics (audio characteristics of the speakers, speaker positions, and room acoustics, etc.). You can enjoy good balanced sound without special knowledge by using the YPAO technology (☞P. 21). Step 3: Connect your components Center speaker Components (such as DVD player) Surround Back right speaker Surround Back left speaker Surround left speaker Requirements qty. Speakers Front speaker 2 Center speaker 1 Surround speaker 2 Surround back 2 speaker Active subwoofer 1 Speaker cable 7 Subwoofer cable 1 Reproduction component such as DVD player 1 Video monitor such as TV 1 Video cable or HDMI cable 2 Audio cable 2 y • The priority of the requirement of other speakers is as follows: 1 Two surround speakers 2 One center speaker 3 One (or two) surround back speaker(s) • Video and audio cables are unnecessary if you use HDMI cables. Connect your TV, DVD player, or other components. • Connecting a TV monitor or projector ☞P. 14 • Connecting other components ☞P. 16 • Connecting a multi-format player or an external decoder ☞P. 18 • Connecting an external amplifier ☞P. 18 • Connecting a USB storage device ☞P. 19 • Connecting a Yamaha iPod universal dock or Bluetooth wireless audio receiver ☞P. 18 • Connecting to the network ☞P. 19 • Connecting the FM and AM antennas ☞P. 20 • Connecting an XM Mini-Tuner Home Dock ☞P. 35 • Connecting a SiriusConnect tuner ☞P. 39 Step 4: Turn on the power Connect the power cable and turn on this unit. • Connecting the power cable • Turning this unit on and off ☞P. 20 ☞P. 20 Step 5: Select the input source and start playback Select the component connected in step 3 as an input source and start playback. • Basic procedure • Selecting sound field programs ☞P. 24 ☞P. 27 y • This unit supports the SCENE function (page 24) that changes the input source and sound field program at one time. Four scenes are preset for different purposes for Blu-ray disc, DVD and CD, and you can select from a scene from those just by pressing a remote control key. ADVANCED OPERATION ADDITIONAL INFORMATION APPENDIX English 9 En
-
 1
1 -
2
-
3
-
4
-
5
-
6
-
7
-
 8
8 -
 9
9 -
 10
10 -
 11
11 -
 12
12 -
 13
13 -
 14
14 -
 15
15 -
 16
16 -
 17
17 -
 18
18 -
19
-
20
-
21
-
22
-
23
-
24
-
25
-
26
-
27
-
28
-
29
-
30
-
31
-
32
-
33
-
34
-
35
-
36
-
37
-
38
-
39
-
40
-
41
-
42
-
43
-
44
-
45
-
46
-
47
-
48
-
49
-
50
-
51
-
52
-
53
-
54
-
55
-
56
-
57
-
58
-
59
-
60
-
61
-
62
-
63
-
64
-
65
-
66
-
67
-
68
-
69
-
70
-
71
-
72
-
73
-
74
-
75
-
76
-
77
-
78
-
79
-
80
-
81
-
82
-
83
-
84
-
85
-
86
-
87
-
88
-
89
-
90
-
91
-
92
-
93
-
94
-
95
-
96
-
97
-
98
-
99
-
100
-
101
-
102
-
103
-
104
-
105
-
106
-
107
-
108
-
109
-
110
-
111
-
112
-
113
-
114
 |
 |