ZyXEL P-871H User Guide - Page 21
Rear Panel
 |
View all ZyXEL P-871H manuals
Add to My Manuals
Save this manual to your list of manuals |
Page 21 highlights
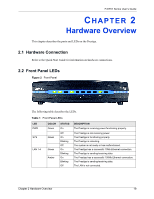
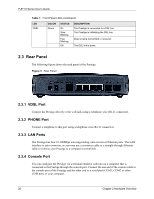
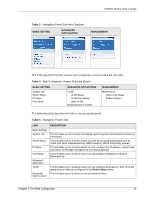
P-871H Series User's Guide Table 1 Front Panel LEDs (continued) LED VDSL COLOR Green STATUS On Slow Blinking Fast Blinking Off DESCRIPTION The Prestige is connected to a DSL line. The Prestige is initializing the DSL line. Data is being transmitted or received. The DSL link is down. 2.3 Rear Panel The following figure shows the read panel of the Prestige. Figure 3 Rear Panel 2.3.1 VDSL Port Connect the Prestige directly to the wall jack using a telephone wire (RJ-11 connector). 2.3.2 PHONE Port Connect a telephone to this port using a telephone wire (RJ-11 connector). 2.3.3 LAN Ports The Prestige has four 10/100Mbps auto-negotiating, auto-crossover Ethernet ports. The LAN interface is auto-crossover, so you may use a crossover cable or a straight-through Ethernet cable to connect your Prestige to a computer/external hub. 2.3.4 Console Port You can configure the Prestige via a terminal emulator software on a computer that is connected to the Prestige through the console port. Connect the one end of the console cable to the console port of the Prestige and the other end to a serial port (COM1, COM2 or other COM port) of your computer. 20 Chapter 2 Hardware Overview
-
 1
1 -
2
-
3
-
4
-
5
-
6
-
7
-
8
-
9
-
10
-
11
-
12
-
13
-
14
-
15
-
 16
16 -
 17
17 -
 18
18 -
 19
19 -
 20
20 -
 21
21 -
 22
22 -
 23
23 -
 24
24 -
 25
25 -
 26
26 -
27
-
28
-
29
-
30
-
31
-
32
-
33
-
34
-
35
-
36
-
37
-
38
-
39
-
40
-
41
-
42
-
43
-
44
-
45
-
46
-
47
-
48
-
49
-
50
-
51
-
52
-
53
-
54
-
55
-
56
-
57
-
58
-
59
-
60
-
61
-
62
-
63
-
64
-
65
-
66
-
67
-
68
-
69
-
70
-
71
-
72
-
73
-
74
-
75
-
76
-
77
-
78
-
79
-
80
-
81
-
82
-
83
-
84
-
85
-
86
-
87
-
88
-
89
-
90
-
91
-
92
-
93
-
94
-
95
-
96
-
97
-
98
-
99
-
100
-
101
 |
 |
