Acer R5250-Q2000 Configuration Guide - Page 129
At Installation Setting, select the Software.
 |
UPC - 750519188644
View all Acer R5250-Q2000 manuals
Add to My Manuals
Save this manual to your list of manuals |
Page 129 highlights
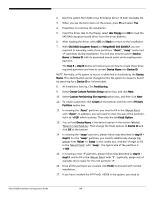
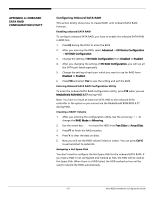
required partitions and how to convert Device Name into Device ID. NOTE: Normally, a file system to mount is identified in /etc/fstab by the Device Name. This identification can be changed so the file system to mount is found by searching for a Device ID or Volume label. 8. At Installation Setting, Click Partitioning . 9. Select Create Custom Partition Setup option box, and click Next 10. Select Custom Partitioning (for experts) option box, and then click Next 11. To create a partition, click Create at the bottom and then select Primary Partition option box. 12. In creating the "/boot" partition, you need to fill in the 'Mount Point' with "/boot". In addition, you will need to enter the size of the partition. Set it to '+1GB' which is plenty. Then click the tab Fstab Option. 13. You will see Device Name is the default option in the section labeled 'Mount in /etc/fstab by'. Then change the Fstab options to Device ID and click OK at the bottom. 14. In creating the "swap" partition, please follow step described in step11 - step13. For the "swap" partition, you need to change File system from 'Reiser' to 'Swap' in the combo box. And don't forget to fill in the 'Mount Point' with "swap". The typical size of the partition is '+1GB'. 15. In creating a root "/" partition, please follow step described in step11 - step13 and to fill in the 'Mount Point' with "/". Typitically, assign rest of available driver space for the root partition "/". 16. Once all the partitions are created, click Finish to proceed with normal installation. 17. If you have installed the ATI FireGL V5200 in the system, you need to install addition packages during the OS installation. If you are using onboard XGI Z9s, please go to step 13 directly. 18. At Installation Setting, select the Software. 19. Check C/C++ Compiler and Tools under Development to add C/C++ compiler tools. 20. Click on Details, change the Filter from Patterns to Package Groups. 21. Select the Source under Development in left window and check kernelsource in the right window to add the kernel source. 22. Click on Accept and continue the installation. 23. Follow the instruction to complete the installation. 24. If you have installed the ATI FireGL V5200 in the system, the system CANNOT boot into X-window after OS installation completed. You need 113 Altos R5250 Installation Configuration Guide
-
 1
1 -
2
-
3
-
4
-
5
-
6
-
7
-
8
-
9
-
10
-
11
-
12
-
13
-
14
-
15
-
16
-
17
-
18
-
19
-
20
-
21
-
22
-
23
-
24
-
25
-
26
-
27
-
28
-
29
-
30
-
31
-
32
-
33
-
34
-
35
-
36
-
37
-
38
-
39
-
40
-
41
-
42
-
43
-
44
-
45
-
46
-
47
-
48
-
49
-
50
-
51
-
52
-
53
-
54
-
55
-
56
-
57
-
58
-
59
-
60
-
61
-
62
-
63
-
64
-
65
-
66
-
67
-
68
-
69
-
70
-
71
-
72
-
73
-
74
-
75
-
76
-
77
-
78
-
79
-
80
-
81
-
82
-
83
-
84
-
85
-
86
-
87
-
88
-
89
-
90
-
91
-
92
-
93
-
94
-
95
-
96
-
97
-
98
-
99
-
100
-
101
-
102
-
103
-
104
-
105
-
106
-
107
-
108
-
109
-
110
-
111
-
112
-
113
-
114
-
115
-
116
-
117
-
118
-
119
-
120
-
121
-
122
-
123
-
 124
124 -
 125
125 -
 126
126 -
 127
127 -
 128
128 -
 129
129 -
 130
130 -
 131
131 -
 132
132 -
 133
133 -
 134
134 -
135
-
136
-
137
-
138
 |
 |
