Brother International HL 4040CN Network Users Manual - English - Page 120
WLAN menu options (HL-4070CDW only), Ethernet, Set to Default, Wired Enable, TCP/IP, Setup WLAN - duplex
 |
UPC - 012502617785
View all Brother International HL 4040CN manuals
Add to My Manuals
Save this manual to your list of manuals |
Page 120 highlights
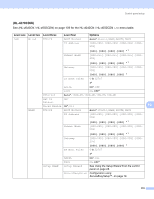
Control panel setup „ IPv6 This printer is compatible with IPv6, the next generation internet protocol. If you want to use the IPv6 protocol, visit http://solutions.brother.com for more information. Ethernet 10 Ethernet link mode. Auto allows the print server to operate in 100BASE-TX full or half duplex, or in 10BASE-T full or half duplex mode by auto negotiation. 100BASE-TX Full Duplex (100B-FD) or Half Duplex (100B-HD) and 10BASE-T Full Duplex (10B-FD) or Half Duplex (10B-HD) fix the print server link mode. This change is valid after the print server has been reset. The default setting is Auto. Note If you incorrectly set this value, you may not be able to communicate with your print server. Set to Default 10 You can restore the Wired menu settings to factory default. Wired Enable 10 You can enable and disable the wired network connection by selecting On or Off. WLAN menu options (HL-4070CDW only) See Wired menu options on page 111 for detailed information of the Wired menu option. 10 10 TCP/IP 10 See TCP/IP on page 111 for more information. Setup WLAN 10 „ Setup Wizard The Setup Wizard guides you through the wireless network configuration. For more information, see Using the Setup Wizard from the control panel on page 28. „ SecureEasySetup The SecureEasySetup™ software allows you to configure the wireless network easier than configuring it manually. By pushing a button on the wireless router or access point, you can complete setup and secure the wireless network. Your router or access point must also support SecureEasySetup™. See Using the SecureEasySetup™ software to configure your printer for a wireless network on page 23. 113
-
 1
1 -
2
-
3
-
4
-
5
-
6
-
7
-
8
-
9
-
10
-
11
-
12
-
13
-
14
-
15
-
16
-
17
-
18
-
19
-
20
-
21
-
22
-
23
-
24
-
25
-
26
-
27
-
28
-
29
-
30
-
31
-
32
-
33
-
34
-
35
-
36
-
37
-
38
-
39
-
40
-
41
-
42
-
43
-
44
-
45
-
46
-
47
-
48
-
49
-
50
-
51
-
52
-
53
-
54
-
55
-
56
-
57
-
58
-
59
-
60
-
61
-
62
-
63
-
64
-
65
-
66
-
67
-
68
-
69
-
70
-
71
-
72
-
73
-
74
-
75
-
76
-
77
-
78
-
79
-
80
-
81
-
82
-
83
-
84
-
85
-
86
-
87
-
88
-
89
-
90
-
91
-
92
-
93
-
94
-
95
-
96
-
97
-
98
-
99
-
100
-
101
-
102
-
103
-
104
-
105
-
106
-
107
-
108
-
109
-
110
-
111
-
112
-
113
-
114
-
 115
115 -
 116
116 -
 117
117 -
 118
118 -
 119
119 -
 120
120 -
 121
121 -
 122
122 -
 123
123 -
 124
124 -
 125
125 -
126
-
127
-
128
-
129
-
130
-
131
-
132
-
133
-
134
-
135
-
136
-
137
-
138
-
139
-
140
-
141
-
142
-
143
-
144
-
145
-
146
-
147
-
148
-
149
-
150
-
151
-
152
-
153
-
154
-
155
-
156
-
157
-
158
-
159
-
160
-
161
-
162
-
163
-
164
-
165
-
166
-
167
-
168
-
169
-
170
-
171
-
172
-
173
-
174
-
175
-
176
-
177
 |
 |
