Brother International HL 4040CN Network Users Manual - English - Page 61
Configuration in Ad-hoc mode, Before configuring the wireless settings
 |
UPC - 012502617785
View all Brother International HL 4040CN manuals
Add to My Manuals
Save this manual to your list of manuals |
Page 61 highlights
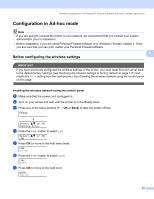
Wireless configuration for Windows® using the Brother automatic installer application Configuration in Ad-hoc mode 4 Note • If you are going to connect the printer to your network, we recommend that you contact your system administrator prior to installation. • Before installation, if you are using Personal Firewall software (e.g. Windows Firewall), disable it. Once you are sure that you can print, restart your Personal Firewall software. 4 Before configuring the wireless settings 4 IMPORTANT If you have previously configured the wireless settings of the printer, you must reset the print server back to the default factory settings (see Restoring the network settings to factory default on page 117) and enable the WLAN setting from the control panel. See Enabling the wireless network using the control panel on this page. Enabling the wireless network using the control panel 4 a Make sure that the power cord is plugged in. b Turn on your printer and wait until the printer is in the Ready state. c Press any of the Menu buttons (+, -, OK or Back) to take the printer off-line. Ready h Select ab or OK Machine Info. d Press the + or - button to select LAN. Select ab or OK LAN e Press OK to move to the next menu level. LAN Wired f Press the + or - button to select WLAN. LAN WLAN g Press OK to move to the next level. WLAN TCP/IP 54
-
 1
1 -
2
-
3
-
4
-
5
-
6
-
7
-
8
-
9
-
10
-
11
-
12
-
13
-
14
-
15
-
16
-
17
-
18
-
19
-
20
-
21
-
22
-
23
-
24
-
25
-
26
-
27
-
28
-
29
-
30
-
31
-
32
-
33
-
34
-
35
-
36
-
37
-
38
-
39
-
40
-
41
-
42
-
43
-
44
-
45
-
46
-
47
-
48
-
49
-
50
-
51
-
52
-
53
-
54
-
55
-
 56
56 -
 57
57 -
 58
58 -
 59
59 -
 60
60 -
 61
61 -
 62
62 -
 63
63 -
 64
64 -
 65
65 -
 66
66 -
67
-
68
-
69
-
70
-
71
-
72
-
73
-
74
-
75
-
76
-
77
-
78
-
79
-
80
-
81
-
82
-
83
-
84
-
85
-
86
-
87
-
88
-
89
-
90
-
91
-
92
-
93
-
94
-
95
-
96
-
97
-
98
-
99
-
100
-
101
-
102
-
103
-
104
-
105
-
106
-
107
-
108
-
109
-
110
-
111
-
112
-
113
-
114
-
115
-
116
-
117
-
118
-
119
-
120
-
121
-
122
-
123
-
124
-
125
-
126
-
127
-
128
-
129
-
130
-
131
-
132
-
133
-
134
-
135
-
136
-
137
-
138
-
139
-
140
-
141
-
142
-
143
-
144
-
145
-
146
-
147
-
148
-
149
-
150
-
151
-
152
-
153
-
154
-
155
-
156
-
157
-
158
-
159
-
160
-
161
-
162
-
163
-
164
-
165
-
166
-
167
-
168
-
169
-
170
-
171
-
172
-
173
-
174
-
175
-
176
-
177
 |
 |
