Brother International PR-1000 Installation Guide for KIT CW PRCW1 - Page 10
Installing The Upgrade Kit Cw
 |
View all Brother International PR-1000 manuals
Add to My Manuals
Save this manual to your list of manuals |
Page 10 highlights
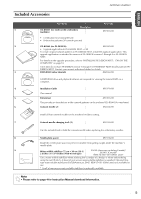
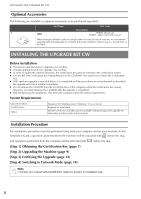
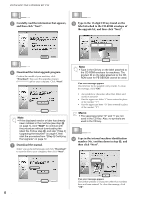
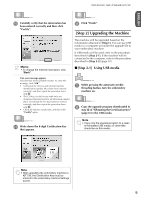
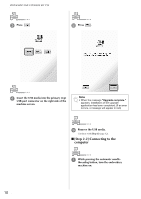
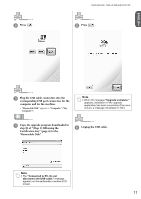
INSTALLING THE UPGRADE KIT CW Optional Accessories The following are available as optional accessories to be purchased separately. Part Name Part Code 1. Table Description PRWT1 (Americas) PRWT1: XE8417-001 (Other area) When arranging multiple copies of a single pattern to make all cuts at one time, we recommend using the table sold separately (or included with some models) in order to ensure a smooth flow of the fabric. INSTALLING THE UPGRADE KIT CW Before Installation z This section describes how to upgrade your machine. z A single upgrade kit will only upgrade one machine. z In order to enable the cutwork functions, the Certification Key must be entered in the certification screen. z Use the KIT CW Certification Key Issuing Wizard on the CD-ROM1 (for machines) to obtain the Certification Key. z If the machine upgrade is canceled before it is completed or if the procedures are not performed as described, the upgrade will not be installed completely. z Do not remove the CD-ROM from the CD-ROM drive of the computer while the Certification Key Issuing Wizard is activated. Remove the CD-ROM after the upgrade is completed. z Before beginning the installation, check that the computer meets the system requirements. System Requirements Operation System CD-ROM drive Others Windows® XP, Windows Vista®, Windows® 7 (32 or 64 bit) Required for installation Internet connection available and one available USB port (required to upgrade the embroidery machine) when using computer Installation Procedure For installation, procedures must be performed using both your computer and on your machine. In this Installation Guide, operations performed from the machine will be indicated with before the step, and operations performed from the computer will be indicated with before the step. [Step 1] Obtaining the Certification Key (page 7) [Step 2] Upgrading the Machine (page 9) [Step 3] Certifying the Upgrade (page 12) [Step 4] Switching to Cutwork Mode (page 14) Note • Contact your nearest authorized Brother dealer for product or installation help. 6
-
 1
1 -
2
-
3
-
4
-
 5
5 -
 6
6 -
 7
7 -
 8
8 -
 9
9 -
 10
10 -
 11
11 -
 12
12 -
 13
13 -
 14
14 -
 15
15 -
16
-
17
-
18
-
19
-
20
-
21
-
22
-
23
-
24
-
25
-
26
-
27
-
28
-
29
-
30
-
31
-
32
-
33
-
34
-
35
-
36
-
37
-
38
-
39
-
40
-
41
-
42
-
43
-
44
-
45
-
46
-
47
-
48
-
49
-
50
-
51
-
52
-
53
-
54
-
55
-
56
-
57
-
58
-
59
-
60
-
61
-
62
-
63
-
64
-
65
-
66
-
67
-
68
-
69
-
70
-
71
-
72
-
73
-
74
-
75
-
76
-
77
-
78
-
79
-
80
-
81
-
82
-
83
-
84
-
85
-
86
-
87
-
88
-
89
-
90
-
91
-
92
-
93
-
94
-
95
-
96
-
97
-
98
-
99
-
100
-
101
-
102
-
103
-
104
-
105
-
106
-
107
-
108
-
109
-
110
-
111
-
112
-
113
-
114
-
115
-
116
-
117
-
118
-
119
-
120
-
121
-
122
-
123
-
124
-
125
-
126
-
127
-
128
-
129
-
130
-
131
-
132
-
133
-
134
-
135
-
136
-
137
-
138
-
139
-
140
-
141
-
142
-
143
-
144
-
145
-
146
-
147
-
148
-
149
-
150
-
151
-
152
-
153
-
154
-
155
-
156
-
157
-
158
-
159
-
160
-
161
-
162
-
163
-
164
-
165
-
166
-
167
-
168
-
169
-
170
-
171
-
172
-
173
-
174
-
175
-
176
-
177
-
178
-
179
-
180
-
181
-
182
-
183
-
184
-
185
-
186
-
187
-
188
-
189
-
190
-
191
-
192
-
193
-
194
-
195
-
196
 |
 |
