Brother International PR-1000 Installation Guide for KIT CW PRCW1 - Page 11
Step 1] Obtaining the, Certification Key
 |
View all Brother International PR-1000 manuals
Add to My Manuals
Save this manual to your list of manuals |
Page 11 highlights
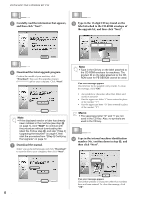
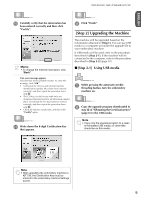
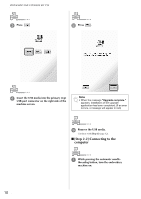
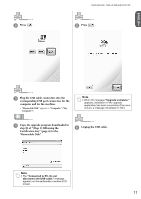
ENGLISH INSTALLING THE UPGRADE KIT CW [Step 1] Obtaining the Certification Key The following procedure describes how to obtain the Certification Key necessary for upgrading. a Make a note of the 10-digit internal machine identification number displayed beside the "No." along with the version number, as shown on page 5 or 6 of the Setting screen depending on your machine model. a b b Insert the CD-ROM1 (for machines) into the computer's CD-ROM drive. Memo • In Windows® 7 or Windows Vista®, when the "AutoPlay" dialog box appears, click "Open folder to view files". c Open the designated drive for your CDROM (usually the "D" drive) on the computer ("Computer" ("My Computer")), double-click to start the "Certification Key Issuing Wizard". → The "Select Language" dialog box automatically appears. a Internal machine identification number (No.) b Version number Note • The internal machine identification number that appears beside "No." is different from the machine serial number (SER. NO.) located on the label attached to the back of the embroidery machine. • Make sure the internal machine identification number (No.) is recorded accurately as these numbers need to be entered within the Certification Key Issuing Wizard in order to obtain the Certification Key. • The number of pages in the Settings screen may differ depending on the version or machine model. d Select the desired language, and then click "OK". → "KIT CW Certification Key Issuing Wizard" appears. Note • Should you fail to access the Web site to download the latest program, an error message appears and the wizard is terminated. In this case, restart the wizard after making a secure internet connection. 7
-
 1
1 -
2
-
3
-
4
-
5
-
 6
6 -
 7
7 -
 8
8 -
 9
9 -
 10
10 -
 11
11 -
 12
12 -
 13
13 -
 14
14 -
 15
15 -
 16
16 -
17
-
18
-
19
-
20
-
21
-
22
-
23
-
24
-
25
-
26
-
27
-
28
-
29
-
30
-
31
-
32
-
33
-
34
-
35
-
36
-
37
-
38
-
39
-
40
-
41
-
42
-
43
-
44
-
45
-
46
-
47
-
48
-
49
-
50
-
51
-
52
-
53
-
54
-
55
-
56
-
57
-
58
-
59
-
60
-
61
-
62
-
63
-
64
-
65
-
66
-
67
-
68
-
69
-
70
-
71
-
72
-
73
-
74
-
75
-
76
-
77
-
78
-
79
-
80
-
81
-
82
-
83
-
84
-
85
-
86
-
87
-
88
-
89
-
90
-
91
-
92
-
93
-
94
-
95
-
96
-
97
-
98
-
99
-
100
-
101
-
102
-
103
-
104
-
105
-
106
-
107
-
108
-
109
-
110
-
111
-
112
-
113
-
114
-
115
-
116
-
117
-
118
-
119
-
120
-
121
-
122
-
123
-
124
-
125
-
126
-
127
-
128
-
129
-
130
-
131
-
132
-
133
-
134
-
135
-
136
-
137
-
138
-
139
-
140
-
141
-
142
-
143
-
144
-
145
-
146
-
147
-
148
-
149
-
150
-
151
-
152
-
153
-
154
-
155
-
156
-
157
-
158
-
159
-
160
-
161
-
162
-
163
-
164
-
165
-
166
-
167
-
168
-
169
-
170
-
171
-
172
-
173
-
174
-
175
-
176
-
177
-
178
-
179
-
180
-
181
-
182
-
183
-
184
-
185
-
186
-
187
-
188
-
189
-
190
-
191
-
192
-
193
-
194
-
195
-
196
 |
 |
