Brother International PR-1000 Installation Guide for KIT CW PRCW1 - Page 21
Recommended time for replacement
 |
View all Brother International PR-1000 manuals
Add to My Manuals
Save this manual to your list of manuals |
Page 21 highlights
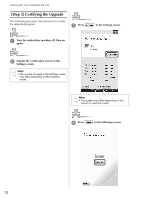
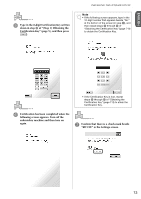
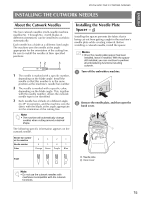
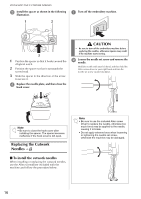
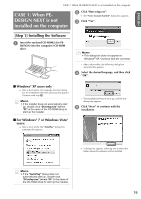
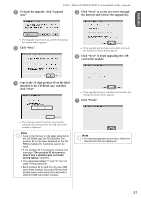
ENGLISH INSTALLING THE CUTWORK NEEDLES c Install the cutwork needle in the cutwork needle-changing tool. Hold the cutwork needle-changing tool with the notch upward. With the needle point down, insert the cutwork needle into the mounting hole. d With the flat side of the needle toward the back of the machine, insert the needle into the needle chamber, pushing the needle upwards until it touches the needle bar stopper. Hint: Pass the needle through the hole in the presser foot first, and then use the cutwork needle-changing tool to lift up the needle. Insert the needle so that the shape of the needle base aligns with the shape of the mounting head in the tool. a Needle bar stopper b Needle c Flat side of needle d Cutwork needle-changing tool Note • Install the cutwork needle with the color and number corresponding to the needle bar on the machine, referring to "About the Cutwork Needles" on page 15. a Mounting hole b Notch c Needle base d Mounting head Note • When inserting the cutwork needle in the cutwork needle-changing tool, the needle should naturally hold in place when it is released, without unnecessary force applied. e While holding the needle in place with your left hand, tighten the needle set screw. Use the Allen screw driver to turn the needle set screw clockwise. CAUTION • Cutwork needles are shorter than traditional embroidery needles, be sure to insert the needle in the needle bar chamber until it reaches the needle bar stopper and securely tighten the needle set screw with the Allen screw driver, otherwise the needle may break or the machine may be damaged. ■ Recommended time for replacement The cutwork needles must be replaced if any of the following occur. z A loud noise is produced when it pierces the fabric. z As compared to immediately after the needle has been replaced, there are prominent uncut areas (the cut edges are rough, etc.). z Nicks can be seen in the blade. Note • When replacing the needles, be sure to use cutwork needles specifically for embroidery machines. To purchase the cutwork needle set, contact your nearest authorized dealer. 17
-
 1
1 -
2
-
3
-
4
-
5
-
6
-
7
-
8
-
9
-
10
-
11
-
12
-
13
-
14
-
15
-
 16
16 -
 17
17 -
 18
18 -
 19
19 -
 20
20 -
 21
21 -
 22
22 -
 23
23 -
 24
24 -
 25
25 -
 26
26 -
27
-
28
-
29
-
30
-
31
-
32
-
33
-
34
-
35
-
36
-
37
-
38
-
39
-
40
-
41
-
42
-
43
-
44
-
45
-
46
-
47
-
48
-
49
-
50
-
51
-
52
-
53
-
54
-
55
-
56
-
57
-
58
-
59
-
60
-
61
-
62
-
63
-
64
-
65
-
66
-
67
-
68
-
69
-
70
-
71
-
72
-
73
-
74
-
75
-
76
-
77
-
78
-
79
-
80
-
81
-
82
-
83
-
84
-
85
-
86
-
87
-
88
-
89
-
90
-
91
-
92
-
93
-
94
-
95
-
96
-
97
-
98
-
99
-
100
-
101
-
102
-
103
-
104
-
105
-
106
-
107
-
108
-
109
-
110
-
111
-
112
-
113
-
114
-
115
-
116
-
117
-
118
-
119
-
120
-
121
-
122
-
123
-
124
-
125
-
126
-
127
-
128
-
129
-
130
-
131
-
132
-
133
-
134
-
135
-
136
-
137
-
138
-
139
-
140
-
141
-
142
-
143
-
144
-
145
-
146
-
147
-
148
-
149
-
150
-
151
-
152
-
153
-
154
-
155
-
156
-
157
-
158
-
159
-
160
-
161
-
162
-
163
-
164
-
165
-
166
-
167
-
168
-
169
-
170
-
171
-
172
-
173
-
174
-
175
-
176
-
177
-
178
-
179
-
180
-
181
-
182
-
183
-
184
-
185
-
186
-
187
-
188
-
189
-
190
-
191
-
192
-
193
-
194
-
195
-
196
 |
 |
