Brother International ULT-2003D Users Manual - English - Page 154
Making Stitch Pattern Adjustments
 |
View all Brother International ULT-2003D manuals
Add to My Manuals
Save this manual to your list of manuals |
Page 154 highlights
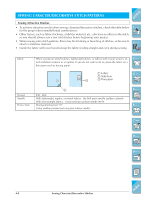
CONTENTS Making Stitch Pattern Adjustments Your stitch pattern may sometimes turn out poorly, depending on the type or thickness of fabric, the stabilizer material used, sewing speed, etc. If your sewing does not turn out well, sew trial stitches using the same conditions as the real sewing, and adjust the stitch pattern as explained below. If the pattern does not turn out well even after making adjustments based on the pattern, make adjustments for each pattern individually. 1. Select a stitch pattern to adjust. 1 Press , then press . 1 - 2 - 3 - 4 - 5 - 2 Select on P.9 of this stitch pattern menu. 6 - 7 - 8 - 9 - ?! 2. Attach monogramming foot "N" and sew the pattern. 5 6 Index Sewing Character/Decorative Stitches 4-11
-
 1
1 -
2
-
3
-
4
-
5
-
6
-
7
-
8
-
9
-
10
-
11
-
12
-
13
-
14
-
15
-
16
-
17
-
18
-
19
-
20
-
21
-
22
-
23
-
24
-
25
-
26
-
27
-
28
-
29
-
30
-
31
-
32
-
33
-
34
-
35
-
36
-
37
-
38
-
39
-
40
-
41
-
42
-
43
-
44
-
45
-
46
-
47
-
48
-
49
-
50
-
51
-
52
-
53
-
54
-
55
-
56
-
57
-
58
-
59
-
60
-
61
-
62
-
63
-
64
-
65
-
66
-
67
-
68
-
69
-
70
-
71
-
72
-
73
-
74
-
75
-
76
-
77
-
78
-
79
-
80
-
81
-
82
-
83
-
84
-
85
-
86
-
87
-
88
-
89
-
90
-
91
-
92
-
93
-
94
-
95
-
96
-
97
-
98
-
99
-
100
-
101
-
102
-
103
-
104
-
105
-
106
-
107
-
108
-
109
-
110
-
111
-
112
-
113
-
114
-
115
-
116
-
117
-
118
-
119
-
120
-
121
-
122
-
123
-
124
-
125
-
126
-
127
-
128
-
129
-
130
-
131
-
132
-
133
-
134
-
135
-
136
-
137
-
138
-
139
-
140
-
141
-
142
-
143
-
144
-
145
-
146
-
147
-
148
-
 149
149 -
 150
150 -
 151
151 -
 152
152 -
 153
153 -
 154
154 -
 155
155 -
 156
156 -
 157
157 -
 158
158 -
 159
159 -
160
-
161
-
162
-
163
-
164
-
165
-
166
-
167
-
168
-
169
-
170
-
171
-
172
-
173
-
174
-
175
-
176
-
177
-
178
-
179
-
180
-
181
-
182
-
183
-
184
-
185
-
186
-
187
-
188
-
189
-
190
-
191
-
192
-
193
-
194
-
195
-
196
-
197
-
198
-
199
-
200
-
201
-
202
-
203
-
204
-
205
-
206
-
207
-
208
-
209
-
210
-
211
-
212
-
213
-
214
-
215
-
216
-
217
-
218
-
219
-
220
-
221
-
222
-
223
-
224
-
225
-
226
-
227
-
228
-
229
-
230
-
231
-
232
-
233
-
234
-
235
-
236
-
237
-
238
-
239
-
240
-
241
-
242
-
243
-
244
-
245
-
246
-
247
-
248
-
249
-
250
-
251
-
252
-
253
-
254
-
255
-
256
-
257
-
258
-
259
-
260
-
261
-
262
-
263
-
264
-
265
-
266
-
267
-
268
-
269
-
270
-
271
-
272
-
273
-
274
-
275
-
276
-
277
-
278
-
279
-
280
-
281
-
282
-
283
-
284
-
285
-
286
-
287
-
288
-
289
-
290
-
291
-
292
-
293
-
294
-
295
-
296
-
297
-
298
-
299
-
300
-
301
-
302
-
303
-
304
-
305
-
306
-
307
-
308
-
309
-
310
-
311
-
312
-
313
-
314
-
315
-
316
-
317
-
318
-
319
-
320
-
321
 |
 |

Sewing Character/Decorative Stitches
4-11
1
—
2
—
3
—
4
—
5
—
6
—
7
—
8
—
?
!
9
—
CONTENTS
Index
Making Stitch Pattern Adjustments
Your stitch pattern may sometimes turn out poorly, depending on the type or thickness of fabric,
the stabilizer material used, sewing speed, etc. If your sewing does not turn out well, sew trial
stitches using the same conditions as the real sewing, and adjust the stitch pattern as explained
below. If the pattern does not turn out well even after making adjustments based on the
pattern, make adjustments for each pattern individually.
1.
Select a stitch pattern to adjust.
1
Press
, then press
.
2
Select
on P.9 of this stitch pattern menu.
6
5
2.
Attach monogramming foot
“
N
”
and sew the pattern.