Brother International ULT-2003D Users Manual - English - Page 17
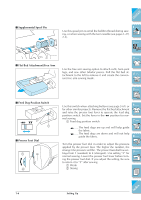
Feed Dog Position Switch, Presser Foot Dial, Supplemental Spool Pin, Flat Bed Attachment/Free Arm - bobbin will not thread
 |
View all Brother International ULT-2003D manuals
Add to My Manuals
Save this manual to your list of manuals |
Page 17 highlights
I Supplemental Spool Pin CONTENTS Use this spool pin to wind the bobbin thread during sewing, or when sewing with the twin needle (see pages 1-29, 2-5). 1 - 2 - I Flat Bed Attachment/Free Arm 3 - Use the free arm sewing option to attach cuffs, hem pant legs, and sew other tubular pieces. Pull the flat bed attachment to the left to remove it and create the convenient free arm sewing mode. 4 - 5 - I Feed Dog Position Switch 1 I Presser Foot Dial 1 3 2 Use this switch when attaching buttons (see page 3-61) or for other similar projects. Remove the flat bed attachment and raise the presser foot lever to operate the feed dog position switch. Set the lever in the position for normal sewing 1 Feed dog position switch 6 - 7 - ..... The feed dogs are up and will help guide the fabric. ..... The feed dogs are down and will not help guide the fabric. 8 - Turn the presser foot dial in order to adjust the pressure applied by the presser foot. The higher the number, the stronger the pressure will be. The presser foot dial has settings from 1 (weakest) to 4 (strongest). Use setting "3" for normal sewing. Lower the presser foot lever before turning the presser foot dial. If you adjust the setting, be sure to return it to "3" after sewing. 1 Weak 2 Strong 9 - ?! 1-6 Setting Up Index
-
 1
1 -
2
-
3
-
4
-
5
-
6
-
7
-
8
-
9
-
10
-
11
-
 12
12 -
 13
13 -
 14
14 -
 15
15 -
 16
16 -
 17
17 -
 18
18 -
 19
19 -
 20
20 -
 21
21 -
 22
22 -
23
-
24
-
25
-
26
-
27
-
28
-
29
-
30
-
31
-
32
-
33
-
34
-
35
-
36
-
37
-
38
-
39
-
40
-
41
-
42
-
43
-
44
-
45
-
46
-
47
-
48
-
49
-
50
-
51
-
52
-
53
-
54
-
55
-
56
-
57
-
58
-
59
-
60
-
61
-
62
-
63
-
64
-
65
-
66
-
67
-
68
-
69
-
70
-
71
-
72
-
73
-
74
-
75
-
76
-
77
-
78
-
79
-
80
-
81
-
82
-
83
-
84
-
85
-
86
-
87
-
88
-
89
-
90
-
91
-
92
-
93
-
94
-
95
-
96
-
97
-
98
-
99
-
100
-
101
-
102
-
103
-
104
-
105
-
106
-
107
-
108
-
109
-
110
-
111
-
112
-
113
-
114
-
115
-
116
-
117
-
118
-
119
-
120
-
121
-
122
-
123
-
124
-
125
-
126
-
127
-
128
-
129
-
130
-
131
-
132
-
133
-
134
-
135
-
136
-
137
-
138
-
139
-
140
-
141
-
142
-
143
-
144
-
145
-
146
-
147
-
148
-
149
-
150
-
151
-
152
-
153
-
154
-
155
-
156
-
157
-
158
-
159
-
160
-
161
-
162
-
163
-
164
-
165
-
166
-
167
-
168
-
169
-
170
-
171
-
172
-
173
-
174
-
175
-
176
-
177
-
178
-
179
-
180
-
181
-
182
-
183
-
184
-
185
-
186
-
187
-
188
-
189
-
190
-
191
-
192
-
193
-
194
-
195
-
196
-
197
-
198
-
199
-
200
-
201
-
202
-
203
-
204
-
205
-
206
-
207
-
208
-
209
-
210
-
211
-
212
-
213
-
214
-
215
-
216
-
217
-
218
-
219
-
220
-
221
-
222
-
223
-
224
-
225
-
226
-
227
-
228
-
229
-
230
-
231
-
232
-
233
-
234
-
235
-
236
-
237
-
238
-
239
-
240
-
241
-
242
-
243
-
244
-
245
-
246
-
247
-
248
-
249
-
250
-
251
-
252
-
253
-
254
-
255
-
256
-
257
-
258
-
259
-
260
-
261
-
262
-
263
-
264
-
265
-
266
-
267
-
268
-
269
-
270
-
271
-
272
-
273
-
274
-
275
-
276
-
277
-
278
-
279
-
280
-
281
-
282
-
283
-
284
-
285
-
286
-
287
-
288
-
289
-
290
-
291
-
292
-
293
-
294
-
295
-
296
-
297
-
298
-
299
-
300
-
301
-
302
-
303
-
304
-
305
-
306
-
307
-
308
-
309
-
310
-
311
-
312
-
313
-
314
-
315
-
316
-
317
-
318
-
319
-
320
-
321
 |
 |
