Brother International MFC-J5910DW Network Users Manual - English - Page 64
Changing the Scan to Network configuration using a web browser - printers
 |
View all Brother International MFC-J5910DW manuals
Add to My Manuals
Save this manual to your list of manuals |
Page 64 highlights
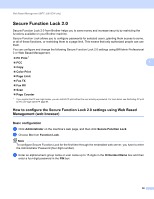
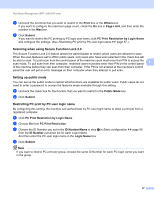
Web Based Management (MFC-J5910DW only) Changing the Scan to Network configuration using a web browser 5 Scan to Network allows you to scan documents directly to a shared folder on a CIFS 1 server located on your local network or the Internet. To enable the CIFS protocol, check the Network tab, click Protocol in the left-hand column, and select the CIFS checkbox. 1 The Common Internet File System (CIFS) is the standard way that computer users share files and printers in Windows®. See the Software User's Guide for more details on Scan to Network. a Click Scan on the machine's web page, and then click Scan to FTP/Network. b Choose Network in the profile numbers (1 to 5) you want to use for Scan to Network settings. 5 You can also store two user defined file names that can be used for creating a Scan to Network Profile in addition to the seven preset file names in Create a User Defined File Name. A maximum of 15 characters can be entered in each of the two fields. c Click Submit. d Click Scan to FTP/Network Profile on Scan page. Click the profile number you want to configure. Now you can configure and change the following Scan to Network settings using a web browser. Profile Name (Up to 15 characters) Host Address Store Directory File Name Quality File Type Use PIN for authentication PIN Code Username Password e After setting, click Submit. 60
-
 1
1 -
2
-
3
-
4
-
5
-
6
-
7
-
8
-
9
-
10
-
11
-
12
-
13
-
14
-
15
-
16
-
17
-
18
-
19
-
20
-
21
-
22
-
23
-
24
-
25
-
26
-
27
-
28
-
29
-
30
-
31
-
32
-
33
-
34
-
35
-
36
-
37
-
38
-
39
-
40
-
41
-
42
-
43
-
44
-
45
-
46
-
47
-
48
-
49
-
50
-
51
-
52
-
53
-
54
-
55
-
56
-
57
-
58
-
 59
59 -
 60
60 -
 61
61 -
 62
62 -
 63
63 -
 64
64 -
 65
65 -
 66
66 -
 67
67 -
 68
68 -
 69
69 -
70
-
71
-
72
-
73
-
74
-
75
-
76
-
77
-
78
-
79
-
80
-
81
-
82
-
83
-
84
-
85
 |
 |