Canon PIXMA MX459 User Manual - Page 100
Use Your Computer to Print a Nozzle Check Pattern
 |
View all Canon PIXMA MX459 manuals
Add to My Manuals
Save this manual to your list of manuals |
Page 100 highlights
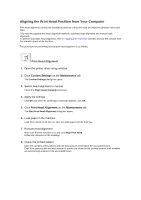
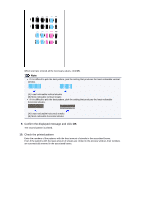
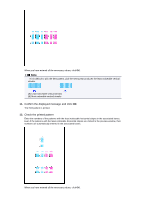
Use Your Computer to Print a Nozzle Check Pattern The nozzle check function allows you to check whether the print head is working properly by printing a nozzle check pattern. Print the pattern if printing becomes faint, or if a specific color fails to print. The procedure for printing a nozzle check pattern is as follows: Nozzle Check 1. Open the printer driver setup window 2. Click Nozzle Check on the Maintenance tab The Nozzle Check dialog box opens. Click Initial Check Items to display the items that you need to check before printing the nozzle check pattern. 3. Load paper in the machine Load one sheet of A4 size or Letter size plain paper into the front tray. 4. Print a nozzle check pattern Make sure that the machine is on and click Print Check Pattern. Printing of the nozzle check pattern begins. Click OK when the confirmation message appears. The Pattern Check dialog box opens. 5. Check the print result Check the print result. When the print result is normal, click Exit. If the print result is smudged or if there are any unprinted sections, click Cleaning to clean the print head. Related Topic Cleaning the Print Heads from Your Computer
-
 1
1 -
2
-
3
-
4
-
5
-
6
-
7
-
8
-
9
-
10
-
11
-
12
-
13
-
14
-
15
-
16
-
17
-
18
-
19
-
20
-
21
-
22
-
23
-
24
-
25
-
26
-
27
-
28
-
29
-
30
-
31
-
32
-
33
-
34
-
35
-
36
-
37
-
38
-
39
-
40
-
41
-
42
-
43
-
44
-
45
-
46
-
47
-
48
-
49
-
50
-
51
-
52
-
53
-
54
-
55
-
56
-
57
-
58
-
59
-
60
-
61
-
62
-
63
-
64
-
65
-
66
-
67
-
68
-
69
-
70
-
71
-
72
-
73
-
74
-
75
-
76
-
77
-
78
-
79
-
80
-
81
-
82
-
83
-
84
-
85
-
86
-
87
-
88
-
89
-
90
-
91
-
92
-
93
-
94
-
 95
95 -
 96
96 -
 97
97 -
 98
98 -
 99
99 -
 100
100 -
 101
101 -
 102
102 -
 103
103 -
 104
104 -
 105
105 -
106
-
107
-
108
-
109
-
110
-
111
-
112
-
113
-
114
-
115
-
116
-
117
-
118
-
119
-
120
-
121
-
122
-
123
-
124
-
125
-
126
-
127
-
128
-
129
-
130
-
131
-
132
-
133
-
134
-
135
-
136
-
137
-
138
-
139
-
140
-
141
-
142
-
143
-
144
-
145
-
146
-
147
-
148
-
149
-
150
-
151
-
152
-
153
-
154
-
155
-
156
-
157
-
158
-
159
-
160
-
161
-
162
-
163
-
164
-
165
-
166
-
167
-
168
-
169
-
170
-
171
-
172
-
173
-
174
-
175
-
176
-
177
-
178
-
179
-
180
-
181
-
182
-
183
-
184
-
185
-
186
-
187
-
188
-
189
-
190
-
191
-
192
-
193
-
194
-
195
-
196
-
197
-
198
-
199
-
200
-
201
-
202
-
203
-
204
-
205
-
206
-
207
-
208
-
209
-
210
-
211
-
212
-
213
-
214
-
215
-
216
-
217
 |
 |