Canon PIXMA MX459 User Manual - Page 148
Encryption Method, Use WEP, Use WPA, Use WPA2, TCP/IP Setup, Transmitted Settings, Set as Default - printer wireless setup
 |
View all Canon PIXMA MX459 manuals
Add to My Manuals
Save this manual to your list of manuals |
Page 148 highlights
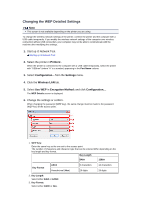
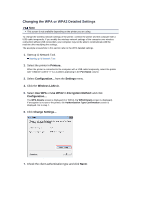
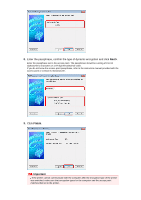
Encryption Method: Select the encryption method used over the wireless LAN. You can change WEP settings with selecting Use WEP and clicking Configuration.... Changing the WEP Detailed Settings You can change WPA or WPA2 settings with selecting Use WPA or Use WPA2 and clicking Configuration.... Changing the WPA or WPA2 Detailed Settings Important If all encryption types of the access point, printer, or computer do not match, the printer cannot communicate with the computer. If the printer cannot communicate with the computer after the encryption type of the printer was switched, make sure that encryption types for the computer and the access point matches that set to the printer. If you connect to a network that is not protected with security measures, there is a risk of disclosing data such as your personal information to a third party. TCP/IP Setup: Sets the IP address of the printer to be used over the LAN. Set a value appropriate for your network environment. 6. Click OK. After changing configuration, a screen is displayed asking you for confirmation before the settings are sent to the printer. If you click Yes, the settings are sent to the printer and the Transmitted Settings screen is displayed. Note Changing the network settings with the USB cable temporarily may switch the default printer. In this case, reset Set as Default Printer.
-
 1
1 -
2
-
3
-
4
-
5
-
6
-
7
-
8
-
9
-
10
-
11
-
12
-
13
-
14
-
15
-
16
-
17
-
18
-
19
-
20
-
21
-
22
-
23
-
24
-
25
-
26
-
27
-
28
-
29
-
30
-
31
-
32
-
33
-
34
-
35
-
36
-
37
-
38
-
39
-
40
-
41
-
42
-
43
-
44
-
45
-
46
-
47
-
48
-
49
-
50
-
51
-
52
-
53
-
54
-
55
-
56
-
57
-
58
-
59
-
60
-
61
-
62
-
63
-
64
-
65
-
66
-
67
-
68
-
69
-
70
-
71
-
72
-
73
-
74
-
75
-
76
-
77
-
78
-
79
-
80
-
81
-
82
-
83
-
84
-
85
-
86
-
87
-
88
-
89
-
90
-
91
-
92
-
93
-
94
-
95
-
96
-
97
-
98
-
99
-
100
-
101
-
102
-
103
-
104
-
105
-
106
-
107
-
108
-
109
-
110
-
111
-
112
-
113
-
114
-
115
-
116
-
117
-
118
-
119
-
120
-
121
-
122
-
123
-
124
-
125
-
126
-
127
-
128
-
129
-
130
-
131
-
132
-
133
-
134
-
135
-
136
-
137
-
138
-
139
-
140
-
141
-
142
-
 143
143 -
 144
144 -
 145
145 -
 146
146 -
 147
147 -
 148
148 -
 149
149 -
 150
150 -
 151
151 -
 152
152 -
 153
153 -
154
-
155
-
156
-
157
-
158
-
159
-
160
-
161
-
162
-
163
-
164
-
165
-
166
-
167
-
168
-
169
-
170
-
171
-
172
-
173
-
174
-
175
-
176
-
177
-
178
-
179
-
180
-
181
-
182
-
183
-
184
-
185
-
186
-
187
-
188
-
189
-
190
-
191
-
192
-
193
-
194
-
195
-
196
-
197
-
198
-
199
-
200
-
201
-
202
-
203
-
204
-
205
-
206
-
207
-
208
-
209
-
210
-
211
-
212
-
213
-
214
-
215
-
216
-
217
 |
 |