Canon PIXMA mini260 Photo Printing Guide - Page 24
Easy-Scroll Wheel, Use the, or the, button to select the layout, and then, press the, button.
 |
View all Canon PIXMA mini260 manuals
Add to My Manuals
Save this manual to your list of manuals |
Page 24 highlights
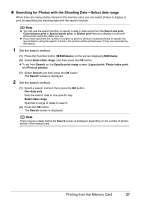
3 Use the Easy-Scroll Wheel or the W or X button to select the layout, and then press the OK button. 4 Select the photo to print. (1) Use the Easy-Scroll Wheel or the W or X button to select the photo you want to print. (2) Press the OK button. The screen to select a frame will be displayed. Note You can do... See "Changing the Display-Change display" on page 26. See "Searching for Photos with the Shooting Date-Select date range" on page 27. See "Printing a Specified Area-Trimming" on page 28. 5 Select a frame. (1) Use the Easy-Scroll Wheel or the W or X button to select a frame. Note Load a single sheet at a time. To print without a frame, press the Function button (f1/No frame) in the frame selection screen. If the photo is upside-down, you can use the S or T button to rotate the frame 180 degrees and adjust the photo up or down for printing. If you want to rotate a photo 90 degrees to match a frame, adjust the size of the trimming area. See "Printing a Specified Area-Trimming" on page 28. (2) Press the OK button. The print confirmation screen is displayed. 6 Start printing. (1) Use the + - buttons to specify the number of copies to print. (2) Press the Print button. Note When printing stickers, be sure to load the media so that it faces in the correct direction. See "Loading Printing Paper" on page 11. 22 Printing from the Memory Card
-
 1
1 -
2
-
3
-
4
-
5
-
6
-
7
-
8
-
9
-
10
-
11
-
12
-
13
-
14
-
15
-
16
-
17
-
18
-
 19
19 -
 20
20 -
 21
21 -
 22
22 -
 23
23 -
 24
24 -
 25
25 -
 26
26 -
 27
27 -
 28
28 -
 29
29 -
30
-
31
-
32
-
33
-
34
-
35
-
36
-
37
-
38
-
39
-
40
-
41
-
42
-
43
-
44
-
45
-
46
-
47
-
48
-
49
-
50
-
51
-
52
-
53
-
54
-
55
-
56
-
57
-
58
-
59
-
60
-
61
-
62
-
63
-
64
-
65
-
66
-
67
-
68
-
69
-
70
-
71
-
72
-
73
-
74
-
75
-
76
-
77
-
78
-
79
-
80
-
81
-
82
-
83
-
84
-
85
-
86
-
87
-
88
-
89
-
90
-
91
-
92
 |
 |
