Canon PIXMA mini260 Photo Printing Guide - Page 47
Print Head Deep Cleaning
 |
View all Canon PIXMA mini260 manuals
Add to My Manuals
Save this manual to your list of manuals |
Page 47 highlights
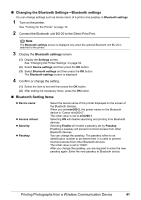
Print Head Deep Cleaning If print quality does not improve by standard Print Head Cleaning, try Print Head Deep Cleaning, which is a more powerful process. Print Head Deep Cleaning consumes ink, so perform this procedure only when necessary. 1 Turn on the printer. See "Turning On the Printer" on page 10. 2 Start Print Head Deep Cleaning. (1) Display the Settings screen. (2) Select Maintenance and then press the OK button. (3) Select Deep Cleaning and then press the OK button. (4) Select Yes and then press the OK button. Important Do not perform any other operations until the Print Head Deep Cleaning finishes. This takes about 90 seconds. 3 Print the nozzle check pattern to verify that the Print Head Nozzles are clean. When Print Head Deep Cleaning finishes, the confirmation message is displayed. Select Yes to print the Nozzle Check Pattern, and verify the Print Head Nozzles. See "Printing the Nozzle Check Pattern" on page 43. Note If Print Head Deep Cleaning does not resolve the problem, the Print Head may be worn out. Contact a Canon service representative. Printing Maintenance 45
-
 1
1 -
2
-
3
-
4
-
5
-
6
-
7
-
8
-
9
-
10
-
11
-
12
-
13
-
14
-
15
-
16
-
17
-
18
-
19
-
20
-
21
-
22
-
23
-
24
-
25
-
26
-
27
-
28
-
29
-
30
-
31
-
32
-
33
-
34
-
35
-
36
-
37
-
38
-
39
-
40
-
41
-
 42
42 -
 43
43 -
 44
44 -
 45
45 -
 46
46 -
 47
47 -
 48
48 -
 49
49 -
 50
50 -
 51
51 -
 52
52 -
53
-
54
-
55
-
56
-
57
-
58
-
59
-
60
-
61
-
62
-
63
-
64
-
65
-
66
-
67
-
68
-
69
-
70
-
71
-
72
-
73
-
74
-
75
-
76
-
77
-
78
-
79
-
80
-
81
-
82
-
83
-
84
-
85
-
86
-
87
-
88
-
89
-
90
-
91
-
92
 |
 |
