Canon PIXMA mini260 Photo Printing Guide - Page 31
Changing Print Settings-Advanced, Vivid photo ON/Vivid photo OFF
 |
View all Canon PIXMA mini260 manuals
Add to My Manuals
Save this manual to your list of manuals |
Page 31 highlights
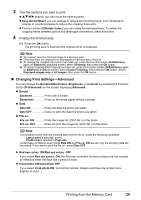
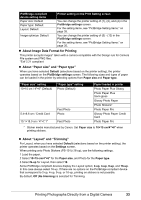
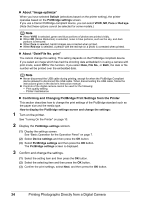
3 Trim the sections you want to print. STW X buttons: you can move the trimming area. Easy-Scroll Wheel: you can enlarge or reduce the trimming frame. Turn clockwise to enlarge or counterclockwise to reduce the cropping frame size. Function button (f2/Rotate frame): you can rotate the trimming frame. To switch the cropping frame between portrait and landscape orientations, press this button. 4 Finalize the trimmed area. (1) Press the OK button. The trimming area is fixed and the original photo is displayed. Note You cannot save the trimmed image to a memory card. Trimming limits are displayed on photographs that have been trimmed. To change the cropped area once it has been set, press the Function button (f2/Edit/menu) again on Edit/menu displayed screen, select Trimming, then press the OK button. To cancel cropping after cropping has been set, press the Function button (f2/Edit/menu) again on Edit/menu displayed screen, select Cancel Trimming, then press the OK button. Select Displayed images only or All images, then press the OK button. Changing Print Settings-Advanced You can change the Bordered/Borderless, Brightness, or Contrast by pressing the Function button (f1/Advanced) on the screen displaying Advanced. Border Bordered Prints with a border. Borderless Prints on the whole paper without a border. Date Date ON Prints the date the photo was taken. Date OFF Does not print the date the photo was taken. File no. File no. ON Prints the image No. (DCF No.) on the photo. File no. OFF Does not print the image No. (DCF No.) on the photo. Note It is possible to print both the shooting date and the file no. under the following conditions: - Layout print is selected, and/or - Credit card is selected in Page size. Under these conditions, even if both Date ON and File no. ON are set, only the shooting date will be printed. If you want to print the file no., select Date OFF. Red eye correc. ON/Red eye correc. OFF If you select Red eye correc. ON, the Red eye correction function corrects red-eye caused by reflection when the flash hits a person's eyes. Vivid photo ON/Vivid photo OFF If you select Vivid photo ON, Vivid photo function (Greens and blue are printed more brightly) is used. Printing from the Memory Card 29
-
 1
1 -
2
-
3
-
4
-
5
-
6
-
7
-
8
-
9
-
10
-
11
-
12
-
13
-
14
-
15
-
16
-
17
-
18
-
19
-
20
-
21
-
22
-
23
-
24
-
25
-
 26
26 -
 27
27 -
 28
28 -
 29
29 -
 30
30 -
 31
31 -
 32
32 -
 33
33 -
 34
34 -
 35
35 -
 36
36 -
37
-
38
-
39
-
40
-
41
-
42
-
43
-
44
-
45
-
46
-
47
-
48
-
49
-
50
-
51
-
52
-
53
-
54
-
55
-
56
-
57
-
58
-
59
-
60
-
61
-
62
-
63
-
64
-
65
-
66
-
67
-
68
-
69
-
70
-
71
-
72
-
73
-
74
-
75
-
76
-
77
-
78
-
79
-
80
-
81
-
82
-
83
-
84
-
85
-
86
-
87
-
88
-
89
-
90
-
91
-
92
 |
 |