Canon PIXMA mini260 Photo Printing Guide - Page 37
PictBridge Setting Items, Face brightener
 |
View all Canon PIXMA mini260 manuals
Add to My Manuals
Save this manual to your list of manuals |
Page 37 highlights
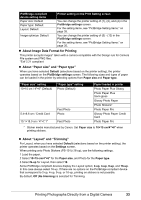
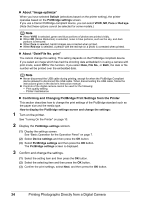
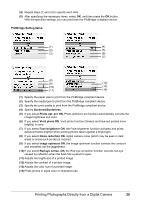
(4) Repeat steps (1) and (2) to specify each item. (5) After specifying the necessary items, select OK, and then press the OK button. With the specified settings, you can print from the PictBridge compliant device. PictBridge Setting Items: (1) (4) (2) (5) (3) (6) (7) (8) (9) (12) (10) (13) (11) (14) (1) Specify the paper size to print from the PictBridge compliant device. (2) Specify the media type to print from the PictBridge compliant device. (3) Specify the print quality to print from the PictBridge compliant device. (4) Specify Bordered/Borderless. (5) If you select Photo opt. pro ON, Photo optimizer pro function automatically corrects the image brightness and color. (6) If you select Vivid photo ON, Vivid photo function (Greens and blue are printed more brightly) is used. (7) If you select Face brightener ON, the Face brightener function activates and prints darkened faces brighter when printing photos taken against a bright light. (8) If you select Noise reduction ON, digital camera noise (which may be seen in dark areas or areas such as sky) is reduced. (9) If you select Image optimizer ON, the Image optimizer function corrects the contours and smoothes out the jaggedness. (10) If you select Red eye correc. ON, the Red eye correction function corrects red-eye caused by reflection when the flash hits a person's eyes. (11) Adjusts the brightness of a printed image. (12) Adjusts the contrast of a printed image. (13) Adjusts the color hue of a printed image. (14) Prints photos in sepia color or illustration-like. Printing Photographs Directly from a Digital Camera 35
-
 1
1 -
2
-
3
-
4
-
5
-
6
-
7
-
8
-
9
-
10
-
11
-
12
-
13
-
14
-
15
-
16
-
17
-
18
-
19
-
20
-
21
-
22
-
23
-
24
-
25
-
26
-
27
-
28
-
29
-
30
-
31
-
 32
32 -
 33
33 -
 34
34 -
 35
35 -
 36
36 -
 37
37 -
 38
38 -
 39
39 -
 40
40 -
 41
41 -
 42
42 -
43
-
44
-
45
-
46
-
47
-
48
-
49
-
50
-
51
-
52
-
53
-
54
-
55
-
56
-
57
-
58
-
59
-
60
-
61
-
62
-
63
-
64
-
65
-
66
-
67
-
68
-
69
-
70
-
71
-
72
-
73
-
74
-
75
-
76
-
77
-
78
-
79
-
80
-
81
-
82
-
83
-
84
-
85
-
86
-
87
-
88
-
89
-
90
-
91
-
92
 |
 |
