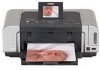
Canon iP6600D iP6600D Direct Printing Guide
Canon iP6600D - PIXMA Color Inkjet Printer Manual
 |
UPC - 013803048889
View all Canon iP6600D manuals
Add to My Manuals
Save this manual to your list of manuals |
Canon iP6600D manual content summary:
- Canon iP6600D | iP6600D Direct Printing Guide - Page 1
Photo Printer Series Direct Printing Guide - Canon iP6600D | iP6600D Direct Printing Guide - Page 2
- Canon iP6600D | iP6600D Direct Printing Guide - Page 3
Photo Printer Direct Printing Guide - Canon iP6600D | iP6600D Direct Printing Guide - Page 4
- Canon iP6600D | iP6600D Direct Printing Guide - Page 5
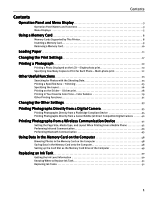
Cards Supported by This Printer 8 Inserting a Memory Card 9 Removing a Memory Card 10 Loading Paper 11 Changing the Print Settings 17 Printing a Photograph 20 Printing a Photo Displayed on the LCD - Single-photo print 20 Specifying How Many Copies to Print for Each Photo - Multi-photo print - Canon iP6600D | iP6600D Direct Printing Guide - Page 6
Contents Printing Maintenance 54 When Printing Becomes Faint or Colors are Incorrect 54 Printing the Nozzle Check Pattern 55 Examining the Nozzle Check Pattern 55 Print Head Cleaning 56 Print Head Deep Cleaning 57 Aligning Print Head - Auto head align 58 Troubleshooting 59 Index 73 2 - Canon iP6600D | iP6600D Direct Printing Guide - Page 7
to print. Flashing: the printer is preparing to print, or is preparing to turn off. *When the POWER lamp and the Alarm lamp flash alternately, an error has occurred that may require a service call. (2) Feed Switch Button Select the paper source between the auto sheet feeder and cassette. (3) Menu - Canon iP6600D | iP6600D Direct Printing Guide - Page 8
screen. (12)OK Button Allows you to make a selection. For example, selecting a photo to be printed, selecting a menu item or other settings. If an error occurs, press to resume printing after resolving a printer problem. (13) Buttons Allows you to select the option on the LCD: selecting a menu - Canon iP6600D | iP6600D Direct Printing Guide - Page 9
Device" on page 42 or the Bluetooth User's Guide. (21)IrDA Interface Port Connects the printer to a mobile phone through a wireless IrDA connection. Menu Displays With the Menu button pressed, the Menu screen appears. You can print photos with various options as well as maintain the - Canon iP6600D | iP6600D Direct Printing Guide - Page 10
margin of photos. See "Other Printing Functions" on page 31. Maintenance/settings You can select a maintenance item or a setting item in this menu. Maintenance Displays the maintenance items below. Nozzle check Prints a check pattern to ensure that ink is output correctly, or that the print head is - Canon iP6600D | iP6600D Direct Printing Guide - Page 11
See "Inside of the printer is dirty" on page 64. Device settings Displays the setting items below. Print settings Quiet mode See "Changing the Other Settings" on page 33. Prevent paper abrasion See "If the printed surface is still scratched" on page 66. Wireless print settings Sets the page size - Canon iP6600D | iP6600D Direct Printing Guide - Page 12
.21 compliant), and DPOF (Ver. 1.00 compliant). Photos stored in a memory card not supported by the digital camera may fail in loading or be damaged. For types of memory cards supported by the digital camera, refer to your digital camera user's manual. Use the digital camera to format a memory card - Canon iP6600D | iP6600D Direct Printing Guide - Page 13
special adapter. Do not try to insert the memory card into the card slot any further than the position where it stops; other wise, the printer or the memory card will be damaged. 9 - Canon iP6600D | iP6600D Direct Printing Guide - Page 14
selected, you cannot print the photos in the memory card print photos from the computer. Using the operation panel to print photos may result in improper printing. Removing a Memory Card If you use the printer connected to your computer, follow the instructions printer while the indicator lamp is flashing can - Canon iP6600D | iP6600D Direct Printing Guide - Page 15
You can use just the auto sheet feeder or cassette according to the location of the printer. For Example, if you intend to install the printer in a small place, such as on a shelf with minimal space, you can use just the cassette for printing. You cannot load sticker paper or credit card-sized - Canon iP6600D | iP6600D Direct Printing Guide - Page 16
tray extension completely. 3 Load the paper. Load limit mark Do not load the stack of paper beyond this load limit mark. (1) Load the paper into the auto sheet feeder with the print side facing UP. (2) Align the paper stack against the cover guide on the right side of the paper support. Ensure - Canon iP6600D | iP6600D Direct Printing Guide - Page 17
not touch the printed surface until the ink dries. For specific drying times, refer to the instructions packaged with your media. Loading the Print Media in the Cassette In this example, description is provided using Photo Paper Plus Glossy 4" x 6"/101.6 x 152.4 mm in your printer. See "Media Types - Canon iP6600D | iP6600D Direct Printing Guide - Page 18
side facing DOWN) (1) Load the paper into the cassette with the print side facing DOWN. (2) Align the paper stack against the right side of the cassette. (3) Slide the paper guides to fit the loaded paper stuck. Adjust the size of the cassette. When loading A5-size or larger paper (nonstandard-size - Canon iP6600D | iP6600D Direct Printing Guide - Page 19
. Cassette lamp 1 2 (1) 1. Put your fingers in the notches in either side of the paper output tray and pull down to open it. 2. Pull out the paper out put tray extension completely. Do not touch the printed surface until the ink dries. For specific drying times, refer to the instructions packaged - Canon iP6600D | iP6600D Direct Printing Guide - Page 20
Media Types for Card Direct Printing You can use the following Canon media: Media Type Plain Paper Photo Paper Pro*1 Photo Paper Plus Glossy*1 Photo Paper Plus Semi-Gloss*1 Matte Photo Paper Glossy Photo Paper Photo Stickers*2*3 Paper Support Load Limit Page Size A4/Letter: up to 150 sheets [A4 - Canon iP6600D | iP6600D Direct Printing Guide - Page 21
settings using the Effects setting as an example. For information on each item, see "Print Setting Items" on page 18. 1 Press the Settings button. Print setting screen is displayed. 2 Select the Setting tab. Use the buttons to select the Setting tab. Select tab 2. 3 Select the setting item. Use - Canon iP6600D | iP6600D Direct Printing Guide - Page 22
saved settings are loaded when the printer is turned on. 1. Press the Photo Paper Pro, Photo Plus Glossy, Matte Photo Paper, Glossy Photo Paper, Plain paper (3) Select the printing quality. Standard/High (4) Select the Bordered or Borderless print. Bordered/Borderless (5) Select whether to print - Canon iP6600D | iP6600D Direct Printing Guide - Page 23
+2, Contrast +1, Contrast standard, Contrast -1, Contrast -2 (9) Adjust color hue. Color hue red +2, Color hue red +1, Color hue original, Color hue yellow +1, Color hue yellow +2 (10)Apply the effect to print a photo in sepia or like an illustration. No effects, Sepia, Simulate illustration 19 - Canon iP6600D | iP6600D Direct Printing Guide - Page 24
LCD goes into sleep mode automatically. Press the OK button to turn on the LCD again. Printing a Photo Displayed on the LCD - Single-photo print 1 Prepare to print. Preparing to print (1) Turn on the printer. (2) Load the paper. See "Loading Paper" on page 11. (3) Insert the memory card in the card - Canon iP6600D | iP6600D Direct Printing Guide - Page 25
the slide show. You can do... You can zoom in/out on the photo on the LCD using the buttons. See "Searching for Photos with the Shooting Date" on page 23. See "Printing a Specified Area - Trimming" on page 25. 4 Start printing. (1) Confirm the settings. To change any of the settings, press the - Canon iP6600D | iP6600D Direct Printing Guide - Page 26
How Many Copies to Print for Each Photo - Multi-photo print You can specify how many copies to print for each photo. 1 Prepare to print. See "Preparing to print" on page 20. 2 Select the print mode. (1) Press the Menu button. (2) Use the buttons to select Multi-photo print and then press the - Canon iP6600D | iP6600D Direct Printing Guide - Page 27
selecting the menus below, you can display and print the photos searched for by date: Single-photo print, Multi-photo print, Layout print, Sticker print, and Color balance. If you have specified the number of copies to print for photos or pasted photos to specify the layout before using the search - Canon iP6600D | iP6600D Direct Printing Guide - Page 28
press the OK button. (2) Use the buttons to select the latest shooting date to search and then press the OK button. You can display or print the photos that are shot within the specified range of date. To cancel the search mode, follow the procedure below. (1) Press the Search button. (2) Use the - Canon iP6600D | iP6600D Direct Printing Guide - Page 29
, the trimmed selection will be lost. 1 Select the photo to trim. 2 Set the trimming mode. Press the Trimming button. The printer is now in trimming mode. Trimming guide 3 Trim and rotate the sections you wish to print. • Trimming button: You can rotate the trimming area. • buttons: You can move - Canon iP6600D | iP6600D Direct Printing Guide - Page 30
Half, bordered (w/lines) Album (4/right) Album (4/left) 1 Prepare to print. Mixed 1 Mixed 2 Mixed 3 See "Preparing to print" on page 20. 2 Select the print mode. (1) Press the Menu button. (2) Use the buttons to select Special photo print and then press the OK button. (3) Use the buttons to - Canon iP6600D | iP6600D Direct Printing Guide - Page 31
steps (1) and (2) for each photo you wish to print. (4) Press the Print button. The print confirmation screen is displayed. You can only paste photos on one page at a time. Start printing once you have pasted photos on one page. 6 Start printing. (1) Confirm the print settings. To change any of the - Canon iP6600D | iP6600D Direct Printing Guide - Page 32
on the Sticker - Sticker print You can print your favorite photo on the Canon Photo Stickers. 1 Prepare to print. See "Preparing to print" on page 20. You cannot load sticker paper in the cassette. Load one sheet at a time in the auto sheet feeder. 2 Select the print mode. (1) Press the Menu - Canon iP6600D | iP6600D Direct Printing Guide - Page 33
sheet of paper and select a color tone you like from them before printing. 1 Prepare to print. See "Preparing to print" on page 20. 2 Select the print mode. (1) Press the Menu button. (2) Use the buttons to select Special photo print and then press the OK button. (3) Use the buttons to select Color - Canon iP6600D | iP6600D Direct Printing Guide - Page 34
balance sample starts. Since the ink takes a few minutes to set on the media, wait for a short while before going to Step 5. 5 Select the color balance. The color balance selection screen appears on the LCD after printing the sample. Select the number of sample photo you like. (1) Use the buttons - Canon iP6600D | iP6600D Direct Printing Guide - Page 35
using the DPOF function are printed according to the printer's index print layout. - Photos to Print : Only the photos specified using the DPOF function are printed (the photos cannot be specified on the operation panel). - Copies : The photos are printed according to the numbers of copies - Canon iP6600D | iP6600D Direct Printing Guide - Page 36
the number of copies to print. (3) Press the Print button. For the Print all photos, all photos saved on the memory card will be printed. For the Photo Index print, an index of all photos saved on the memory card will be printed. For the DPOF print, the photos will be printed according to the DPOF - Canon iP6600D | iP6600D Direct Printing Guide - Page 37
from a memory card or from a digital camera connected to this printer. If you are printing with your computer connected, specify the required settings in the printer driver. Date display You can change the format for printing the date. (1) Use the buttons to select Other settings and then press - Canon iP6600D | iP6600D Direct Printing Guide - Page 38
show setting You can select whether to display photos quickly or in fine detail during the slide OK button. Reset setting You can reset all settings, other than the display language and the print head position, to the initial state. (1) Use the buttons to select Reset setting and then press - Canon iP6600D | iP6600D Direct Printing Guide - Page 39
Jet Direct allows you to print photos from a Canon Bubble Jet Direct compatible (PictBridge incompatible) digital camera or digital video camcorder without a computer by simply connecting the digital camera or digital video camcorder to this printer. * Hereafter, the PictBridge compliant digital - Canon iP6600D | iP6600D Direct Printing Guide - Page 40
have to select a mode of printing photos compliant with PictBridge before connecting the device. You may also have to turn on the device or select Play mode manually after connecting the device to the printer. Perform necessary operations according to the instruction manual supplied with your device - Canon iP6600D | iP6600D Direct Printing Guide - Page 41
displayed on Canon PictBridge compliant devices are used in the description given below. Different names may be displayed on your device depending on the brand or model. For details, refer to your device's instruction manual. About Image Data Format for Printing This printer accepts images* taken - Canon iP6600D | iP6600D Direct Printing Guide - Page 42
Photo Paper Plus Semi-Gloss Photo Glossy Photo Paper 5.4 x 8.6 cm/Credit Card Photo Glossy Photo Paper Credit Card *1 This paper is exclusively used to print photo stickers. When printing on sticker paper, select 10 x 15 cm/4" x 6" in Paper size. *2 This size can be selected only for Canon - Canon iP6600D | iP6600D Direct Printing Guide - Page 43
and printer, follow the device instructions given in the Instruction manual. Controls of the digital camera cannot be used for the following: - Print quality setting - Printer maintenance For the device operation method and troubleshooting, refer to your device's manual. For print error messages - Canon iP6600D | iP6600D Direct Printing Guide - Page 44
The following is a list of media types that can be set on a Canon Bubble Jet Direct compatible digital camera or digital video camera (PictBridge incompatible) along with their limitations when connected to this printer. Media Types for Digital Camera When you connect a digital camera, you can - Canon iP6600D | iP6600D Direct Printing Guide - Page 45
operation method and troubleshooting, refer to your digital camera's manual. For print error messages, see "Cannot Print Properly from the Digital Camera" on page 70. By operating the digital camera, you can make the following prints: - You can make a standard print from the photo displayed in the - Canon iP6600D | iP6600D Direct Printing Guide - Page 46
for wireless data transmission, you can print photos through a cordless connection with the printer. If the optional Bluetooth unit BU-20 is connected to the printer, you can also print photos through Bluetooth communication. For details, refer to the Bluetooth User's Guide. When printing photos - Canon iP6600D | iP6600D Direct Printing Guide - Page 47
all settings you need. The photos in the mobile phone can be printed according to the following settings. Setting Items (1) Select the page size for the wireless print. (2) Select the media type for the wireless print. (1) For information on wireless print compatible (2) page size and media - Canon iP6600D | iP6600D Direct Printing Guide - Page 48
you use. For this distance, refer to your mobile phone manual. Effective angle (in both vertical and horizontal direction): About 10°. Infrared port of printer Less than 20 cm (Do not block with any obstacle.) Infrared port of mobile phone (2) Select the photo to print and send the data to the - Canon iP6600D | iP6600D Direct Printing Guide - Page 49
to the Bluetooth User's Guide. The mobile phone supporting the OPP (Object Push Profile) or BIP (Basic Imaging Profile) can print photos. For details of profiles, refer to your product's instruction manual. Printing through Bluetooth communication When you print through Bluetooth communication from - Canon iP6600D | iP6600D Direct Printing Guide - Page 50
. See "Setting the Page Size, Media Type, and Layout When Printing From a Mobile Phone" on page 42. 4 Start printing from a mobile phone. • When you select the device name, select the initial value of this printer "Canon iP6600D-1". • If you are required to enter the passkey, enter the initial - Canon iP6600D | iP6600D Direct Printing Guide - Page 51
on the screen of the Bluetooth devices. When you set iP6600D-2, the printer name on the Bluetooth device is "Canon iP6600D-2". The initial value is set to iP6600D-1. Selecting ON will disable search and printing from Bluetooth devices. Selecting Enable will enable a passkey. Setting a passkey - Canon iP6600D | iP6600D Direct Printing Guide - Page 52
to the computer. You can print the photos from Easy-PhotoPrint. To use the Easy-PhotoPrint Startup button, connect the printer to the computer and install the printer driver, Easy-PhotoPrint, and Memory Card Utility (required only for Windows Me/Windows 98/Windows 98 Second Edition). For more - Canon iP6600D | iP6600D Direct Printing Guide - Page 53
Card Utility must have been installed for Windows Me/Windows 98/Windows 98 Second Edition. If the utility is not installed, install it following the installation procedure explained in the Easy Setup Instructions. When Read/write mode is selected, you cannot print photo in the memory card. After - Canon iP6600D | iP6600D Direct Printing Guide - Page 54
Replacing an Ink Tank Replace ink tank(s) if they are out of ink. When replacing them, check the model numbers and their installation positions. With this printer, ink tanks must be installed from the right in the order indicated below. Black: CLI-8BK Cyan: CLI-8C PhotoCyan: CLI-8PC - Canon iP6600D | iP6600D Direct Printing Guide - Page 55
Ink Tanks When ink tanks run out of ink, replace them using the following steps. 1 Ensure that the printer is on. 2 Put your fingers in the notches in either side of the paper output tray and pull down to open it. 3 Open the cover, and then the inner cover forward to open it. The print head - Canon iP6600D | iP6600D Direct Printing Guide - Page 56
lamp fast. (1) Push the tab and remove the ink tank. Do not touch the print head lock lever; remove only the ink tank. Push the tab and remove the ink tank. Be sure to replace the ink tank one by one when replacing more than one ink tank. Handle ink tanks carefully to avoid staining clothing or the - Canon iP6600D | iP6600D Direct Printing Guide - Page 57
Insert the ink tank in the print head holder. (2) Press on the mark until the ink tank snaps firmly into place. (3) Ensure that the ink tank lamp lights red. Ensure that the ink tanks are installed in the order directed by the label. The printer cannot be used unless all the ink tanks are installed - Canon iP6600D | iP6600D Direct Printing Guide - Page 58
off the ink tank. See "Replacing an Ink Tank" on page 50. Step1 "Printing the Nozzle Check Pattern" on page 55 If missing lines or white stripes appear After print head cleaning, print the nozzle check pattern. Step2 "Print Head Cleaning" on page 56 If the problem remains after performing print head - Canon iP6600D | iP6600D Direct Printing Guide - Page 59
Pattern Examine the nozzle check pattern output by the printer, and clean the print head when necessary. The nozzle check pattern will not be printed correctly if there is not enough ink. Replace the ink tank if the remaining amount of ink is insufficient. See "Replacing an Ink Tank" on page 50 - Canon iP6600D | iP6600D Direct Printing Guide - Page 60
appear in the printed nozzle check pattern. Note that cleaning the print head causes waste ink to be absorbed in the waste ink absorber. Cleaning the print head consumes ink, so perform print head cleaning only when necessary. Ensure that the inner cover is closed. 1 Ensure that the printer is on - Canon iP6600D | iP6600D Direct Printing Guide - Page 61
, open the cover and ensure that there are sufficient ink levels in all ink tanks and turn off the printer. Be sure to perform another print head deep cleaning 24 hours after turning off the printer. If this does not solve the problem, the print head may be damaged. Contact the Customer Care Center - Canon iP6600D | iP6600D Direct Printing Guide - Page 62
, you can align the print head manually if the results of automatic print head alignment are not satisfactory. Automatic print head alignment cannot be performed from the cassette. Always load paper in the auto sheet feeder. Ensure that the inner cover is closed. 1 With the printer on, load a sheet - Canon iP6600D | iP6600D Direct Printing Guide - Page 63
OK button with the ink tank installed. Then printing can continue under the ink out condition. Replace the empty ink tank immediately after the printing. The printer may be damaged if printing is continued under the ink out condition. If multiple ink tank lamps are flashing red, check how fast they - Canon iP6600D | iP6600D Direct Printing Guide - Page 64
than one ink tanks of the same color are installed. Confirm that the ink tanks are installed in the appropriate positions. See "Replacing an Ink Tank" on page 50. The printer has a built-in waste ink absorber to hold the ink used during print head cleaning, for example. This error message indicates - Canon iP6600D | iP6600D Direct Printing Guide - Page 65
Error code Try This An ink tank that was once empty is installed. Replace the ink tank. Printing under the situation may damage the Print Head. Canon shall not be liable for any printer malfunction or damage caused by refilled ink tanks. If you want to continue printing with the refilled ink tank - Canon iP6600D | iP6600D Direct Printing Guide - Page 66
Adjusting the Print Head Manually If the automatic print head adjustment does not work or if you wish to adjust the print heads manually, follow the procedure below. 1. With the printer on, load two sheets of A4/Letter-sized plain paper in the auto sheet feeder. 2. Press the Menu button. 3. Use - Canon iP6600D | iP6600D Direct Printing Guide - Page 67
lines are shifted: See "Aligning Print Head - Auto head align" on page 58. Check the print side of the printer. Ink tank is not fully inserted Follow the instructions packaged with your specialty media for loading and handling. Open the cover, paper output tray and inner cover, and then press - Canon iP6600D | iP6600D Direct Printing Guide - Page 68
printer is dirty If the inside of the printer is dirty, printed paper may be smudged. Follow the steps described below to clean the inside of the printer. Ensure that the inner cover is closed. (1) Ensure that the printer inside the printer are stained, wipe ink off the protrusions using a swab or - Canon iP6600D | iP6600D Direct Printing Guide - Page 69
loaded in the printer will feed through the printer and be ejected. (11)Repeat (10) three times. If repeating this procedure three times or more does not solve the problem, contact the Customer Care Center. • Check to see if the paper you are printing on is too thick. See "Print Media to Avoid - Canon iP6600D | iP6600D Direct Printing Guide - Page 70
the Prevent paper abrasion to ON. This procedure also applies to direct printing from your camera. 1. Press the Menu button. 2. Use the buttons Device Settings and then press the OK button. 4. Use the buttons to select Print settings and then press the OK button. 5. Use the buttons to select Prevent - Canon iP6600D | iP6600D Direct Printing Guide - Page 71
/ Paper Does Not Feed Properly/Printed Surface is Scratched" on page 64 to confirm that you are using the correct paper and are loading it into the printer correctly. If you cannot remove the paper or if the paper tears inside the printer, or if the paper jam error continues after removing the paper - Canon iP6600D | iP6600D Direct Printing Guide - Page 72
is sticking out of the cassette, reload the paper in the cassette. (7) Insert the cassette into the printer again, and press the OK button on the printer. If you have turned off the printer in step (2), you will need to retry printing, because this operation cancels any print jobs in progress. When - Canon iP6600D | iP6600D Direct Printing Guide - Page 73
. Landscape 4" x 6"/101.6 x 152.4 mm size paper loaded in the cassette jams inside the printer When reloading the paper into the printer, see "Back of Paper is Smudged/ Paper Does Not Feed Properly/Printed Surface is Scratched" on page 64 to confirm that you are using the correct paper and are - Canon iP6600D | iP6600D Direct Printing Guide - Page 74
or not installed. Install a print head according to the Easy Setup Instructions. If the print head has already been installed, remove the print head and reinstall it. If the error still remains, the print head may be defective. Contact the Customer Care Center. The printer has a built-in waste ink - Canon iP6600D | iP6600D Direct Printing Guide - Page 75
. Ink Error/No ink The ink tank that was once empty is installed. Replace the ink tank. Printing under the situation may damage the print head. Canon shall not be liable for any printer malfunction or damage caused by refilled ink tanks. If you want to continue printing with the refilled ink tank - Canon iP6600D | iP6600D Direct Printing Guide - Page 76
may also have to turn on the device or select Play mode manually after connecting the device to the printer. Perform necessary operations according to the instruction manual supplied with your device. The print head nozzles may be clogged if printing becomes faint or colors are incorrect. See "When - Canon iP6600D | iP6600D Direct Printing Guide - Page 77
6 Manual head align 6, 62 Media Type (Bubble Jet Direct 40 Media Type (Card Direct 16 Media Type (Wireless 43 Memory Card (Using on the Computer 48 Memory Card Utility 48, 49 Menu Button 3 Multi-photo print 5, 22 N Noise reduction (Card Direct 19 Noise reduction (PictBridge 39 Nozzle check - Canon iP6600D | iP6600D Direct Printing Guide - Page 78
show setting 7, 34 Special photo print 5, 31 Sticker print (Card Direct 6, 28 Sticker print (Wireless 43 T Trimming (Card Direct 25 Trimming (PictBridge 38 Trimming Button 4, 25 Trimming guide 25 V Vivid photo 19 W Waste ink absorber 60 White Streaks 63 Wireless print settings 7, 42 74 - Canon iP6600D | iP6600D Direct Printing Guide - Page 79
- Canon iP6600D | iP6600D Direct Printing Guide - Page 80
S. de R.L. de C.V. Periferico Sur No. 4124 Col. Ex-Rancho de Anzaldo, C.P. 01900, Mexico, D.F. The following ink tanks are compatible with this printer. For details on ink tank replacement, refer to "Replacing an Ink Tank" in this guide. QA7-3755-V01 XXXXXXXX ©CANON INC.2005 PRINTED IN THAILAND
-
 1
1 -
 2
2 -
 3
3 -
 4
4 -
 5
5 -
 6
6 -
 7
7 -
8
-
9
-
10
-
11
-
12
-
13
-
14
-
15
-
16
-
17
-
18
-
19
-
20
-
21
-
22
-
23
-
24
-
25
-
26
-
27
-
28
-
29
-
30
-
31
-
32
-
33
-
34
-
35
-
36
-
37
-
38
-
39
-
40
-
41
-
42
-
43
-
44
-
45
-
46
-
47
-
48
-
49
-
50
-
51
-
52
-
53
-
54
-
55
-
56
-
57
-
58
-
59
-
60
-
61
-
62
-
63
-
64
-
65
-
66
-
67
-
68
-
69
-
70
-
71
-
72
-
73
-
74
-
75
-
76
-
77
-
78
-
79
-
80
 |
 |
Photo Printer
Series
Direct Printing Guide
Direct Printing Guide
Direct Printing Guide
Direct Printing Guide