Canon iP6600D iP6600D Direct Printing Guide - Page 66
POWER Lamp and Alarm Lamp Flash Alternately, Cannot See the Display Properly on the LCD/Cannot See
 |
UPC - 013803048889
View all Canon iP6600D manuals
Add to My Manuals
Save this manual to your list of manuals |
Page 66 highlights
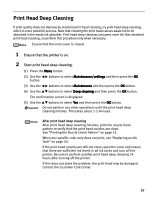
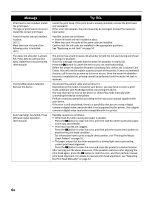
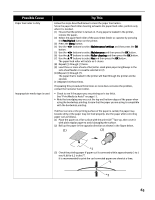
Adjusting the Print Head Manually If the automatic print head adjustment does not work or if you wish to adjust the print heads manually, follow the procedure below. 1. With the printer on, load two sheets of A4/Letter-sized plain paper in the auto sheet feeder. 2. Press the Menu button. 3. Use the buttons to select Maintenance/settings and then press the OK button. 4. Use the 5. Use the button. buttons to select Maintenance and then press the OK button. buttons to select Manual head align and then press the OK 6. When the confirmation message is displayed, use the buttons to select Yes and then press the OK button. The print head alignment pattern will be printed. 7. The message of "Did the patterns print correctly?" is displayed on the LCD. Ensure that the patterns were printed normally and use the buttons to select Yes and then press the OK button. 8. Examine the printed pattern and enter the number of column "A" with fewest white stripes using the buttons. 9. Use the button and move the cursor to column "B", and use the buttons to select the number with fewest white stripes. 10. Repeat same procedure and enter the pattern numbers up to column "J". 11. After setting the number of all column, press the OK button. POWER Lamp and Alarm Lamp Flash Alternately Possible Cause Try This An error that requires contacting the Customer Care Center may have occurred Disconnect the printer cable from the printer, and then turn the printer off and unplug the printer from the power supply. Plug the printer back in and turn the printer back on after leaving it for a while. If the problem remains, contact the Customer Care Center. Cannot See the Display Properly on the LCD/Cannot See the Display on the LCD Possible Cause Try This Cannot see the display properly on the LCD/ The display on the LCD is illegible Cannot see the display on the LCD Adjust the contrast of the LCD in the Adjust contrast menu in the Maintenance/ settings. See "Changing the Other Settings" on page 33. The LCD may be in the sleep mode. Press the OK button to turn on the LCD again. * If you leave the printer more than five minutes without using any button on the operation panel, the LCD goes into the sleep mode automatically. 62
-
 1
1 -
2
-
3
-
4
-
5
-
6
-
7
-
8
-
9
-
10
-
11
-
12
-
13
-
14
-
15
-
16
-
17
-
18
-
19
-
20
-
21
-
22
-
23
-
24
-
25
-
26
-
27
-
28
-
29
-
30
-
31
-
32
-
33
-
34
-
35
-
36
-
37
-
38
-
39
-
40
-
41
-
42
-
43
-
44
-
45
-
46
-
47
-
48
-
49
-
50
-
51
-
52
-
53
-
54
-
55
-
56
-
57
-
58
-
59
-
60
-
 61
61 -
 62
62 -
 63
63 -
 64
64 -
 65
65 -
 66
66 -
 67
67 -
 68
68 -
 69
69 -
 70
70 -
 71
71 -
72
-
73
-
74
-
75
-
76
-
77
-
78
-
79
-
80
 |
 |
