Canon iP6600D iP6600D Direct Printing Guide - Page 55
Knowing When to Replace Ink Tank, Replacing Ink Tanks - print head not installed
 |
UPC - 013803048889
View all Canon iP6600D manuals
Add to My Manuals
Save this manual to your list of manuals |
Page 55 highlights
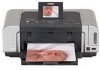
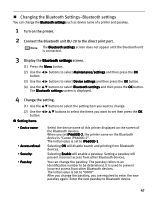
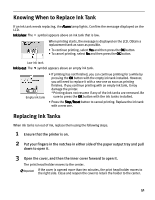
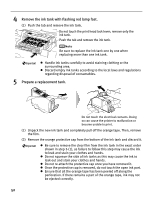
Knowing When to Replace Ink Tank If an ink tank needs replacing, the Alarm lamp lights. Confirm the message displayed on the LCD. Ink is low: The symbol appears above an ink tank that is low. When printing starts, the message is displayed on the LCD. Obtain a replacement tank as soon as possible. • To continue printing, select Yes and then press the OK button. • To cancel printing, select No and then press the OK button. Low ink tank Ink is out: The symbol appears above an empty ink tank. Empty ink tank • If printing has not finished, you can continue printing for a while by pressing the OK button with the empty ink tank installed. However, you will need to replace it with a new one as soon as printing finishes. If you continue printing with an empty ink tank, it may damage the printer. *Printing does not resume if any of the ink tanks are removed. Be sure to press the OK button with the ink tanks installed. • Press the Stop/Reset button to cancel printing. Replace the ink tank with a new one. Replacing Ink Tanks When ink tanks run out of ink, replace them using the following steps. 1 Ensure that the printer is on. 2 Put your fingers in the notches in either side of the paper output tray and pull down to open it. 3 Open the cover, and then the inner cover forward to open it. The print head holder moves to the center. If the cover is opened more than ten minutes, the print head holder moves to the right side. Close and reopen the cover to return the holder to the center. 51
-
 1
1 -
2
-
3
-
4
-
5
-
6
-
7
-
8
-
9
-
10
-
11
-
12
-
13
-
14
-
15
-
16
-
17
-
18
-
19
-
20
-
21
-
22
-
23
-
24
-
25
-
26
-
27
-
28
-
29
-
30
-
31
-
32
-
33
-
34
-
35
-
36
-
37
-
38
-
39
-
40
-
41
-
42
-
43
-
44
-
45
-
46
-
47
-
48
-
49
-
 50
50 -
 51
51 -
 52
52 -
 53
53 -
 54
54 -
 55
55 -
 56
56 -
 57
57 -
 58
58 -
 59
59 -
 60
60 -
61
-
62
-
63
-
64
-
65
-
66
-
67
-
68
-
69
-
70
-
71
-
72
-
73
-
74
-
75
-
76
-
77
-
78
-
79
-
80
 |
 |