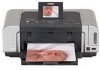
Canon iP6600D iP6600D Direct Printing Guide - Page 8
Starts Easy-PhotoPrint. See Browsing Photos in the Memory Card on the Computer - problems
 |
UPC - 013803048889
View all Canon iP6600D manuals
Add to My Manuals
Save this manual to your list of manuals |
Page 8 highlights
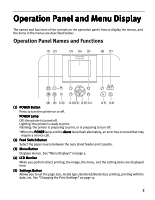
(6) Trimming Button Allows you to trim the photo being displayed on the screen. See "Printing a Specified Area - Trimming" on page 25. (7) Buttons Press to enlarge or reduce the photo being displayed. Pressing this button in trimming mode allows you to enlarge/reduce the area to be trimmed. See "Printing a Specified Area - Trimming" on page 25. (8) Save Button Saves data in the memory card onto the computer's hard disk. See "Saving Data in the Memory Card onto the Computer" on page 48. (9) Easy-PhotoPrint Startup Button Starts Easy-PhotoPrint. See "Browsing Photos in the Memory Card on the Computer" on page 48. (10)Alarm Lamp Lighting: an error has occurred and the printer is not ready to print. *When the POWER lamp and the Alarm lamp flash alternately, an error has occurred that may require a service call. (11)Back Button Allows you to return to the previous screen. (12)OK Button Allows you to make a selection. For example, selecting a photo to be printed, selecting a menu item or other settings. If an error occurs, press to resume printing after resolving a printer problem. (13) Buttons Allows you to select the option on the LCD: selecting a menu item or photo, specifying the number of copies to print, making print settings, or scrolling the screen. (14)Search Button Looks up target photos in the memory card using the shooting date as the search key. See "Searching for Photos with the Shooting Date" on page 23. (15)Print Button Press to start printing according to the settings displayed on the LCD. (16)Stop/Reset Button Press to cancel the settings you have made. If this button is pressed during printing, the printer aborts printing. 4
-
 1
1 -
2
-
 3
3 -
 4
4 -
 5
5 -
 6
6 -
 7
7 -
 8
8 -
 9
9 -
 10
10 -
 11
11 -
 12
12 -
 13
13 -
14
-
15
-
16
-
17
-
18
-
19
-
20
-
21
-
22
-
23
-
24
-
25
-
26
-
27
-
28
-
29
-
30
-
31
-
32
-
33
-
34
-
35
-
36
-
37
-
38
-
39
-
40
-
41
-
42
-
43
-
44
-
45
-
46
-
47
-
48
-
49
-
50
-
51
-
52
-
53
-
54
-
55
-
56
-
57
-
58
-
59
-
60
-
61
-
62
-
63
-
64
-
65
-
66
-
67
-
68
-
69
-
70
-
71
-
72
-
73
-
74
-
75
-
76
-
77
-
78
-
79
-
80
 |
 |