Canon imageCLASS MF4150 MF4100 Series Scanner Driver Guide - Page 56
Scanning from an Application, Click [Scan].
 |
View all Canon imageCLASS MF4150 manuals
Add to My Manuals
Save this manual to your list of manuals |
Page 56 highlights
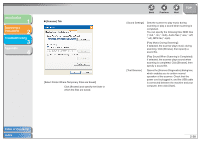
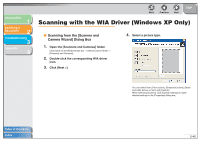
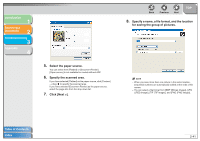
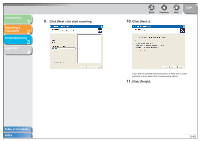
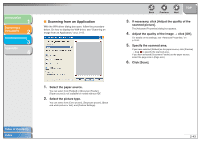
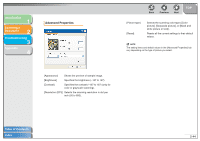
Introduction 1 Scanning a Document 2 Troubleshooting 3 Appendix 4 ■ Scanning from an Application With the WIA driver dialog box open, follow the procedure below. On how to display the WIA driver, see "Scanning an Image from an Application," on p. 2-15. Back Previous Next TOP 3. If necessary, click [Adjust the quality of the scanned picture]. The [Advanced Properties] dialog box appears. 4. Adjust the quality of the image → click [OK]. For details on the settings, see "Advanced Properties," on p. 2-44. 5. Specify the scanned area. If you have selected [Flatbed] as the paper source, click [Preview] → drag to specify the scanned area. If you have selected [Document Feeder] as the paper source, select the page size in [Page size]. 6. Click [Scan]. 1. Select the paper source. You can select from [Flatbed] or [Document Feeder]. [Paper source] is not available for models without ADF. 2. Select the picture type. You can select from [Color picture], [Grayscale picture], [Black and white picture or text], and [Custom Settings]. Table of Contents Index 2-43
-
 1
1 -
2
-
3
-
4
-
5
-
6
-
7
-
8
-
9
-
10
-
11
-
12
-
13
-
14
-
15
-
16
-
17
-
18
-
19
-
20
-
21
-
22
-
23
-
24
-
25
-
26
-
27
-
28
-
29
-
30
-
31
-
32
-
33
-
34
-
35
-
36
-
37
-
38
-
39
-
40
-
41
-
42
-
43
-
44
-
45
-
46
-
47
-
48
-
49
-
50
-
 51
51 -
 52
52 -
 53
53 -
 54
54 -
 55
55 -
 56
56 -
 57
57 -
 58
58 -
 59
59 -
 60
60 -
 61
61 -
62
-
63
-
64
-
65
-
66
-
67
-
68
-
69
-
70
-
71
-
72
-
73
-
74
-
75
-
76
 |
 |
