Cisco G1 Installation Guide - Page 19
Installing a CompactFlash Disk, Installing a USB Flash Memory Module or eToken-NPE-G2 - interface
 |
UPC - 746320679488
View all Cisco G1 manuals
Add to My Manuals
Save this manual to your list of manuals |
Page 19 highlights
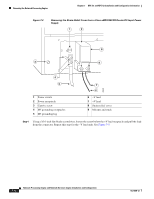
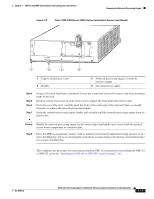
Chapter 7 NPE-G1 and NPE-G2 Installation and Configuration Information Installing the NPE-G1 or NPE-G2 Installing a CompactFlash Disk Use the following instructions to install the CompactFlash Disk. Figure 7-7 Installing a CompactFlash Disk 1 ORK PROCESSING ENGINE - G1 2 ORK PROCESSING ENGINE - G1 COMPACT FLASH COMPACT FLASH 3 ORK PROCESSING ENGINE - G1 COMPACT FLASH 66776 1 Inserting the CompactFlash Disk 2 Pressing the ejector button to release the CompactFlash Disk 3 Removing the CompactFlash Disk Step 1 Step 2 Step 3 Turn the CompactFlash Disk so that the label is facing down. Slide the CompactFlash Disk into the CompactFlash Disk slot. To remove the CompactFlash Disk, push the ejector button, and gently pull the CompactFlash Disk from its slot. You are finished installing the CompactFlash Disk. For more information on using the CompactFlash Disk, see Using the Flash Disk at the following URL: http://www.cisco.com/en/US/products/hw/routers/ps341/prod_installation_guide09186a00802a6394.ht ml For instructions on installing an SFP module in the NPE-G2, go to the "Installing an SFP Module-NPE-G2" section on page 7-20. For instructions on installing a Gigabit Interface Converter (GBIC) in the NPE-G1, go to the "Installing a GBIC-NPE-G1" section on page 7-23. Installing a USB Flash Memory Module or eToken-NPE-G2 To connect a Cisco USB Flash memory module or the Aladdin USB eToken Pro key to the NPE-G2 USB port, simply insert the module into the port as shown in Figure 7-8. The USB Flash memory module can be inserted in only one way, and can be inserted or removed regardless of whether the router is powered up or not. OL-4448-12 Network Processing Engine and Network Services Engine Installation and Configuration 7-19
-
 1
1 -
2
-
3
-
4
-
5
-
6
-
7
-
8
-
9
-
10
-
11
-
12
-
13
-
 14
14 -
 15
15 -
 16
16 -
 17
17 -
 18
18 -
 19
19 -
 20
20 -
 21
21 -
 22
22 -
 23
23 -
 24
24 -
25
-
26
-
27
-
28
-
29
-
30
-
31
-
32
-
33
-
34
-
35
-
36
-
37
-
38
-
39
-
40
-
41
-
42
-
43
-
44
-
45
-
46
-
47
-
48
-
49
-
50
-
51
-
52
-
53
-
54
-
55
-
56
-
57
-
58
-
59
-
60
-
61
-
62
-
63
-
64
-
65
-
66
-
67
-
68
 |
 |
